Introduction
- First of all, you don't need to read this article in all its parts. For most situations it is sufficient to check the prerequisites, to download the software and to run the installer that will guide you.
- In this article you find the details about available installer options, updates and rollbacks for interested parties.
- The JOC Cockpit can be installed on Linux and Windows systems by use of a graphical installer.
- Technically the JOC Cockpit can be operated for any Unix environment, however, the JS7 - Platforms limit support by SOS for JOC Cockpit operation to Linux.
Prerequisites
The following requirements have to be met before JOC Cockpit can be installed and operated:
- A Java Runtime Environment starting from version 1.8 is required. For details see Which Java versions is JobScheduler available for?
- JOC Cockpit requires access to a database to store inventory information, status information and workflow related logs, see JS7 - Database.
- A schema has to be created in the database prior to installation.
- A user account has to be created that is granted full privileges to the schema.
- If you intend to use different accounts and privilege sets for setup and operation of JOC Cockpit then consider switching Hibernate configuration files after setup (see below) to use an account with limited privileges to select, insert, update, delete and execute permissions for schema objects.
- Installation of JOC Cockpit requires administrative permissions:
- for Unix systems:
- Root permissions are required if JOC Cockpit is to be installed including the Jetty servlet container.
- To install JOC Cockpit without root permissions the setup script should be executed with the
-uargument, otherwise thesudoprompt will ask for the root password.
- for Windows systems:
- The setup asks for administrative permissions.
- for Unix systems:
Note that an X-Server is required if the installer is executed on Unix systems in graphical mode. If an X-Server is not installed, then consider using JS7 - JOC Cockpit - Use of Linux/Windows Headless Installation.
Download
- Download the JOC Cockpit installer archive for your target environment from the JS7 - Download page.
- For Unix systems:
- A .tar.gz archive including the installer is available that can be used to run the installer.
js7_joc_linux.<release>.tar.gz
- A .tar.gz archive including the installer is available that can be used to run the installer.
- For Windows systems:
- A .zip archive including the installer is available that can be used to run the installer.
js7_joc_windows.<release>.zip
- A .zip archive including the installer is available that can be used to run the installer.
- For Unix systems:
- The .tar.gz/.zip archives can be used to install JOC Cockpit with the graphical installer or by headless installation with both 32 bit and 64 bit operating systems.
Graphical Installer
Installation
The installer is available for Windows and Unix systems.
- To run the installer in headless mode see JS7 - JOC Cockpit - Use of Linux/Windows Headless Installation.
- To run the installer in graphical mode consider the below information.
Installer Archive
- Extract the JOC Cockpit archive to a suitable directory such as
/home/<user-account>on Unix systems orC:\user\<user-account>on Windows systems.
The extracted installer directory layout looks like this:
hibernate-examples(directory for DBMS connection sample files, for details see JS7 - Database)hibernate-integrated-security-mssql.cfg.xmlhibernate-maria-mysql.cfg.xmlhibernate-oracle12c.cfg.xmlhibernate-postgres.cfg.xml
install-joc.txt(installation notes)joc.<release>.jar(installer library for a given release)joc_install.xml(installer response file)license.gpl(copy of GPLv3 (General Public License) )license.html, license.txt(copy of JS7 JobScheduler Commercial License Agreement)setup.sh|cmd(installer script)
Database Connection
Prior to installation the database connection has to be ready:
- Create a schema and user account in your preferred database. For supported DBMS versions see JS7 - Database.
- Specify connection information for the JOC Cockpit setup:
- you can specify general connection information during the installation procedure or
- you can prepare a Hibernate configuration file to store connection information.
- Pick up one of the above Hibernate example files and copy the file to the installer directory, e.g. with the name
hibernate.cfg.xml. - Apply your changes to the file as explained from the JS7 - Database article.
- Pick up one of the above Hibernate example files and copy the file to the installer directory, e.g. with the name
Running the Installer
Graphical installation is started by running the setup.sh or setup.cmd file from the extracted archive.
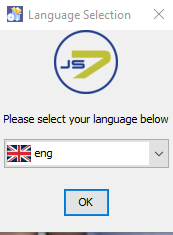
Language Selection
Select the language to be used for the setup: English and German are available.
Step 1 - Welcome Screen

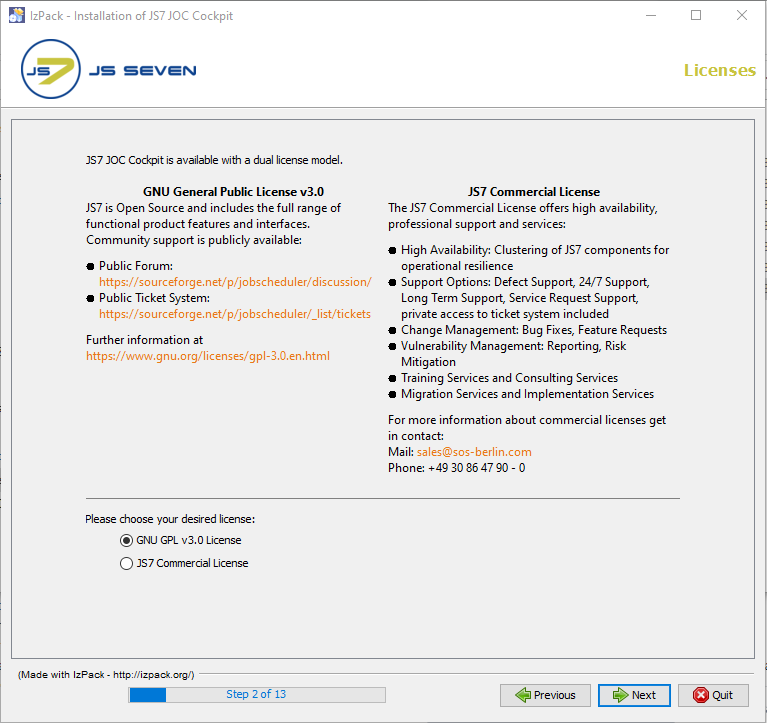
Step 2 - License Options
- The License Options window displays licenses available for JOC Cockpit:
- The Open Source License GPLv3 (General Public License) is available.
- The SOS Commercial License can be used by adding a license certificate file that you receive from SOS after purchase of a license. For details see JS7 - FAQ - How to apply a JS7 License Key.
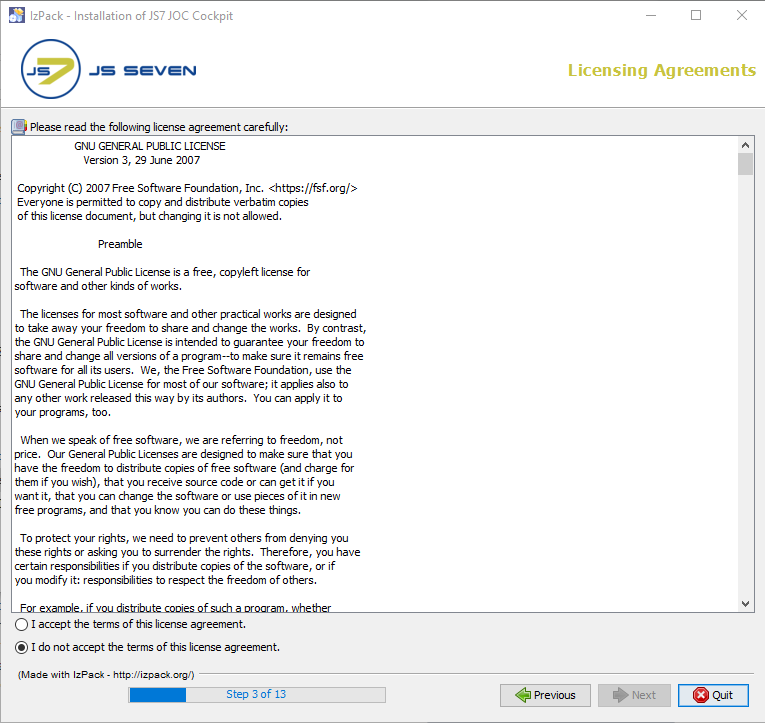
Step 3 - License Agreement
The License Agreement displayed in step 2 of the installation has to be accepted before installation can take place.
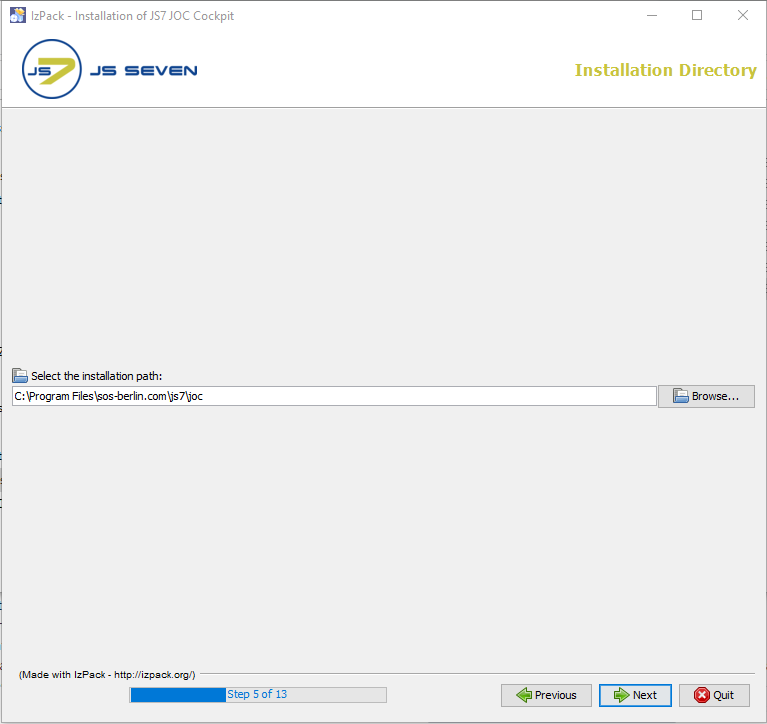
Step 4 - Target Directory for Installation
- The path to the installation directory for the JOC Cockpit program files is specified with this step.
The default installation directories for the JOC Cockpit are:
/opt/sos-berlin.com/js7/jocon Unix systems andC:\Program Files\sos-berlin.com\js7\jocon Windows systems.
- Users can use the following window to specify an individual installation directory for JOC Cockpit.
Step 5 - Jetty Installation & Configuration
- The JOC Cockpit ships with the Jetty Servlet Container. Step 4 allows to specify whether the Servlet Container is to be installed and if so, to specify its configuration, i.e. the ports to be used, installation directory, memory pool, etc.
- While the Jetty Servlet Container included with the JOC Cockpit is installed in the installation directory that is specified with the previous step - the Jetty configuration files are installed in the jetty_base directory. The Jetty Base input field in the installer window can be used to specify the jetty_base directory.
- The default path to the jetty_base directory on Unix systems points to the user's home directory:
- e.g.
/home/<user-account>/sos-berlin.com/js7/joc
- e.g.
- By default log files are stored in:
/var/log/sos-berlin.com/js7/logson Unix systems.
- The default path to the jetty_base directory and log files on Windows systems is:
C:\ProgramData\sos-berlin.com\js7\joc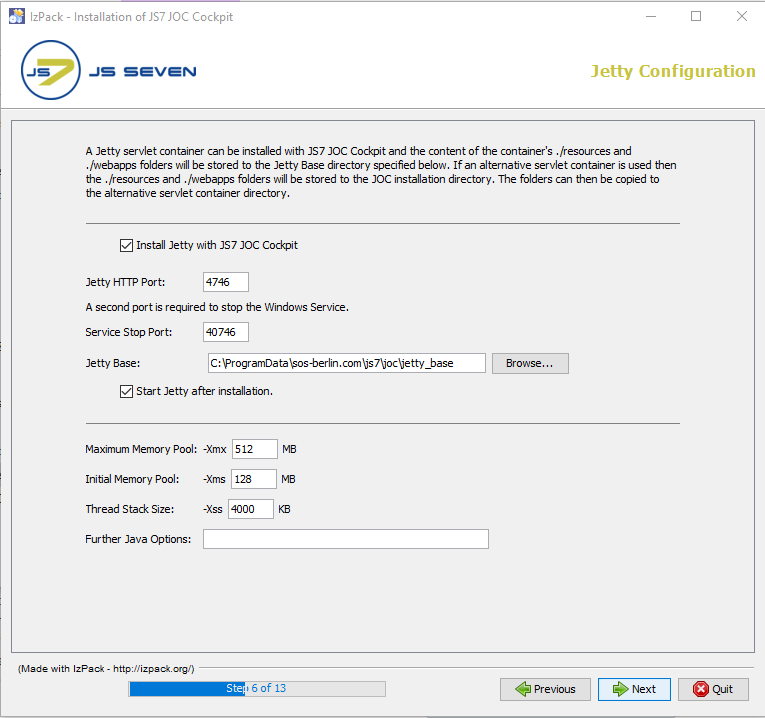
- The default path to the jetty_base directory on Unix systems points to the user's home directory:
- Note that if the Jetty included with JOC Cockpit is not to be installed and either an alternative Jetty installation or another Servlet Container product is to be used then relevant configuration files such as
shiro.iniandjoc.propertieswill still be written to the file system. These files can then be moved to a suitable location for the Servlet Container as required. See the Configuration with Alternative Web Servers section below for more information.
Step 5 - JOC Configuration
- The JOC Cockpit can be installed for cluster operation. if JOC Cockpit is installed for clustering, then it is required to provide a title to the JOC Cockpit. By default the title is joc.
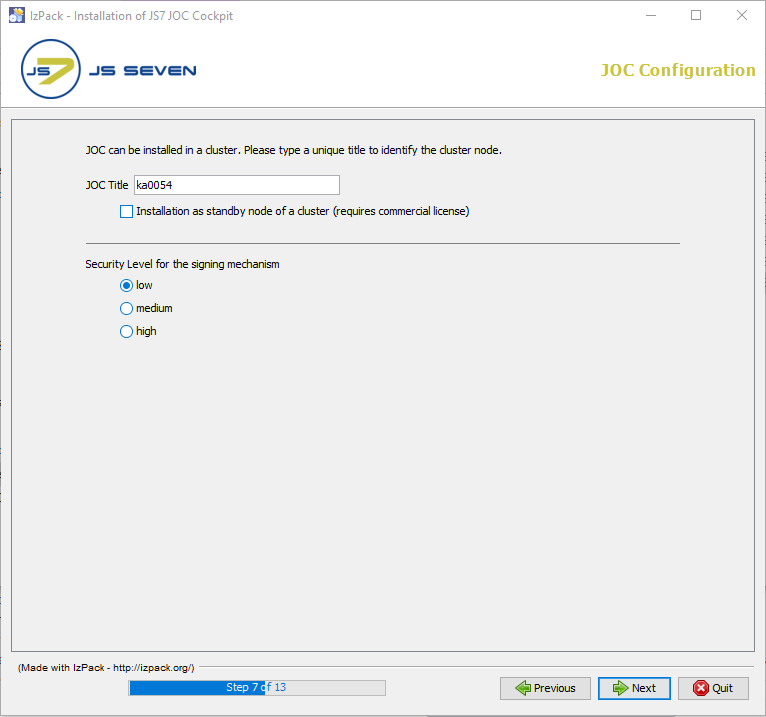
- The security level for the signing mechanism has to be specified at the time of JOC Cockpit installation. A security level is required for signing of deployed objects such as workflows. See the Secure Configuration Article for more information. The JOC Cockpit provides three types of security levels:
- Low: This mechanism is easy to use as it does not require any user interaction for the signing operation to be performed.
- Medium: This mechanism is similar to the low security level except for the fact that the private key stored with the current user's profile is used for the signing of deployable objects.
- High: This mechanism is the highest security level and requires any deployable objects to be exported and to be signed individually outside of JOC Cockpit.
Step 6 - Database Management System
Choose the DBMS to be used by the JOC Cockpit for the database.
The database connection settings either can be specified directly or can be provided by a Hibernate configuration file. If the settings are specified directly then it is required to choose the DBMS otherwise the Hibernate configuration file path can be specified after checking the option with hibernate configuration file.
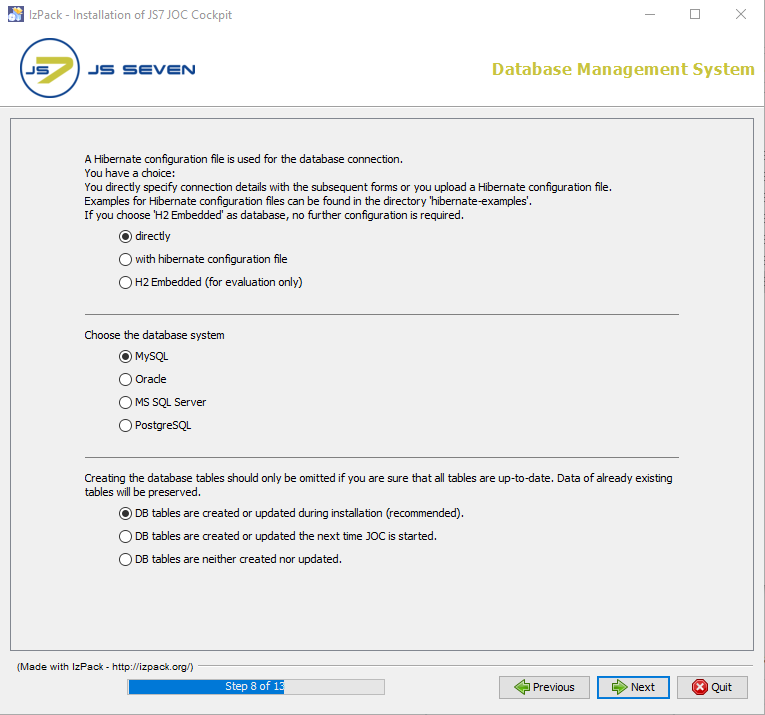
The DBMS is specified by the upper selection from this window. It is recommended to choose the option to create database objects during installation.
Step 7 - Database Connection Configuration
Specify the configuration for the database connection.
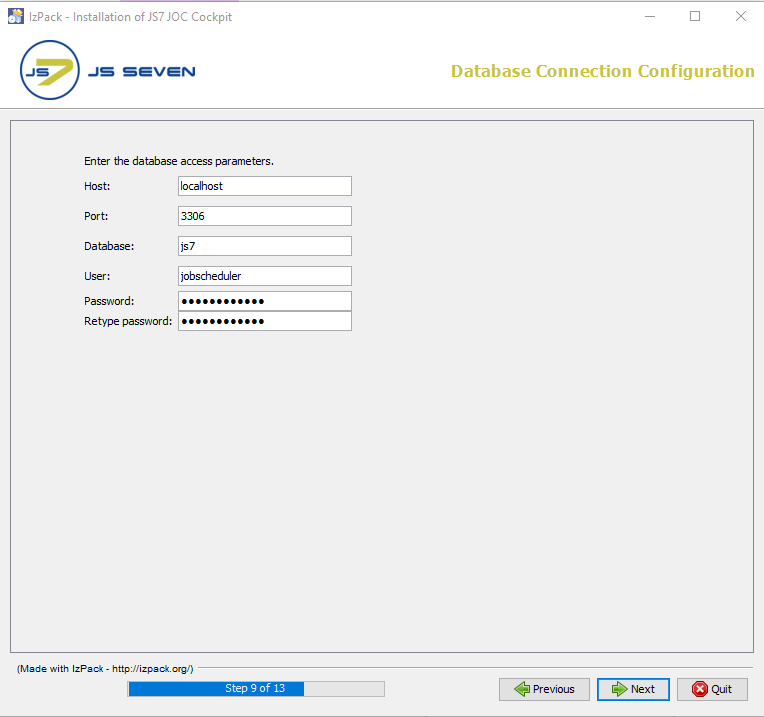
The database connection settings from the above screenshot should be evident.
The database configuration for the JOC Cockpit is written to an XML file during installation and is stored in the
jetty_base/resources/jocfolder. The default name of the database configuration file is hibernate.cfg.xml. This file can be modified later on if required. Any text editor can be used. The JOC Cockpit service has to be restarted to apply changes to the Hibernate configuration file.The name and location of the Hibernate configuration file is specified with the
joc.propertiesfile that can be found in thejetty_base/resources/jocfolder.
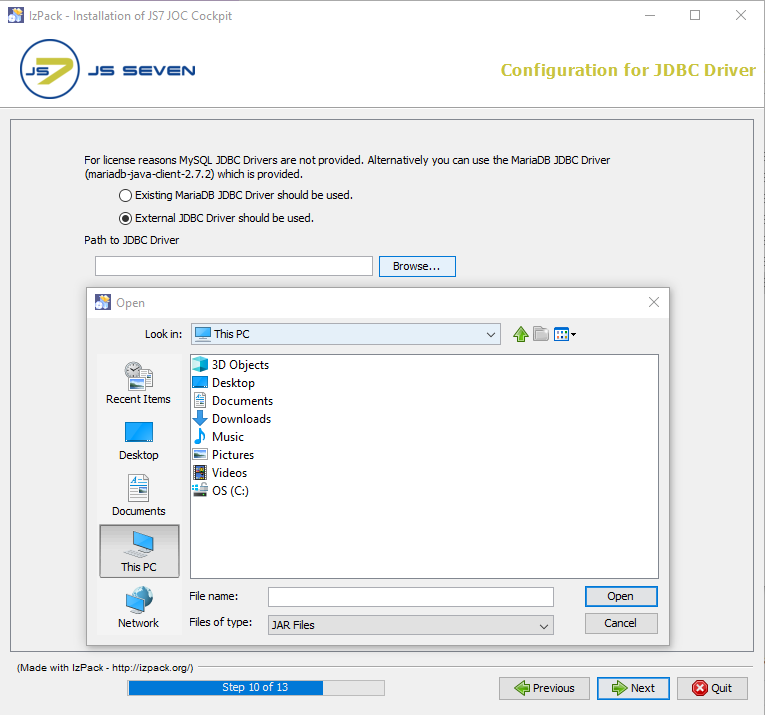
Step 8 - JDBC Driver for the Database Connection
- Specify if a JDBC Driver included with the installer should be used for the database connection or if an external JDBC Driver should be used.
The information displayed with this window depends on the DBMS that you selected:- If you specify a MySQL® DBMS then you will find a checkbox to specify if you want to use the MariaDB® JDBC Driver included with JS7.
- If you do not want to use the MariaDB® JDBC Driver version included with JS7 then you have to select an individual JDBC Driver (*.jar) that you downloaded from the DBMS vendor prior to installation of JOC Cockpit..
Configuring the JDBC Driver URL for Oracle® RAC databases
The JDBC Driver URL for Oracle® RAC databases can be added to the Host input field of the database connection window. For example:
jdbc:oracle:thin:@(DESCRIPTION=(ADDRESS_LIST=(LOAD_BALANCE=OFF)(FAILOVER=ON)
(ADDRESS=(PROTOCOL=TCP)(HOST=tst-db1.myco.com)(PORT=1604))
(ADDRESS=(PROTOCOL=TCP)(HOST=tst-db2.myco.com)(PORT=1604)))
(CONNECT_DATA=(SERVICE_NAME=mydb1.myco.com)(SERVER=DEDICATED)))
In addition, the Schema and Port input fields should be left empty.
Step 9 - Performing the Installation
This step displays a progress bar for the first part of the installation procedure.
Changes to the configuration cannot be applied once this step is started.

Step 10 - Applying the Configuration
This step displays the progress of the second part of the installation procedure that includes to set permissions and to install the JOC Cockpit Unix daemon or Windows Service.
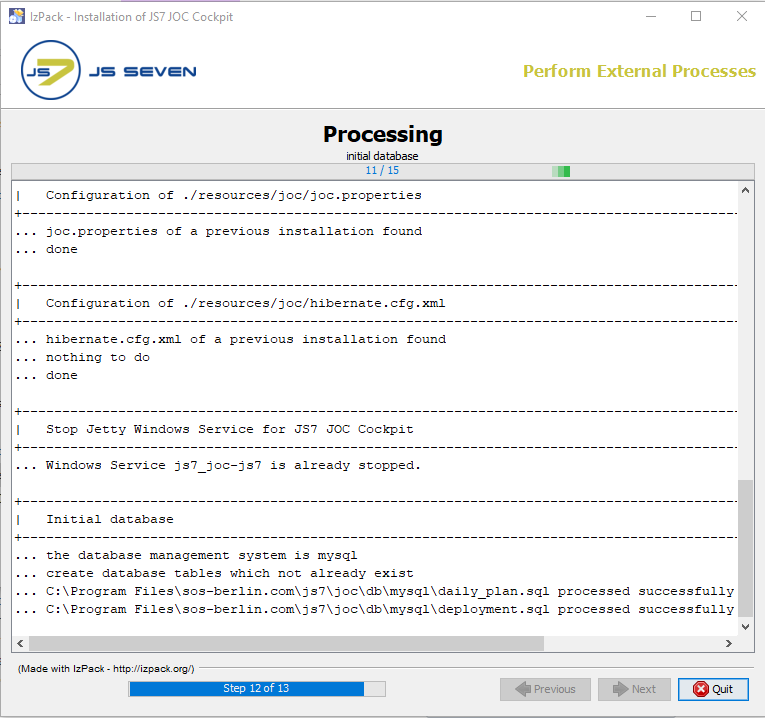
The information displayed with this step is written to the installation log file that can be found in the
jetty_base/logsfolder.
Step 11 - Completion
The last step of the installation displays summary information about the installation (success/error) and paths to relevant files.
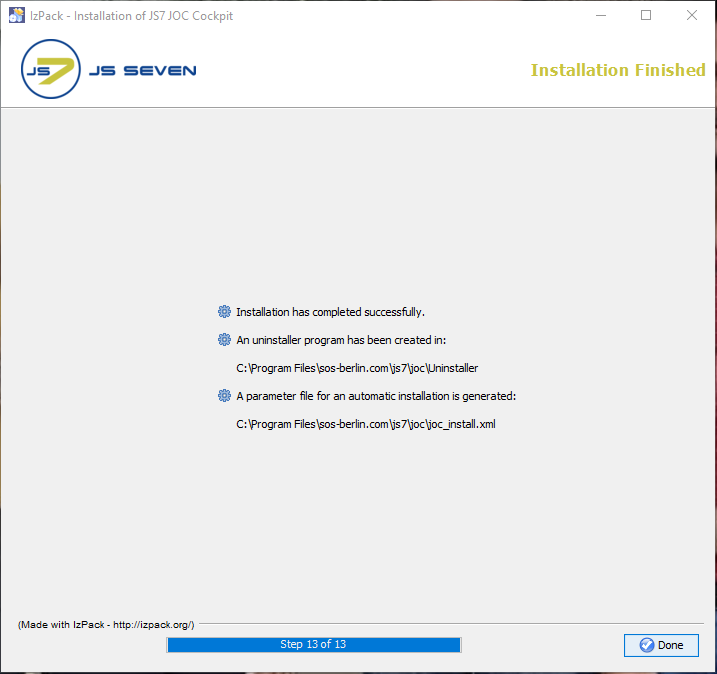
Note that if a problem occurs during installation a warning message will be displayed and a link to the installation log file will be provided.
- A failed installation can be repeated at any time, no uninstallation is required.
Operation
- Navigate to the Initial Operation section of this article for information about opening the JOC Cockpit Interface.
Directory Layout
If the Jetty servlet container included with JOC Cockpit is installed then files will be added by default
- for Unix to the
/var/sos-berlin.com/js7/jocand/opt/sos-berlin.com/js7/jocdirectories, - for Windows to the
ProgramData\sos-berlin.com\js7\jocandProgram Files\sos-berlin.com\js7\jocdirectories.
The following listing explains the directory layout after installation of JOC Cockpit:
/opt(Unix)Program Files(Windows)sos-berlin.comjs7joc(installation directory)install(directory with installer scripts and *.sql files to populate the database)install_jetty_base.cmdupdate_jetty_base.cmd
jetty(directory for Jetty binary files and scripts)service(directory for operation as a Windows Service)Uninstaller(uninstaller directory, the empty directory remains in place after uninstall)uninstall.sh|cmduninstaller.jar.jocinstallinformation(installation response file, remains in place after uninstall)joc_install.xml(installer response file, remains in place after uninstall)
jetty_base(symbolic link to configuration directory)
/var(Unix)ProgramData(Windows)sos-berlin.comjs7jocjetty_base(configuration directory)archive(directory for JOC Cockpit versions before applying patches, remains in place after uninstall)lib(directory for Java libraries , remains in place after uninstall)logs(directory for log files, remains in place after uninstall)patches(directory for patch files (*.zip), remains in place after uninstall)resources(directory for configuration files, remains in place after uninstall)joc(directory for configuration files, remains in place after uninstall)license(directory for license certificate files, remains in place after uninstall)xsd(directory for XSD schema files, remains in place after uninstall)hibernate.cfg.xml(Hibernate configuration file for database access, remains in place after uninstall if modified)joc.properties(JOC Cockpit configuration file, remains in place after uninstall)log4j2.xml(log configuration file, remains in place after uninstall if modified)shiro.ini.active(Shiro configuration file reporting the currently active configuration, remains in place after uninstall)shiro.ini-example(Shiro example configuration file)
temp(directory for temporary files, remains in place after uninstall)webapps(directory for JOC Cockpit files that are extracted from the deployedjoc.warfile)start.ini(Jetty servlet container configuration file, remains in place after uninstall)
Directory Layout if the Jetty Servlet Container is not Installed
If the Jetty servlet container included with JOC Cockpit is not installed and if no previous configuration files are found in the Program Files\sos-berlin.com\js7\joc directory then by default files will be added to the Program Files\sos-berlin.com\js7\joc directories only.
If configuration files are found in the Program Files\sos-berlin.com\js7\joc directory then files will be added to the ProgramData\sos-berlin.com\js7joc and Program Files\sos-berlin.com\js7\joc directories as explained above.
Update
Preparation
- Stop the JS7 JOC Cockpit instance.
Running the installer
The update using the graphical installer can be performed by running the installer setup.cmd|sh file from the extracted .tar.gz/.zip archive and by providing the same parameters such as installation directory, ports etc.
Installation Log Files
The JOC Cockpit configuration and installation log information is written to a new log file each time an installation or update is carried out. These log files can be found in the logs sub-directory of the jetty_base directory.
- Installation log files use names according to the pattern
Install_V<release>_<date-time>_....logwhere<release>is the release number and<date-time>refers to the point in time of installation. - For further information about logging see JS7 - Logging.
Installation for alternative Servlet Containers
The JOC Cockpit installation procedure contains the option to install the Jetty servlet container included with the JOC Cockpit installer archive. An alternative servlet container that is capable of handling Java web applications, such as Tomcat, can be used, however, support by SOS is limited to the JOC Cockpit application and does not include support for individually installed servlet containers.
If the Jetty servlet container included with JOC Cockpit is not to be installed, then the installer will check if a jetty_base symlink from a previous installation is found in the jetty_home directory. Particularly relevant for system administrators is the shiro.ini.active file (containing authentication and authorization information) and the joc.properties file (containing JOC Cockpit installation settings).
- If configuration files are found then they will not be overwritten or removed.
- Default configuration files will be written to the file system in the
joc_homedirectory. - System administrators can move the configuration files to the appropriate directory of their servlet container as required.
Location of the resources/joc directory after fresh installation
With a fresh installation, the installer will not find an existing Jetty servlet container and will store the resources directory for the joc application by default to the following location:
- for Unix systems:
/opt/sos-berlin.com/js7/joc/resources/joc
- for Windows systems:
C:\Program Files\sos-berlin.com\js7\joc\resources\joc
Location of the resources/joc directory after update
If JOC Cockpit is updated without the Jetty servlet container but on top of an existing installation that includes the Jetty servlet container then the resources\joc the directory will not be moved from its location. Practically this means that the "new" resources directory after the update will be found with the following directories (assuming the original installation was carried out for the default directories):
- for Unix systems:
/opt/sos-berlin.com/js7/joc/resources/joc
- for Windows systems:
C:\Program Files\sos-berlin.com\js7\joc\resources\joc
In this situation
- the
shiro.iniandjoc.propertiesfiles from an earlier installation will not be overwritten. - an existing
hibernate.cfg.xmldatabase configuration file will be considered during update and the settings will be suggested as default values. This file will be deleted and a new version of the file will be stored to thejoc_homedirectory. - an update of JOC Cockpit will not overwrite any existing configuration files. However new versions of the
joc.propertiesandshiro.inifiles with the namesjoc.properties-exampleandshiro.ini-examplewill be stored to theresources\jocfolder, alongside the original files.
Initial Operation
Operation
Having completed the installation or update of the JS7 JOC Cockpit you can start the JOC Cockpit either manually or from its Unix daemon/Windows Service, see JS7 - JOC Cockpit Command Line Operation.
Login to JOC Cockpit User Interface
Note that a working servlet container - either the Jetty provided with the JOC Cockpit or some other product - is required before the JOC Cockpit can be operated.
In your browser navigate to the JOC Cockpit URL and enter the User Account and Password. Typically the URL includes the hostname and port that JOC Cockpit has been installed for:
For example,
http://myhost:4446. Please check that the JOC Cockpit port is accessible which might include to add firewall rules to allow access to this port from the computer that you operate the browser for.After initial installation of JOC Cockpit the default User Account and Password of
root:rootwill be available if no changes have been made to theshiro.iniconfiguration file.
Note that the root user is assigned the
allrole in the default configuration that includes any available permissions.
See the Authentication and Authorization - Configuration article for information about the configuration of other user profiles and authentication methods.Note that the JOC Cockpit web service might take a minute to start and to display the login window.

Register Controller and Agents
After successful login to JOC Cockpit a dialog window appears. This window asks to register a Controller. You will find the same dialog later on from the User -> Manage Controllers/Agents menu item.
You have a choice to register a Standalone Controller (n scope of the JS7 Open Source License) or a Controller Cluster for high availability (requires a JS7 Commercial License, see JS7 - Licensing).
Register Standalone Controller
Registering a Standalone Controller is a straightforward task:
Explanation
- The title added for the Controller will be visible in the JS7 - Dashboard view.
- The URL for JOC Cockpit is the hostname and port of the Controller as seen by JOC Cockpit. This URL is used by JOC Cockpit to connect to a Controller.
- Consider that the Controller's port is accessible which might include to add firewall rules to allow access to this port from the server that JOC Cockpit is operated for.
Register Controller Cluster
A Controller Cluster implements high availability for automated fail-over should a Controller instance be terminated or become unavailable.
Note that high availability by clustering is subject to JS7 - Licensing. Without a license fail-over/switch-over will not take place between Controller cluster members.

Explanation
- This dialog allows to specify the Primary Controller instance, the Secondary Controller instance and an Agent Cluster Watcher.
- The title added for each Controller instance will be visible in the JS7 - Dashboard view.
- Primary and Secondary Controller instances require a URL as seen from JOC Cockpit. This URL is used by JOC Cockpit to connect to the Controller instances respectively.
- The URL of the Controller typically includes the hostname and port that the Controller instance is operated for.
- The Agent Cluster Watcher is required for operation of a Controller Cluster. The Agent is contacted by both Controller Cluster members to verify the cluster status should no direct connection between Controller Cluster members be available.
- The Agent is assigned an
Agent IDwhich is a unique identifier for this Agent that cannot be modified during lifetime of an Agent. Change of theAgent IDrequires to remove and to add the Agent with JOC Cockpit, it is not required to uninstall/reinstall an Agent. - The
Agent Nameis a unique identifier that is used for example in the Configuration view to assign Agents to jobs. TheAgent Namecan be modified later on. - The
Agent URLis the hostname and port for which the Agent is operated.
- The Agent is assigned an
- Consider that the following connections should be accessible which might include to add firewall rules to allow access to the ports:
- JOC Cockpit connection to the Primary Controller host and port.
- JOC Cockpit connection to the Secondary Controller host and port.
- Primary Controller connection to the Secondary Controller host and port.
- Secondary Controller connection to the Primary Controller host and port.
- Primary Controller connection to the Cluster Watcher Agent host and port.
- Secondary Controller connection to the Cluster Watcher Agent host and port.
Register Agents
After the connection between JOC Cockpit and the Controller is established you can add Agents. To register an Agent switch to the Manage Controller/Agents view from the user menu. Click on the Action Menu of the Controller for which an Agent should be registered and select Add Agent.

Explanation:
- The Agent is assigned an
Agent IDwhich is a unique identifier for this Agent that cannot be modified during the lifetime of an Agent. Change of theAgent IDrequires to remove and to add the Agent with JOC Cockpit, it is not required to uninstall/reinstall an Agent. - The
Agent Nameis a unique identifier that is used for example in the Configuration view to assign Agents to jobs. TheAgent Namecan be modified later on - In addition, you can add
Agent Alias Namesto make the same Agent available by different names. - The
Agent URLis the hostname and port for which the Agent is operated.
Configuration
The JOC Cockpit offers a number of configuration items that can be used to configure JOC Cockpit. Find details from the JS7 - JOC Cockpit Configuration Items article.
Deinstallation
The JOC Cockpit can be uninstalled using the uninstall.cmd and uninstall.sh scripts available from the following locations:
- For Unix systems:
/opt/sos-berlin.com/js7/joc/Uninstaller
- For Windows systems:
C:\Program Files\sos-berlin.com\js7\joc\Uninstaller
Windows Systems
Starting the uninstaller will open the following window on Windows systems: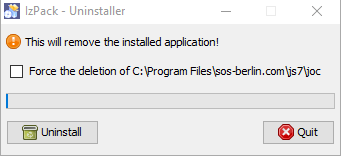
Selecting the "Force the deletion of C:\Program Files\ ...." checkbox will cause the uninstaller to remove both program files and configuration files and folders.
If the checkbox is not selected then configuration files will be left in both the JOC Cockpit installation directory and the Jetty servlet container installation folder (if installed with the JOC Cockpit).
Cluster Operation
Please consider that operating a JOC Cockpit cluster for high availability requires a commercial license, see JS7 - Licensing.
A number of JOC Cockpit instances can be operated as a passive cluster with the first JOC Cockpit instance started acting as the primary cluster member and any additional JOC Cockpit instances acting as standby cluster members. The role of the primary cluster member is decided by the order by which JOC Cockpit instances are started.
The installation of JOC Cockpit instances follows the standard operating procedures explained above, there is no difference in installation considering the roles of primary cluster members and standby cluster members.
Automated Start-up and Shutdown
For Unix systems, the start-up and shutdown configurations apply that are executed by root, e.g. in /etc/init.d or corresponding locations and by use of systemd.
- The JOC Cockpit will start for the user account that is specified during installation. The JOC Cockpit start script
jetty.sh|cmdwill switch to this account independently from the fact that the start script is executed e.g. by therootaccount. - For use with
systemdfind a sample service file from./bin/joc.service-examplefile.
For Windows systems operation of the JOC Cockpit by a Windows Service is recommended as such services can be configured to start/stop automatically on server start-up and shutdown.
Further References
- JS7 - JOC Cockpit - Use of Graphical Installer
- JS7 - JOC Cockpit - Command Line Operation
- JS7 - JOC Cockpit Configuration
- JOC Cockpit - Authentication and Authorization
- JOC Cockpit - Security
Installation with alternative servlet containers:
- Tips from a user for Installation with Tomcat
Overview
Content Tools