Introduction
- The JOC Cockpit can be installed on Linux and Windows systems without use of a graphical installer by running the JOC Cockpit installer in headless mode.
- Technically the JOC Cockpit can be operated for any Unix environment, however, the JS7 - Platforms include support for JOC Cockpit operation with Linux.
Prerequisites
The following requirements have to be met before JOC Cockpit can be installed and operated:
- A Java Runtime Environment starting from version 1.8 is required. For details see Which Java versions is JobScheduler available for?
- JOC Cockpit requires access to a database to store inventory information, status information and workflow related logs, see JS7 - Database.
- Installation of JOC Cockpit requires administrative permissions:
- for Unix systems:
- Root permissions are required if JOC Cockpit is to be installed including the Jetty servlet container.
- To install JOC Cockpit without root permissions the setup script should be executed with the
-uargument, otherwise thesudoprompt will ask for the root password.
- for Windows systems:
- The setup asks for administrative permissions.
- for Unix systems:
Download
- Download the JOC Cockpit installer archive for your target environment from the JS7 - Download page.
- For Unix systems:
- A tarball archive including the installer is available that can be used to run the installer in headless mode.
js7_joc_linux.<release>.tar.gz
- A tarball archive including the installer is available that can be used to run the installer in headless mode.
- For Windows systems:
- A .zip archive including the installer is available that can be used to run the installer in headless mode.
js7_joc_windows.<release>.zip
- A .zip archive including the installer is available that can be used to run the installer in headless mode.
- For Unix systems:
- The .tar.gz/.zip archives can be used to install JOC Cockpit with the graphical installer or for headless installation with both 32 bit and 64 bit operating systems.
Installation in Headless Mode
Installation
The installer is available for Windows and Unix systems.
- To run the installer in graphical mode see JS7 - JOC Cockpit - Use of Graphical Installer.
- To run the installer in headless mode consider the below information.
Installer Archive
- Extract the JOC Cockpit archive to a suitable directory such as
/home/<user-account>on Unix systems orC:\uses\<user-account>on Windows systems.
The resulting installer directory layout looks like this:
hibernate-exampleshibernate-integrated-security-mssql.cfg.xmlhibernate-maria-mysql.cfg.xmlhibernate-oracle12c.cfg.xmlhibernate-postgres.cfg.xml
install-joc.txtjoc.<release>.jarjoc_install.xmllicense.gpllicense.txtsetup.sh|cmd
Installer Response File
- The JOC Cockpit makes use of the
joc_install.xmlfile that includes installer options such as installation path, ports etc. The
joc_install.xmlfile is explained with the code listing below. The comments included are intended to be self-explanatory.
Download: joc_install.xml
Running the Installer
Headless installation is performed by opening a terminal or command window and navigating to the folder containing the setup.sh|cmd file.
Performing headless installation of JOC Cockpit on Unix systems with root permissions
Starting headless installation of the JOC Cockpit on Unix systems with root permissions/home/<user-account>/joc.<release> ./setup.sh joc_install.xml
Performing headless installation of JOC Cockpit on Unix systems without root permissions
Starting headless installation of the JOC Cockpit on Unix systems without root permissions/home/<user-account>/joc.<release> ./setup.sh -u joc_install.xml
Performing headless installation of JOC Cockpit on Windows systems
Starting headless installation of the JOC Cockpit on Windows systemsC:\users\<user-account>\joc.<release> setup.cmd joc_install.xml
Installation Directory Layout
If the Jetty servlet container included with JOC Cockpit is installed then files will be added by default
- for Unix to the
/var/sos-berlin.com/js7/jocand/opt/sos-berlin.com/js7/jocdirectories, - for Windows to the
ProgramData\sos-berlin.com\js7\jocandProgram Files\sos-berlin.com\js7\jocdirectories.
The following listing explains the directory layout after installation of JOC Cockpit:
/var (Unix) ProgramData (Windows)sos-berlin.comjs7jocjetty_basearchive (directory with files, remains after uninstall)lib (directory with files, remains after uninstall)logs (directory with files, remains after uninstall)patches (directory with files, remains after uninstall)resources (remains after uninstall and (empty) after full uninstall)joc (directory with files, remains after uninstall)license (directory with files, remains after uninstall)xsd (directory with files, remains after uninstall)hibernate.cfg.xml (remains after uninstall if modified)joc.properties (remains after uninstall)log4j2.xml (remains after uninstall if modified)shiro.ini.active (remains after uninstall)shiro.ini-example (only added if shiro.ini file is found)
temp (directory with files, remains after uninstall)webappsstart.ini (file, remains after uninstall)
/opt (Unix) Program Files (Windows)sos-berlin.comjs7jocinstall (directory with files)install_jetty_base.cmdupdate_jetty_base.cmd
jetty (directory with files)jetty_base (symlink)serviceUninstaller (directory, the empty remains after uninstall and full uninstall)uninstall.sh|cmduninstaller.jar
.jocinstallinformation (file, remains after uninstall)joc_install.xml (file, remains after uninstall)
Directory Layout if the Jetty Servlet Container is not Installed
If the Jetty servlet container included with JOC Cockpit is not installed and no previous configuration files are found in the Program Files\sos-berlin.com\js7\joc directory then by default files will be added to the Program Files\sos-berlin.com\js7\joc directories only.
If configuration files are found in Program Files\sos-berlin.com\js7\joc directory then files will be added to the ProgramData\sos-berlin.com\js7joc and Program Files\sos-berlin.com\js7\joc directories as explained above.
Update
Preparation
- Stop the JS7 JOC Cockpit instance.
Running the Update
- The update of the JS7 JOC Cockpit is performed from the same download archive as used for any fresh installation.
- Use the
joc_install.xmlfile created while the installation. The default location of thejoc_install.xmlfile from a previous installation is:C:\Program Files\sos-berlin.com\js7\joc\for Windows
/opt/sos-berlin.com/js7/jocfor Linux systems
- Perform the same step as running the installer as added above.
Installation Log Files
The JOC Cockpit configuration and installation log information is written to a new log file each time an installation or update is carried out. These log files can be found in the logs sub-directory of the jetty_base directory.
- Installation log files use names according to the pattern
Install_V<release>_<date-time>_....logwhere<release>is the release number and<date-time>refers to the point in time of installation.
- For further information about logging see JS7 - Logging.
Installation for alternative Servlet Containers
The JOC Cockpit installation procedure contains the option to install the Jetty servlet container included with the JOC Cockpit installer archive. An alternative servlet container that is capable of handling Java web applications, such as Tomcat, can be used, however, support by SOS is limited to the JOC Cockpit application and does not include support for individually installed servlet containers.
If the Jetty servlet container included with JOC Cockpit is not to be installed, then the installer will check if a jetty_base symlink from a previous installation is found in the jetty_home directory. Particularly relevant for system administrators is the shiro.ini.active file (containing authentication and authorization information) and the joc.properties file (containing database configuration information).
- If configuration files are found then they will not be overwritten or removed.
- Default configuration files will be written to the file system in the
joc_homedirectory. - System administrators can move the configuration files to the appropriate directory of their servlet container as required.
Location of the resources/joc directory after fresh installation
With a fresh installation the installer will not find an existing Jetty servlet container and will store the resources directory by default to the following locatin:
- for Unix systems:
/opt/sos-berlin.com/js7/joc/resources/joc
- for Windows systems:
C:\Program Files\sos-berlin.com\js7\joc\resources\joc
Location of the resources/joc directory after update
If JOC Cockpit is updated without the Jetty servlet container but on top of an existing installation that includes the Jetty servlet container then the resources\joc directory will not be moved from its location. Practically this means that the "new" resources directory after the update will be found with the following directories (assuming the original installation was carried out for the default directories):
- for Unix systems:
/opt/sos-berlin.com/js7/joc/resources/joc
- for Windows systems:
C:\Program Files\sos-berlin.com\js7\joc\resources\joc
In this situation
- the
shiro.iniandjoc.propertiesfiles from an earlier installation will not be overwritten. - an existing
hibernate.cfg.xmldatabase configuration file will be considered during the update and the settings will be suggested as default values. The file will be deleted and a new version of the file will be stored to thejoc_homedirectory. - an update of JOC Cockpit will not overwrite any new or old configuration files. However new versions of the
joc.propertiesandshiro.inifiles with the namesjoc.properties-exampleandshiro.ini-examplewill be stored to theresources\jocfolder, alongside the original files.
Initial Operation
Initial Operation with the JOC Cockpit Login Form
Note that a working Servlet Container - either the Jetty provided with the JOC Cockpit or some other product - is required before the JOC Cockpit can be operated.
Navigate to the JOC Cockpit login form in a browser and enter the User Account and Password.
After initial installation of JOC Cockpit the default User Account and Password of root:root will be available if no changes have been made to the
shiro.iniconfiguration file.Note that the root user is assigned the all role in the default configuration which includes all available permissions.
See the Authentication and Authorization - Configuration article for information about the configuration of other user profiles and authentication methods.
Note that the web service may take a minute to start and display the login form.

Configuration
The JOC Cockpit includes certain configuration items which can be used to configure JOC Cockpit. Details about how to configure JOC Cockpit the article JS7 - JOC Cockpit Configuration Items can be followed.
Deinstallation
The JOC Cockpit can be uninstalled using the uninstall.cmd and uninstall.sh scripts available from the following locations:
- For Unix systems:
- For Windows systems:
C:\Program Files\sos-berlin.com\js7\joc\Uninstaller
Windows systems
Starting the uninstaller will open the following form on Windows systems: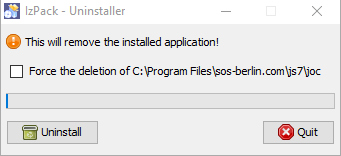
Selecting the "Force the deletion of C:\Program Files\ ...." checkbox will cause the uninstall script to remove both the program and configuration files and folders.
If the checkbox is not selected, configuration files will be left in both the JOC Cockpit installation folder and the Jetty web server installation folder (if installed with the JOC Cockpit).
Unix systems
The uninstall script on Unix systems runs in headless mode. The uninstall script will start the Uninstaller and remove both the program files, configuration files and respective folders.
Cluster Operation
Please consider that operating a JOC Cockpit cluster for high availability requires a commercial license, see JS7 - Licensing.
A number of JOC Cockpit instances can be operated as a passive cluster with the first JOC Cockpit instance started acting as the primary cluster member and any additional JOC Cockpit instances acting as standby cluster members. The role of the primary cluster member is decided by the order only in which instances are started.
The installation of the JOC Cockpit instances follows the standard operating procedures described above, there is no difference in installation consider the roles of primary cluster member and standby cluster members.
Automated Start-up and Shutdown
For Unix systems, the start-up and shutdown configurations apply that are executed by root, e.g. in /etc/init.d or corresponding locations and by use of systemd.
- The JOC Cockpit will start for the user account that is specified during installation. The JOC Cockpit start script jetty.sh|cmd will switch to this account independently from the fact that the start script is executed e.g. by the
rootaccount. - For use with
systemdfind a sample service file from./bin/joc.service-examplefile.
For Windows systems operation of the JOC Cockpit by a Windows Service is recommended as such services can be configured to start/stop automatically on server start-up and shutdown.
Further References
- JS7 - JOC Cockpit - Use of Graphical Installer
- JS7 - JOC Cockpit - Command Line Operation
- JS7 - JOC Cockpit Configuration
- JOC Cockpit - Authentication and Authorization
- JOC Cockpit - Security
- JS7 - Troubleshooting
Installation with other servlet containers:
- Tips from a user for Installation with Tomcat
Overview
Content Tools