Getting Started
The example shown on this page assumes that the Editor ihas been installed and configured as described in the XML Editor - Installation and Configuration article.
- The Editor can be opened most easily through a double-click on a shortcut to the
sos.xml.editor.exebinary. - Clicking File -> Open will open a tab for a new configuration.
The configuration of a YADE file transfer operation is used in this article as a 'vehicle' for describing the use of the XML Editor. Other uses are available or in development, such as the configuration of the JobScheduler Monitoring Interface.
Specifying the XSD schema
- The XSD schema can either be specified using a file system address or by referencing an XSD schema:
- entering an HTTP link. The SOS has the following schemas currently available:
- See the screenshot below:

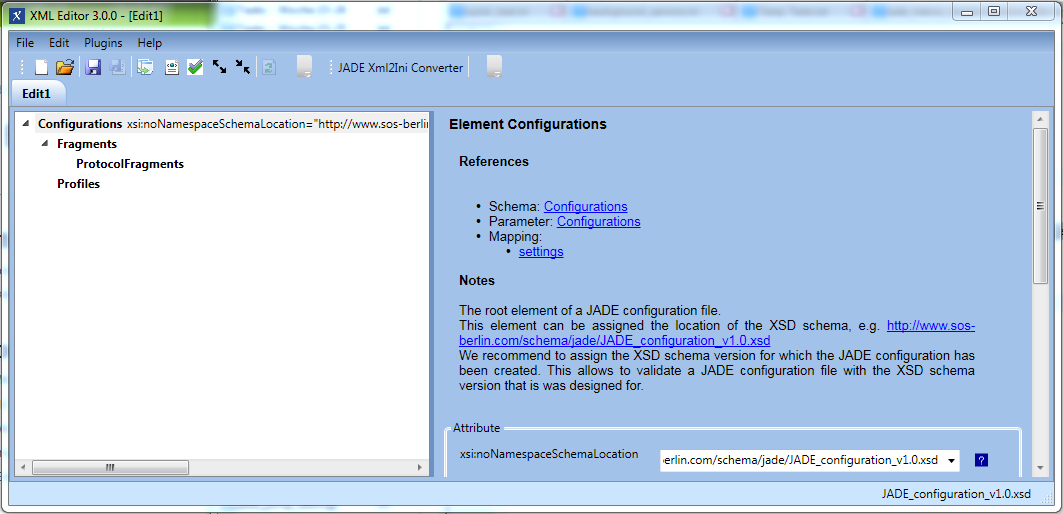
xsi:noNamespaceSchemaLocation
This field is used to bind an XSD schema to the configuration as an attribute for the Configurations element as shown in the following screenshot.

Note that this location should be used with the same schema assigned as the configuration above.
Developing a Configuration
Once an XML element has been specified, all mandatory child elements of that element will be automatically added to the configuration and shown in the left hand pane of the editor as shown in the following screenshot:
The right hand pane of the editor shows:
- the reference documentation for the element currently selected,
- entry fields for any attributes that can / have to be specified for the element and
- a list of any child elements already specified (not shown in the screenshot)
The Configurations element in the YADE Reference schema shown in the screenshot above is the root XML element and therefore automatically specified when a new configuration is opened, along with its mandatory child elements.
Adding Child Elements
Optional child elements can be listed by right-clicking on an element and then selecting the required child from the list of available options as shown in the next screenshot:

A Simple Configuration
The next screenshot shows a simple but complete configuration that will download a series of files from our online test FTP server and write them to the local file system.
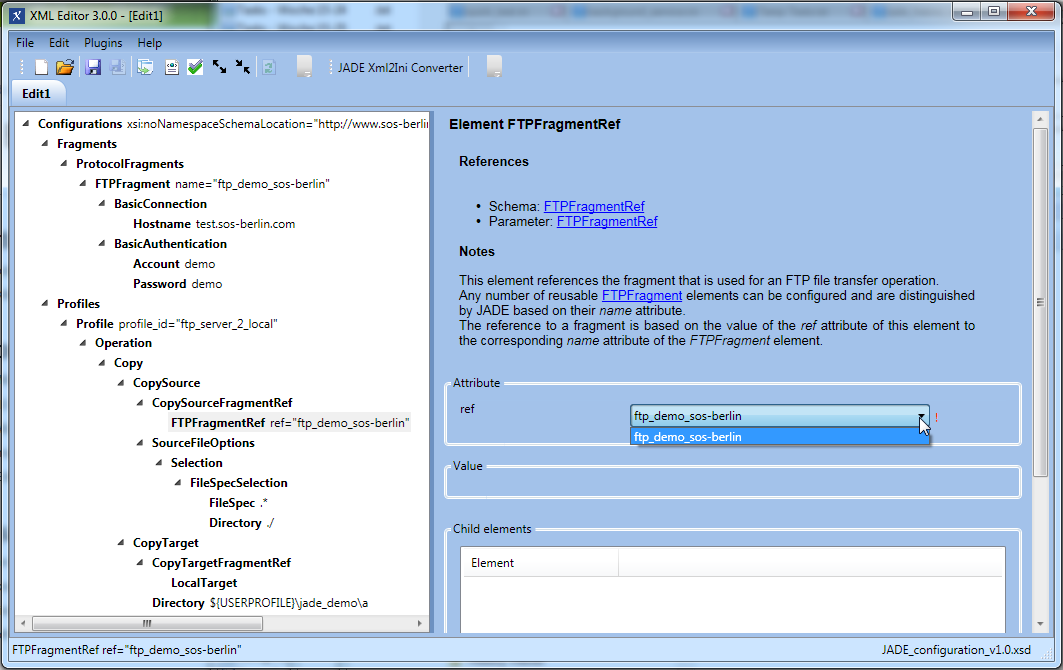
Note that starting point for the processing of this configuration is the Profile element which specifies that:
- the files are to be copied,
- the ftp_demo_sos-berlin configuration fragment is to be used for the source part of the operation,
- the files are to be transferred from the directory defined using / file path,
- the files are to be transferred to the C:\Users\aa\jade_demo\a directory.
The structure of the configuration is described in more detail in the YADE User Manual - Configuring and Running File Transfers article and its child articles.
Saving the configuration
The configuration is saved in the standard way by clicking on the diskette symbol in the upper left menu or by using a right click on the configuration Edit1 tab.
Saving causes the configuration to be saved by default in the following formats:
- the XML format that will become the new standard for YADE with release 1.11,
- the
settings.iniformat that will that will remain standard until release 1.11 (when the YADE Xml2Ini Converter plugin is active).
Note that the YADE Xml2Ini Converter plugin used to generate the settings.ini file can be deactivated (and configured) as described in the Plugins section of this article below.
More information about the change of formats can be found in the YADE User Manual - Configuration Formats & Tools article.
The following code boxes can be opened to show the simple configuration described above in XML and in settings.ini formats:
Automatic Configuration Validation
Note that during saving the XML Editor automatically validates the configuration against the Schema and highlights errors.
Running the configuration
The simple configuration described above is started from the command line or in a batch file on Windows systems using one of the following calls, where sos-berlin_demo_2_local is the name given to the configuration on saving:
jade.cmd -settings="%USERPROFILE%\jade_demo\sos-berlin_demo_2_local.xml" -profile="ftp_server_2_local"
jade.cmd -settings="%USERPROFILE%\jade_demo\sos-berlin_demo_2_local.ini" -profile="ftp_server_2_local"
More information including example calls for Unix systems can be found in the YADE User Manual - Configuring and Running File Transfers article.
Plugins
YADE Xml2Ini Converter
JS-1416 - Getting issue details... STATUS
By default the XML Editor comes with an activated YADE Xml2Ini Converter plugin that is used to convert the Editor's native XML format to the settings.ini format required for YADE up to versions 1.10.
The menu for configuring this plugin can be opened using either the YADE Xml2Ini Converter button shown in the screenshot below or by opening the Plugins entry in the main menu.
The plugin can be configured using the Settings shown in the screenshot below:
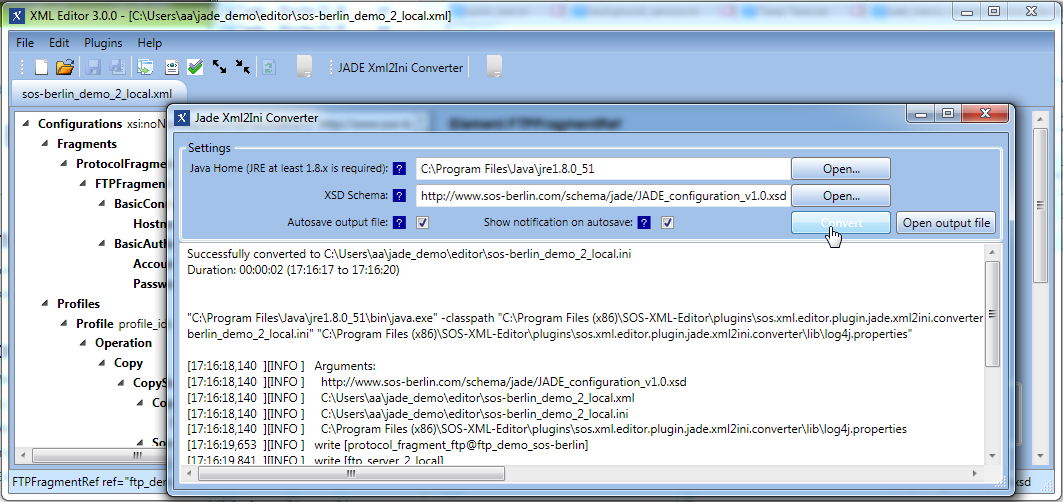
- XSD Schema: allows an alternative schema to be used for the conversion to that specified in the current XML Editor tab.
- Autosave output file: automatically saves the converted file under the same folder and file name as the 'original' XML file but with the extension .ini.
- Show notification on autosave: causes a a small notification window to be shown at the taskbar when a file is saved and an autosave setting causes the Converter Plugin to be executed.
- Convert: is used to convert the XML document shown in the current XML Editor tab to a compatible .ini format.
- Open INI file: opens the converted file in the default editor for .ini format.
Keyboard Shortcuts
JS-1501 - Getting issue details... STATUS
- The XML Editor supports shortcuts that allow the Editor to be used without a pointing device (mouse).
- Shortcuts at tab level - work when the focus is in the left or in the right panel:
- CTRL S: Save
- CTRL V: Validate XML
- CTRL X: Show XML
- Shortcuts at context level of a selected element - work when the focus is in the left panel:
- CTRL +: Expand
- CTRL -: Collapse
- CTRL A: Add Child - opens the Add Child context menu
References
Change Management References