Introduction
JobScheduler has a full JADE managed file transfer program "on board". This allows JobScheduler features such as file watching and run time periods to be combined with JADE's managed file transfer features such as error detection, compliant logging and notifications.
JADE can be accessed from the JobScheduler using one of the JADE JITL jobs, via the JADE API. The JITL jobs are pre-configured job templates that can be used to rapidly develop job scheduling operations and are provided as standard with every JobScheduler installation package.
The configuration and use of a simple JITL job is described in JobScheduler - Tutorial 4 - Configuring and Running a JITL Job: the current tutorial builds on the information provided in the Configuring and Running a JITL Job tutorial and show how to configure, run and test simple file transfer operations with the JADEJob. Users should then be able to build on this information to complete their own real-life transfer operations.
Background
The screenshots used in this tutorial were made using JobScheduler 1.9.
This tutorial assumes that a JobScheduler has been installed and is running. See the JobScheduler - Tutorials - Introduction and Requirements for an introduction to the requirements for the installation of JobScheduler and links to instructions about the installation procedure itself.
This tutorial describes how to configure the JITL JADEJob to carry out a simple file transfer operation - transferring all the files found in a folder on a remote server to the local file system. This operation described has already been used in the The JADE Client Command Line Interface - Tutorial 1 - Getting Started, and involves the transfer of files from the online SOS demo server to the local file system. The demo server server allows read-only FTP and SFTP access and has been installed to allow users to get their jobs up, running and tested as quickly as possible.
Note that to get the file transfer operation described in this tutorial up and running, your firewall(s) will need to allow file transfer via ports 21 (for FTP) and 22 (for SFTP).
A separate installation of JADE is not required for this tutorial.
Configuration of a simple JITL JADEJob (FTP protocol, password authentication)
The first three steps have already been described in detail in the JobScheduler - Tutorial 2 - Editing a Simple Job with JOE tutorial and are therefore only summarized here:
- Start JobScheduler
- Open the JobScheduler Object Editor (JOE)
- Open the JobScheduler Live Folder:
- A sub-folder "tutorials-5-jade-jitl-job" of the live folder is used in this tutorial for all the objects.
A copy of this sub-folder can be downloaded from ????
- A sub-folder "tutorials-5-jade-jitl-job" of the live folder is used in this tutorial for all the objects.
- In the left hand pane of JOE mark the Jobs icon - opening the JobScheduler icon if necessary.
- Start the wizard function by clicking on the button of the same name as shown in the screenshot below.

- Select Order controlled job in the small window that opens and then Next, which will open the Import Jobs window as shown in the next screenshot.
- Enter a Jobname such as jitl_job_1.
- In the Jobs pane, scroll down until the two JADE Jobs are visible and select the job with the jadeJob.xml file name.
This will cause the Title field to be filled with "API Job for JobScheduler ...." Click on the Finish button to create the new job and close the wizard.
Deprecated Parameters
Note that use of the wizard to configure the job parameters as described in Tutorial 4 - Configuring and Running a JITL Job - i.e. proceeding by clicking on Next instead of Finish - is not recommended for this job.
This is because in releases up to and including 1.9 the wizard uses deprecated parameters which considerably restricts the configurations possible for the JITL Job.
See the JITL-201 - Getting issue details... STATUS for more information about this issue.
- You will now be returned to JOE's Jobs tab.
- Open the jitl_job_1 element you have just created In the editor's left hand Scheduler Elements pane and select the Parameter element as shown in the next screenshot.

- Open the jitl_job_1 element you have just created In the editor's left hand Scheduler Elements pane and select the Parameter element as shown in the next screenshot.
- Now enter the JITL job parameter name/value pairs.
- There are a number of approaches that can be taken to specifying the parameter name/value pairs:
- Use the job Parameter form shown to enter parameter pairs and store the information in the job configuration. This is the simplest approach and will be described first in this tutorial.
- Specify a
settings.inifile and Profile in job Parameter form and then enter the necessary parameters in this file using a text editor. This procedure is described in the Use of a Profile and settings.ini file section of this tutorial. - It is also possible to create a custom JITL job by duplicating the JADE JITL jjob in the JobScheduler data jobs folder and directly editing this file. This procedure is outside the scope of this tutorial.
The values of the necessary parameter name/value pairs can be taken from the list below:
JADE Parameter Settings[ftp_server_2_local] operation = copy source_host = test.sos-berlin.com source_protocol = ftp source_port = 21 source_user = demo source_password = demo source_dir = / target_host = localhost target_protocol = local target_dir = ${USERPROFILE}\jade_demo\a- The use of the job Parameter form is very similar to the use of the JITL job parameter wizard already mentioned. The use of the wizard was described in the Configuring and Running a JITL Job tutorial and the use of the Parameter form should therefore not require any further explanation.
- There are a number of approaches that can be taken to specifying the parameter name/value pairs:
- The Job Parameter form will appear as shown below once the parameter pairs have been entered:

- Note that the value of the target_dir parameter shown in the screenshot has been changed from the parametrized value used in JADE (
${USERPROFILE}\jade_demo\a) to an absolute value.
This is because the JobScheduler on the system used to develop this tutorial does not run under the normal Windows user account and therefore the ${USERPROFILE} variable would return the wrong path. - Information about finding exact JADE parameter definitions is given in the JobScheduler - Tutorial 5 - The JADE JITL Job - Configuring and running a simple file transfer job section in this tutorial.
- Note that the value of the target_dir parameter shown in the screenshot has been changed from the parametrized value used in JADE (
- Create a new job chain for the job:

- Add the job to the job chain along with two end nodes as shown:

- Create and configure an order for the job chain:

- Don't forget to save the configuration as shown:

Start the Order in JOC, the JobScheduler Operations Center using the Order menu button as shown

- Open the log file after the order has run using the Show Log link as shown in the next screenshot:

The screenshot below shows an extract from the log file for this order and the detailed log information that is available for JADE file transfer operations: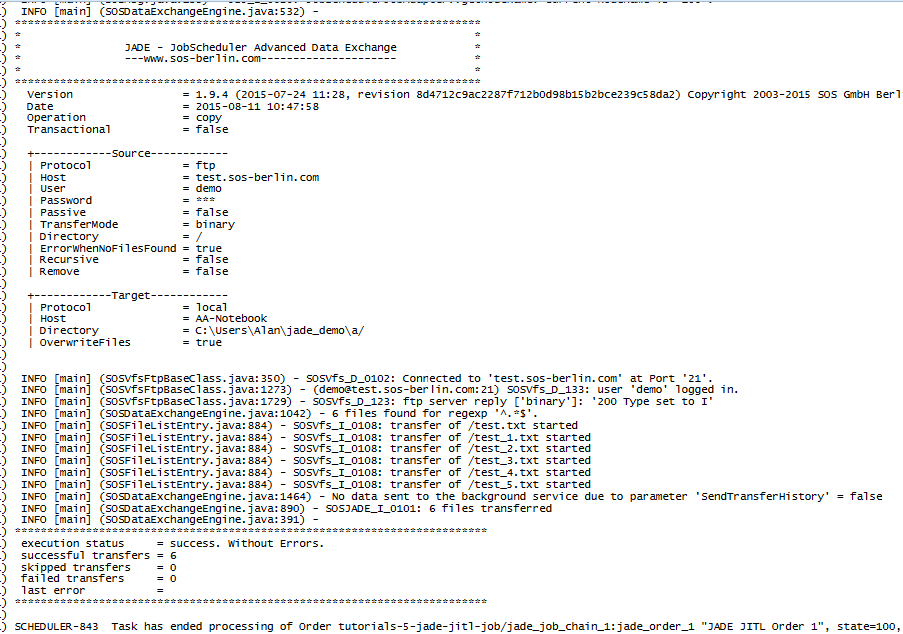
As can be seen from the log file, six files have been copied to the...\jade_demo\afolder. These were all the files in the remote folder as a filter was not specified to select particular files.
Configuration Download
- An archive containing the the job, job chain and order objects used in this tutorial is available for download:
- This file can be unpacked and the contents copied to your JobScheduler live folder where they can be run with one minor change:
- The archive contains three sets of JobScheduler elements, each made up of a job, a job chain and an order. The elements relevant to the above example all have the suffix _1 in their names.
Note that the value for the author's username in the local_dir parameter in the download file has to been changed from the value shown in the screenshots (Alan) to myUserName. You will need to change this value to the appropriate value for your own system.
- The archive contains three sets of JobScheduler elements, each made up of a job, a job chain and an order. The elements relevant to the above example all have the suffix _1 in their names.
File Transfer using the SFTP protocol and public/private key authentication
JADE and therefore the JITL JADEJob can be configured to use a range of protocols, including SFTP, and to use public/private key authentication. The configuration of a JITL JADEJob using SFTP and public/private key authentication is the subject of this section.
As with the simple file transfer using FTP protocol and password authentication described above, this job downloads files from the SOS demo server and saves them on the local file system. The configuration of the JADE Command Line Client to carry out this operation was described in The JADE Client Command Line Interface - Tutorial 6 - Public / Private Key Authentication tutorial and we recommend that you follow the instructions contained in that tutorial to download and install the necessary rsa private key file.
Job Configuration
- Public/private key installation
- Follow the instructions in the JADE Tutorial 6 - Public / Private Key Authentication article linked above to download and correctly save the demo_id_rsa private key.
- Create a job, job chain and order for the file transfer using JOE (the JobScheduler Object Editor)
- We recommend that you use the job, job chain and order created for the Simple File Transfer tutorial described above as a basis.
- In the test environment used to make the screenshots for this tutorial the job, job chain and order created for the previous tutorial were first simply copied on the file system and their names changed from *_1 to *_2.
- If returning the focus to JOE does not bring a message that files have been modified and and the question if the configuration should be reloaded, then force a reload using the grey Reload button with the arrow at the top left of JOE.
- Update the job in the job chain object and the job chain in the order object to the correct values, if necessary following the screenshots in the Simple File Transfer example above as a guide.
- In JOE's left hand Scheduler elements pane open the jitl_job_2 object and then select the Parameter object
- Update the port and protocol parameters to the values shown in the screenshot below.
(The procedure for setting and modifying parameters in JOE was described in the JobScheduler Simple File Transfer tutorial.)- Do not forget the change the value of the author's username (Alan) in the local_dir parameter to a suitable value for your system.
- Add the ssh_auth_method parameter set to publickey.
- Remove the password element by selecting the parameter and then clicking the Remove button.

- Note the following points (already mentioned in the Simple File Transfer example above):
- The value set for the local_dir parameter is an absolute value, whereas a global variable -
${USERPROFILE}- was used in the JADE Client tutorial linked above.
This is because the JITL Job is executed under the JobScheduler user whereas the JADE example is executed under the current user account ID.
- The value set for the local_dir parameter is an absolute value, whereas a global variable -
- Update the port and protocol parameters to the values shown in the screenshot below.
- Save the modified configuration.
- We recommend that you use the job, job chain and order created for the Simple File Transfer tutorial described above as a basis.
- Run the new order (jade_order_2 in the download) in JOC (the JobScheduler Operations Center) in the same way as described in the Simple File Transfer example above.
The file transfer log (accessed in JOC as described in the Simple File Transfer example) should show that one file was copied to the local_dir folder.
Note that the file_spec parameter set in this example introduces file name filtering and reduces the number of files found - six were found in the Simple File Transfer example - to one.
Configuration Download
- An archive containing the the job, job chain and order objects used in this tutorial is available for download:
- This file can be unpacked and the contents copied to your JobScheduler live folder.
Note that the value for the author's username in the local_dir parameter in the download file has to been changed from Alan to myUserName.
Use of a Profile and settings.ini file
The JADE JITL Job can also be configured to use file transfer configurations saved in a file independent of the JITL job. This has the advantage that the configuration - or parts of the configuration - can be tested and reused in a number of JITL jobs.
Note that up to and including release 1.10 of JADE and JobScheduler both the JADE JITL job and the Command Line Client save configurations in the form of one or more Profiles in a text-based settings.ini file. From release 1.11 onwards this approach will be replaced with an XSD schema-based XML file. See the JADE User Manual - Using the JADE Client article for more information about this change.
Profiles can be called from other Profiles, which means that a system of reusable configuration fragments can be built up. This is described in the Example of a global profile with fragments article.
The profile and settings file are specified with parameters of the same names in the JITL job Parameter form, as shown in the screenshot below: 
Single Source Configuration
We recommend that only the settings and profile parameters are set in the JITL job parameter form and that all other configuration parameters are set in the Profiles. While this may appear contradictory to our design policy for other SOS products, where merging configuration sources is possible, inconsistencies in the implementation of JITL job parameters when used together with a settings.ini file make this approach recommendable. See the JADE JITL Job Wizard behavior inconsistent when used with settings.ini file issue for more information.
Note also:
- The path to the settings.ini file is relative to the ${SCHEDULER_DATA} folder, which on a Windows 7/8 computer with a default JobScheduler installation would be:
C:\ProgramData\sos-berlin.com\jobscheduler\JobScheduler_ID\
where JobScheduler_ID is the ID given to the JobScheduler during installation
- We suggest that the settings.ini file is included in a folder within the JobScheduler live folder to simplify portability. For example:
- settings =
config\live\js-tutorials-jade-jitl-job\jade_conf\settings.ini
- settings =
- Parameter variables such as ${SCHEDULER_DATA}, which can be used when configuring a file transfer in the JITL Job Parameter form, are not interpreted from a settings file.
- This means that the target_dir parameter which in the listing in the Parameter Settings in JADE subsection above has the value:
${USERPROFILE}\jade_demo\a
is changed to:
- This means that the target_dir parameter which in the listing in the Parameter Settings in JADE subsection above has the value:
- Parameter variables such as
${base_path}can be defined and used within a Profile. However they are not available in other profiles. See the JADE-47 - Make parameter-substitution in profiles possible issue for more information.
Further Configuration Topics
Error handling, notifications and monitoring
Error handling, notifications and monitoring for the JITL JADEJob can be handled on two levels:
- using standard JobScheduler error handling, notifications and monitoring,
- using the JADE error handling and notifications
A brief introduction to both levels of approach is presented below.
JobScheduler error handling, notifications and monitoring
Error handling
The JobScheduler comes with a number of methods for error handling. These include:
- stop a job: running orders have to wait for the job to become available
- suspend an order: the order waits to be resumed later on
- setback an order: make an order repeatedly try to continue processing after a predefined time interval
- make an order leave a job chain
- make an order continue processing with a specific job node for error handling
See the Error handling article for a list of links to articles describing these features in detail.
Notifications
JobScheduler comes with its own mail client which it can use to send notifying e-mails in the event of, for example, jobs ending in error.
See the Notifications article for a list of links to articles describing the notification features in detail.
Monitoring
JobScheduler can be monitored by System Monitors. Such products include e.g. HP OpenView®, Microsoft SCOM®, Nagios®, op5®, Opsview®, Zabbix® etc. As System Monitors are restricted to check the availability and performance of a monitored service the JobScheduler provides additional functionality for System Monitors to report on individual job failure and recovery. The JobScheduler Monitoring Interface can be used with any System Monitor that provides a command line tool for passive checks.
See the Monitoring article for a list of links to articles describing the monitoring features in detail.
JADE error handling and notifications
Error handling
JADE has a limited number of parameters that can be used to provide error handling:
- transactional and atomic file transfer
- check_size
- force_file
- raise_error_if_result_set_is
Definitions for these parameters are provided in the JITL Job Wizard Job Parameter form.
Notifications
Notification events
The JADE JITL job can send e-mails when file transfer events have taken place:
- on success (mail_on_success)
- on error (mail_on_error)
- on empty files (mail_on_empty_files)
E-mail configuration
Notification e-mails themselves are configured in the JITL JADEJob with a number of parameters whose (legacy) names begin with ftp_file_notification - e.g. ftp_file_notification_to, ftp_file_notification_bcc, etc .
Definitions of these parameters can be found in the XML-based parameter reference under their new names - e.g. to, bcc, etc.
Scheduling the JITL JADEJob
Scheduling a JITL job in the JobScheduler is no different to scheduling any other job and therefore there is no reason to repeat the detailed instructions that are presented in JobScheduler - Tutorial 3 - Running an Order Using the Run Time Parameter
Polling for File Presence
Two main methods for polling for the presence of a file are available:
- The JITL JADEJob can be used to poll as part of a file transfer operation. This is the simplest method to configure but binds the polling directly to the file transfer operation.
- A configuration for carrying out file transfer from one server to another with polling is shown in the JADE Server-to-Server File Transfer with polling article.
This configuration could be easily adapted for use with other file transfer situations.
- A configuration for carrying out file transfer from one server to another with polling is shown in the JADE Server-to-Server File Transfer with polling article.
- The JobScheduler can carry out the polling and provides a more powerful and flexible approach than the use of JADE. For example:
- file order sources can be used to start a job chain that is required to carry out a processing operation before the transfer itself. See the How to start jobs and job chains on a file event article for more information
Further documentation
JITL JADEJob
A full job documentation of the JADEJob is provided alongside the job definition. This is an XML file (jadeJob.xml) and can be found in the JITL jobs folder in the JobScheduler installation Program Data/jobs directory. On a Windows 7/8 installation with default settings this would be:
C:\ProgramData\sos-berlin.com\jobscheduler\scheduler_ID\jobswhere scheduler_ID is the ID given to the JobScheduler.
The full documentation for the JITL JADEJob can also be found in the Product Knowledge Base.
JADE parameter definitions
The lower pane of the JITL Job Wizard Job Parameter form (cut off in the screenshots above) shows an extract from the legacy and in part deprecated parameter documentation when a parameter that has been selected using the wizard is active. As already mentioned, we do not recommend using the wizard and we also do not recommend using its documentation.
An alternative reference source, with more relaible parameter descriptions can be found in the JADE Parameter Reference. Note that the version online has been written using the parameter names that will be introduced with the changeover to XML-based configuration in Release 1.11, and that we have withdrawn the legacy (i.e. settings.ini file based configuration) JADE parameter reference. However release 1.11 does not bring a major change in the functions of the JADE parameters - only their names and how they are configured is being significantly changed. Therefore we have made a Parameter Mapping available that shows the settings.ini file parameter names and their corresponding XML-based ones. The XML names can then be used to access the new JADE Parameter Reference, if there are aspects of parameter use that is unclear.