Installation Requirements
The following requirements must be met before the JOC Cockpit can be installed and run:
- The JOC Cockpit can only be installed alongside a JobScheduler Master version 1.11 and newer.
FEATURE AVAILABILITY STARTING FROM RELEASE 1.11 - The JOC Cockpit requires access to the DBMS that operates the JobScheduler database.
- The JOC Cockpit requires access to the DBMS that operates the reporting database. The reporting database may be integrated in the JobScheduler database or may be a separate database on a separate DBMS.
- A JVM 1.8 has to be installed.
Troubleshooting Information
- If a MySQL DBMS is being used by the JobScheduler, then the MySQL
wait_timeoutsetting that rules the max. lifetime of idle connections should be checked and if necessary extended.- The default
wait_timeoutfor MySQL is relatively short and the JOC Cockpit cannot keep the connection busy over longer periods of time without user interaction - for example, overnight. - See the JOC Cockpit - Troubleshooting - Database Connection to MySQL unavailable after idle timeout article for instructions about how to change the MySQL DBMS
wait_timeoutsetting.
- The default
- Find more hints on possible installation problems from the JOC Cockpit - Troubleshooting section.
Operating Systems
The JOC Cockpit is available for Linux and Windows operating systems and the same setup can be used for installation on 64-bit and on 32-bit systems. See the Which platforms is JobScheduler available for and what platform support is provided? article for more information.
HTTPS Authentication
The JOC Cockpit can be operated with HTTPS. However, due to problems often experienced with certificate validation, we do not recommend configuring the JOC Cockpit to use HTTPS during the initial installation and configuration procedure. Instead we recommend that the JOC Cockpit is installed and tested with HTTP and the default shiro authentication and that HTTPS and, if required, LDAP authentication are added in a second step. See the JOC Cockpit - Authentication and Authorization and JOC Cockpit - HTTPS Authentication articles for more information.
Download the JOC Cockpit Archive
The following archive files are available for download:
joc_linux.[release].tar.gzjoc_windows.[release].zip
where release is the release number.
These archives can be used to install the JOC Cockpit either as a dialog or as a batch process and for both 32 and 64-bit systems.
They can be downloaded from:
- the SOS Web Site Download page
- the JobScheduler SourceForge page
Installation Procedure
Preparation
- Ensure that all the necessary Installation Requirements as listed in the section above have been met.
- Unpack the JOC Cockpit archive to a suitable directory such as
/tmpon Linux systems orC:\tempon Windows.
Administration Permissions
- On Windows systems:
- The setup will ask for Elevated Permissions
- On Unix systems:
- Root permissions are required when the JOC Cockpit is to be installed together with Jetty if the Jetty server is to run as a demon (i.e. the Jetty Server and JOC Cockpit are to be automatically started after a reboot of the machine).
- To install the JOC Cockpit without root permissions, the start script should be called with a
-uargument, otherwise the sudo prompt will ask for a password.
- To install the JOC Cockpit without root permissions, the start script should be called with a
- Root permissions are required when the JOC Cockpit is to be installed together with Jetty if the Jetty server is to run as a demon (i.e. the Jetty Server and JOC Cockpit are to be automatically started after a reboot of the machine).
Dialog installation
Dialog installation is started by clicking on the setup.sh or setup.cmd files in the unpacked download archive.
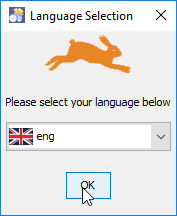
Language Selection
Select the language to be used for the setup: English and German are available.
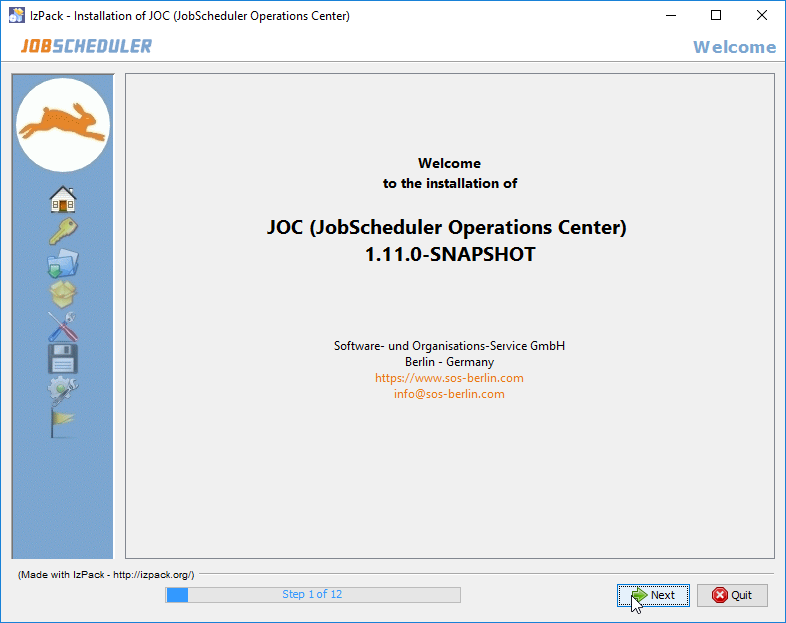
Step 1 - Welcome Screen
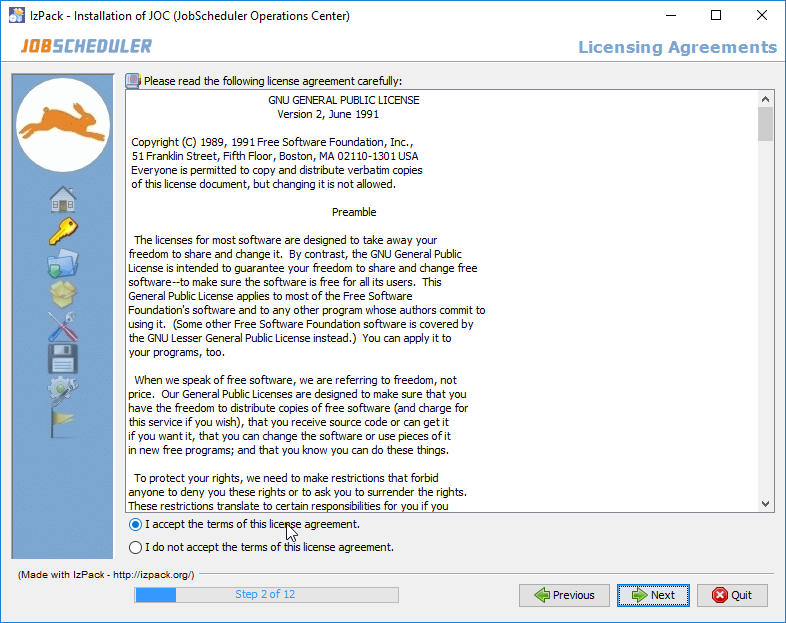
Step 2 - Licensing Agreement
The License Agreement shown in Step 2 of the installation has to be accepted before installation can take place.
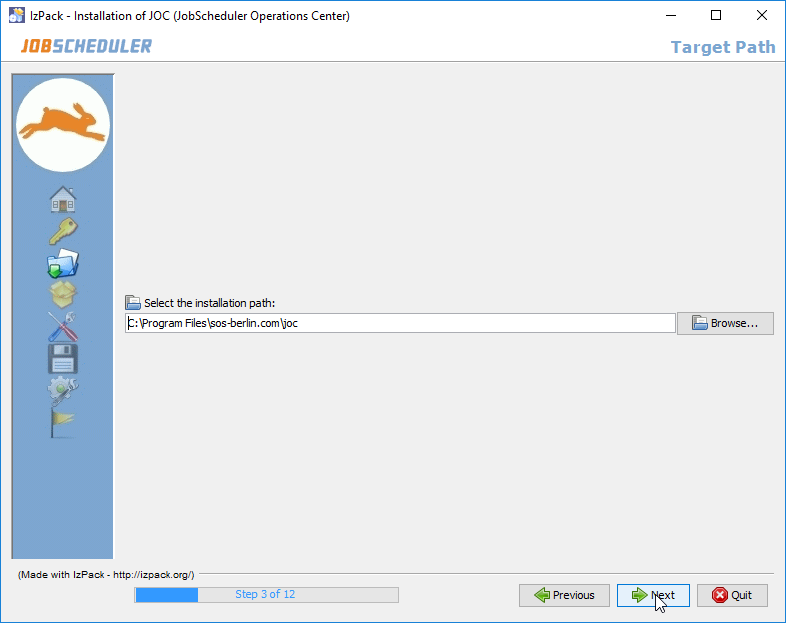
Step 3 - Target Path for the Installation
- The path to the installation directory for the JOC Cockpit program files - referred to later in this page as the joc_installation_directory - is set in this step.
The default installation paths for the JOC Cockpit are:
/opt/sos-berlin.com/jocon Linux systems andC:\Program Files\sos-berlin.com\jocon Windows.
- Users can use the Step 3 installation form shown below to specify their own installation path for the JOC Cockpit if required.
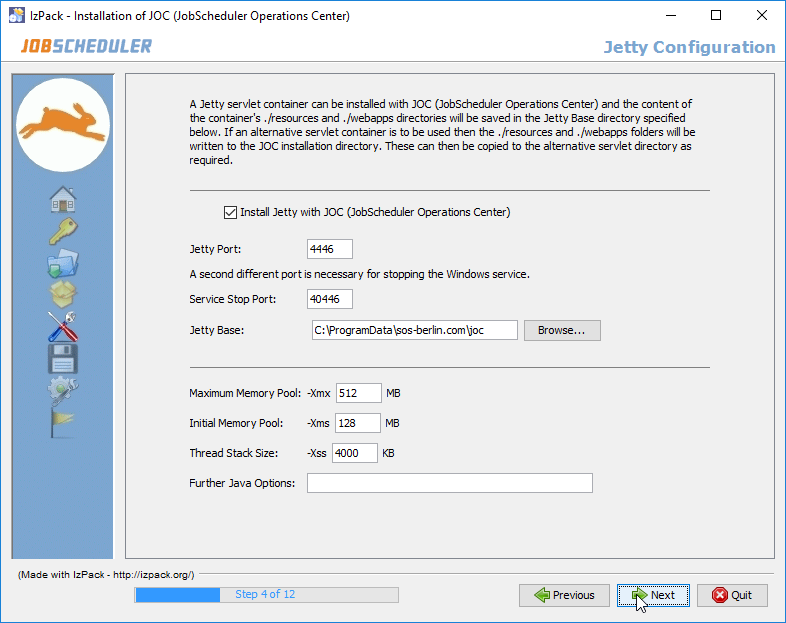
Step 4 - Jetty Installation & Configuration
- The JOC Cockpit requires a Java-capable web server and comes with a Jetty server. Step 4 allows system administrators to specify whether this web server is to be installed and if so, to specify its configuration - i.e. the port(s) it uses, installation path, memory pool, etc..
- The Install JOC ... including Jetty checkbox specifies whether the Jetty web server should be installed.
Default Paths
- While the Jetty web server delivered with the JOC Cockpit is installed in the joc_installation_directory, which was configured in the previous step - the Jetty configuration files are installed in the jetty_base directory. The Jetty Base field in the form shown in the screenshot can be used to set the jetty_base directory.
- The default path to the jetty_base directory on Linux systems leads to the user's home directory:
- e.g.
/home/sos/sos-berlin.com/joc
- e.g.
- Log files are saved by default in:
/var/log/sos-berlin.com/jocon Linux systems.
- The default path to the jetty_base directory and log files on Windows systems is:
C:\ProgramData\sos-berlin.com\joc.
- The default path to the jetty_base directory on Linux systems leads to the user's home directory:
- Note that if If the Jetty delivered with the JOC Cockpit is not to be installed and either an alternative Jetty installation or another web server is to be used, then relevant configuration files for such a server such as the
shiro.iniandjoc.propertiesfiles will still be written to the file system. These files can then be moved by the system administrator to the suitable location for their web server as required. See the Configuration with Alternative Web Servers section below for more information.
Step 5 - Specify the Reporting DBMS
Choose the DBMS to be used by the JOC Cockpit for the Reporting Database.
Caution: the order in which the Reporting and JobScheduler Databases are configured is the opposite to that used in the installation of the JobScheduler.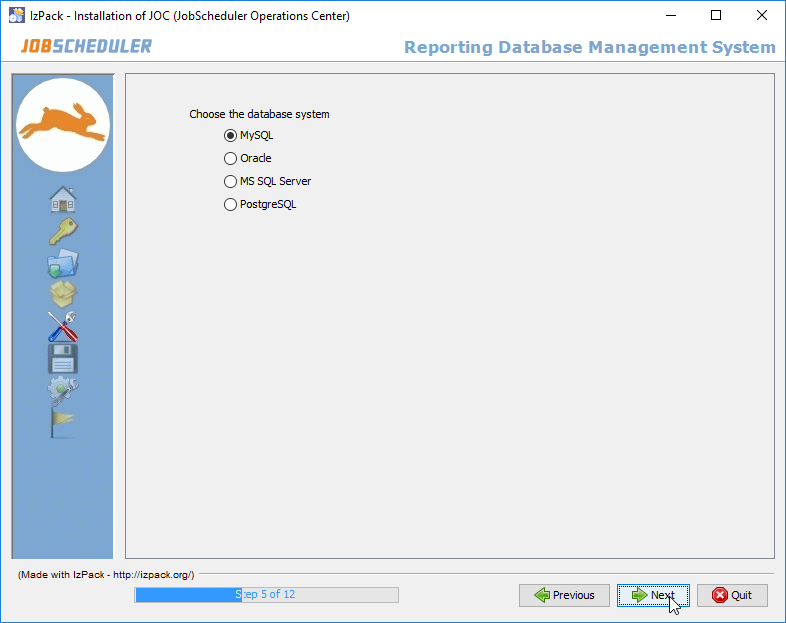
Step 6 - Configure the Reporting Database Connection
Specify the parameters for the connection to the Reporting Database.
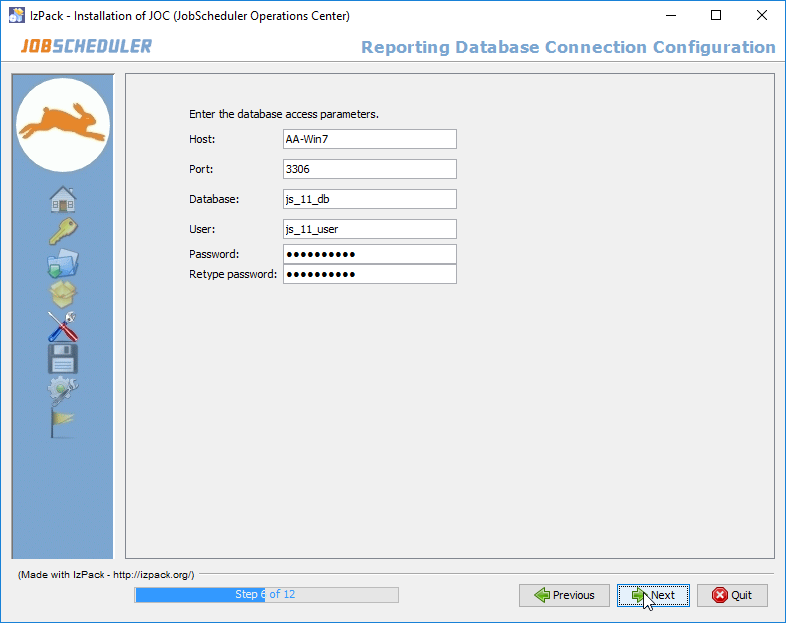
It will be probably be obvious from the names given to the parameters in the screenshot above that the values are for a database to be used by the JobScheduler. In this case the Reporting Database Tables will be integrated in the JobScheduler Database. This will be described in the next step.
The database configuration for the JOC Cockpit is written to an XML file during installation and saved in the
jetty_base/resources/jocfolder.
The default name of the database configuration file is:reporting.hibernate.cfg.xml
This file can be modified at a later date if required using a text editor. The JOC Cockpit service will then have to be restarted before changes made to this file are implemented.
The name and location of the database configuration file itself is specified in the
joc.propertiesfile, which can also be found in thejetty_base/resources/jocfolder.
Step 7 - Specify the JDBC Driver for the Reporting Database Connection
- Specify if an JDBC driver provided with the installation should be used for the Reporting Database Connection or whether an external driver is required.
The information shown in this form depends on the DBMS previously selected:- The jTDS JDBC
®driver delivered with the JobScheduler is only shown as an option when Sybase® or Microsoft SQL Server® DBMSs have been specified. - If you have specified a MySql® DBMS then you will get a checkbox for specifying whether you want to use the MariaDB® JDBC® driver provided with the JobScheduler.
- If you do not check the jTDS JDBC® or the MariaDB JDBC drivers then you must enter your own JDBC® driver in the form shown below.
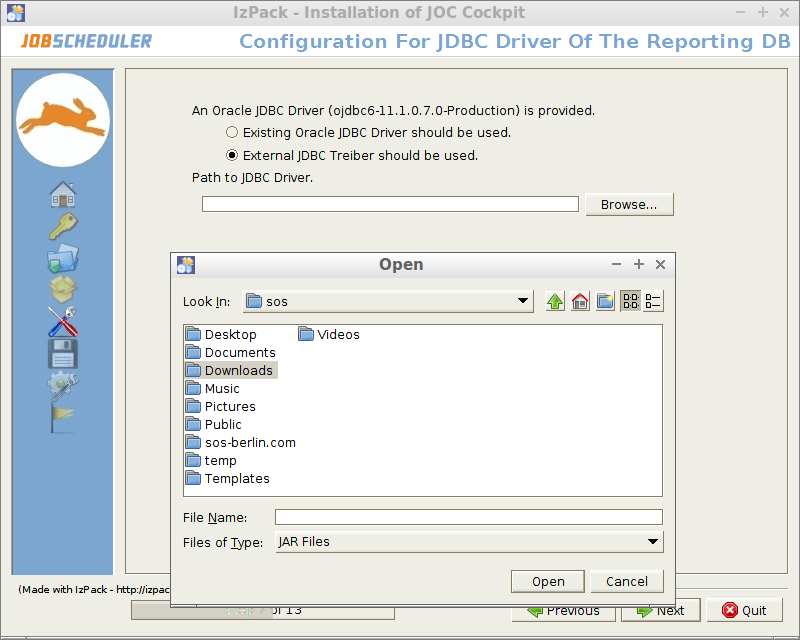
- The jTDS JDBC
Configuring the JDBC Driver-URL for Oracle RAC databases
The JDBC driver URL for Oracle RAC databases should be entered in the Host field of the database connection form. For example:
jdbc:oracle:thin:@(DESCRIPTION=(ADDRESS_LIST=(LOAD_BALANCE=OFF)(FAILOVER=ON)
(ADDRESS=(PROTOCOL=TCP)(HOST=tst-db1.myco.com)(PORT=1604))
(ADDRESS=(PROTOCOL=TCP)(HOST=tst-db2.myco.com)(PORT=1604)))
(CONNECT_DATA=(SERVICE_NAME=mydb1.myco.com)(SERVER=DEDICATED)))
In addition the Schema and Port fields should be left empty.
- Specify if an JDBC driver provided with the installation should be used for the Reporting Database Connection or whether an external driver is required.
Step 8 - Specify the Database Connection Used by the JobScheduler
Specify whether a separate connection it to be specified for the JobScheduler Database
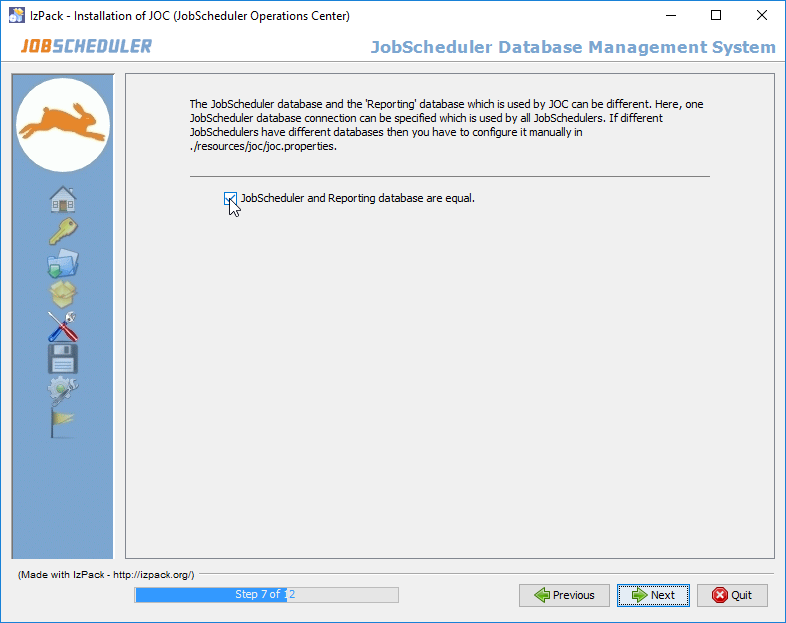
- If the JobScheduler(s) and JOC Cockpit share the same database then clicking Next will cause the Installation to proceed to Step 10. This step starts the installation process itself and changes to the configuration are no longer possible.
- If the JobScheduler(s) and JOC Cockpit use separate databases then the checkbox in the form should be deselected. In this case, clicking Next will cause the Installation to proceed to the specification of the DBMS and the connection parameters for the JobScheduler database, which are described next.
Step 9 - Specify the JobScheduler DBMS
- This form is identical to those already shown for the Reporting Database in Steps 5 to 8 above.
Step 10 - Configure the JobScheduler Database Connection
Specify the parameters for the connection to the JobScheduler Database.
- The DBMS type can be found in the database configuration for job history section of the
$JOBSCHEDULER_DATA/factory.inifile of one of the JobSchedulers to be operated from the JOC Cockpit, where$JOBSCHEDULER_DATAis defined in the JobScheduler Master Installation - 2 - Dialog Installation article.
- The DBMS type can be found in the database configuration for job history section of the
- The database configuration for the JOC Cockpit is written to an XML file during installation and saved in the
jetty_base/resources/jocfolder.
The default name of the database configuration file is:jobscheduler.hibernate.cfg.xml
This file can be modified at a later date if required using a text editor. A JOC Cockpit user will then have to log in again before changes made to this file are implemented.
The name and location of the database configuration file itself is specified in the
joc.propertiesfile, which can also be found in thejetty_base/resources/jocfolder.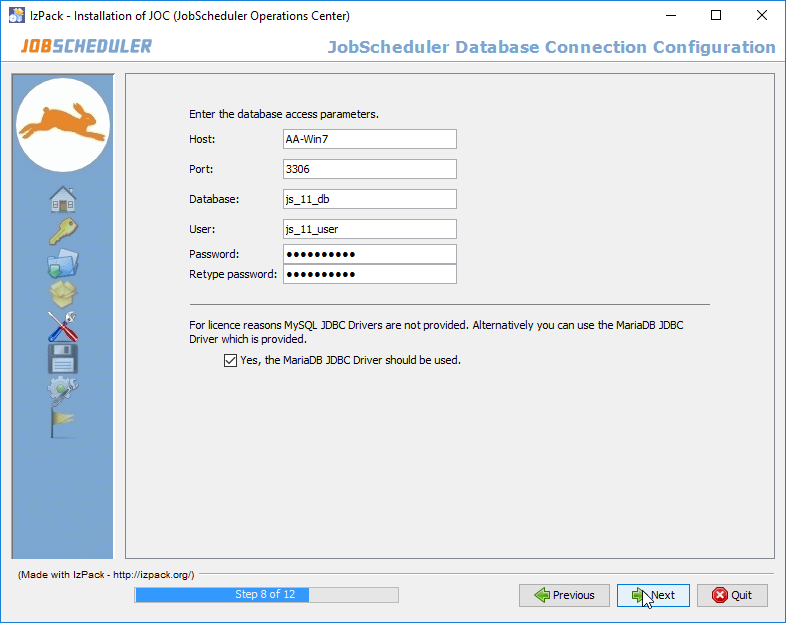
Step 11 - Processing the Installation
This step shows the progress of the first part of the installation procedure.
Changes to the installation configuration can no longer be made once this step has started.
Instead configuration files such as those in thejetty_base/resources/jocfolder can modified manually and then the JOC Cockpit restarted.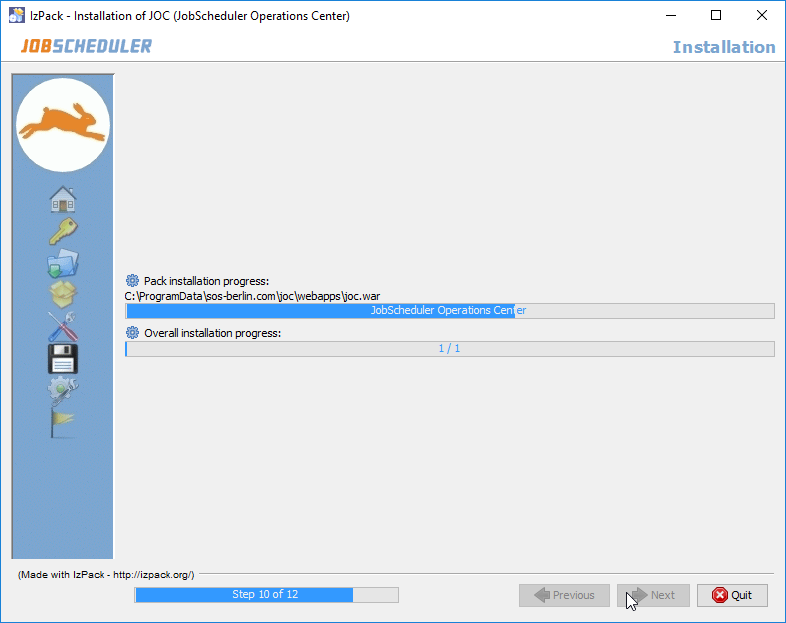
Step 12 - External Processes
This step shows the progress of the second part of the installation procedure.
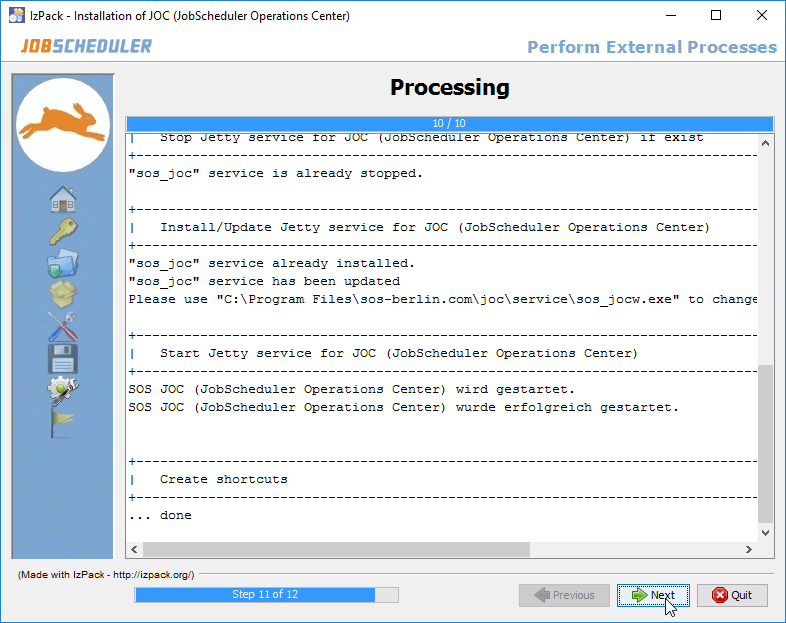
The information shown in this step will be written to the installation log file, which can be found in the
jetty_base/logsfolder
Step 13 - Completion
The last step of the installation shows a summary of the installation (success/error) and paths to relevant information.
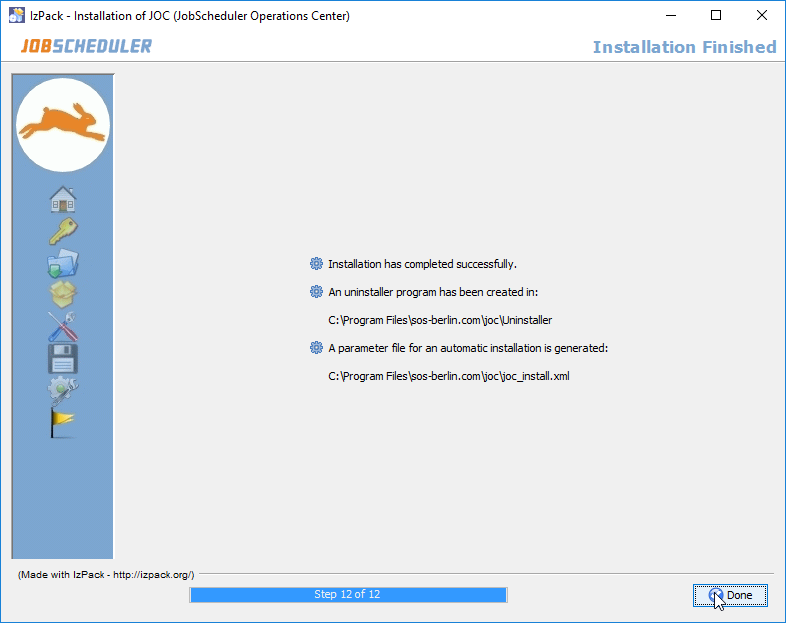
Note that if a problem occurs during installation a warning message will be shown here and a link to the installation log file will be provided.
Operation
- Go to the Initial Operation section of this article for information about opening the JOC Cockpit Interface.
Batch installation
Configuration
The joc_install.xml file has to be configured with parameters such as the installation path, database connections, etc. before installation can start.
The joc_install.xml file is shown in the code listing below. The extensive comments are intended to be self-explanatory.
Batch installation is started by opening a terminal or command window in the folder containing the setup.* file and typing:
- Starting batch installation of the JOC Cockpit on Linux systems with root permissions
/tmp/joc.[release]> ./setup.sh joc_install.xml
Starting batch installation of the JOC Cockpit on Linux systems without root permissions/tmp/joc.[release]> ./setup.sh -u joc_install.xml
- Starting batch installation of the JOC Cockpit on Windows systems
C:\temp\joc.[release]> setup.cmd joc_install.xml
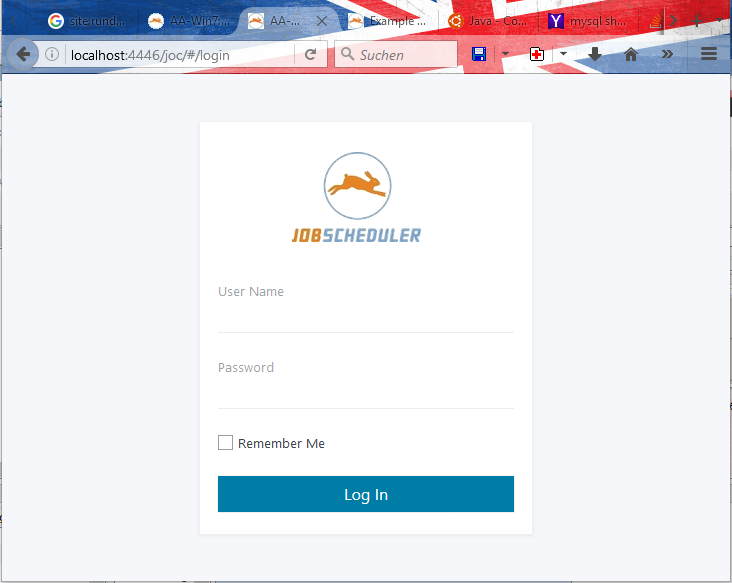
Initial Operation with the JOC Cockpit Login Form
Note that a functioning web server - either the Jetty provided with the JOC Cockpit or another - is required before the JOC Cockpit installation can be operated..
Call the JOC Cockpit login form in a web browser and enter the User Name and Password.
After a first installation of the JOC Cockpit the default User Name and Password of root:root and Shiro Authentication will be active, if changes have not been made to the
shiro.iniconfiguration file. Note that in the default configuration the root user is assigned the all role, which has all permissions available.See the Authentication and Authorization - Configuration article for information about the configuration of other user profiles and authentication methods.
Note that on some systems the web service may take a minute to start and display the login form shown below.
Operation from the Command Line
The default configuration for the Jetty server means that it automatically started with the operating system. However it can also be stopped and started from the command line.
On Linux systems
- In the folder:
/opt/sos-berlin.com/joc/jetty/bin
- Enter:
./jetty.sh stop|start
On Windows systems
- In the folder:
C:\Program Files\sos-berlin.com\joc\service
- Enter:
start_jetty_windows_service.cmd stop|start
Updating
Empty the Browser Cache after updating the JOC Cockpit
You should use Ctrl & F5 as well as emptying the browser cache before starting the JOC Cockpit after an update.
Installation Log Files
The JOC Cockpit configuration and installation log information are written to a new log file each time an installation or update is carried out. These log files can be found in the logs folder in the jetty_base directory.
Installation log files are named according to the pattern Install_V[release]_[date&time]_....log where release is the version release number and date and time refer to the installation.
Deinstallation
The JOC Cockpit can be uninstalled using the uninstall.cmd and uninstall.sh scripts saved in the folders:
- on Linux systems:
/opt/sos-berlin.com/joc/Uninstaller
- on Windows systems:
C:\Program Files\sos-berlin.com\joc\Uninstaller
Windows systems
Starting the uninstaller will open the following form on Windows systems: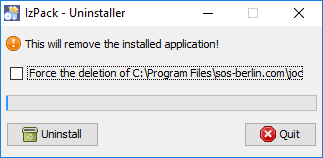
Ticking the "Force the deletion of C:\Program Files\ ...." checkbox will cause the uninstall script to remove both the program and configuration files and folders.
If the checkbox is not selected then configuration files will be left in both the JOC Cockpit installation folder and in the Jetty web server installation folder (if installed with the JOC Cockpit).
On Linux systems
Make a Backup!
The uninstall script on Linux systems will not open a dialog box. Instead an uninstall script will start the Uninstaller and remove both the program and configuration files and folders.
These files contain the configuration information from the last JOC Cockpit and Jetty web server installations.
Files that are not removed during a normal uninstall (i.e. when the checkbox is not ticked) are noted in the File Structure section of this article below.
Configuration with Alternative Web Servers
The JOC Cockpit installation procedure contains the option of installing and using the Jetty Web Server that is included in with the JOC Cockpit installation archive. This option was configured in Step 4 of the installation procedure described above. An alternative web server that is capable of handling Java web applications, such as Tomcat or another web server, can also be used.
If the Jetty provided with the JOC Cockpit is not to be installed, the installation program will look and see if a jetty_base shortcut from a previous installation is to be found in the jetty_home directory. Particularly relevant for system administrators would be the shiro.ini file (containing authentication and authorization information) and the joc.properties file (containing database configuration information).
- If configuration files are found then these will not be overwritten or removed.
- Default configuration files will be written to the file system in the
joc_homedirectory. - System administrators can then move the configuration files to the appropriate application directory as required.
See also links in the References section below.
Location of the resources/joc folder with a fresh installation
With a fresh installation, the installer will not find an existing Jetty and will save the resources directory by default as follows:
- on Linux systems:
/opt/sos-berlin.com/joc/resources/joc
- on Windows systems:
C:\Program Files\sos-berlin.com\joc\resources\joc
Location of the resources/joc folder after an installation on top of a JOC Cockpit installation with Jetty
If the JOC Cockpit is being installed without the included Jetty but on top of an installation that has included the JOC Cockpit Jetty then the resources\joc folder will not be moved from its location. This means that the "new" resources folder will be found after the new installation as follows (if the original installation was carried out in the default directory):
- on Linux systems:
/opt/sos-berlin.com/joc/resources/joc
- on Windows systems:
C:\Program Files\sos-berlin.com\joc\resources\joc
In this situation the shiro.ini and joc.properties file from the earlier installation will not be overwritten.
The "old" hibernate.cfg.xml database configuration file will be read during the installation and the settings suggested as default values. The file itself will be deleted and a new onw saved in the joc_home directory.
An update of the JOC Cockpit will neither overwrite the new or old configuration files. However new versions of the joc.properties and shiro.ini files named joc.properties-example and shiro.ini-example will be written to the resources\joc folder, alongside the originals.
File Structure
The following listings should make clear the changes that occur in the JOC Cockpit file structure during installation and deinstallation.
Windows Systems
Default File Structure if Jetty is Installed
If the Jetty web server provided with the JOC Cockpit is installed then files will be added by default in the ProgramData\sos-berlin.com\joc and Program Files\sos-berlin.com\joc directories.
ProgramDatasos-berlin.comjocjoc_home(symlink, remains after uninstall)logs(directory with files, remains after uninstall)resources(remains after uninstall and (empty) after full uninstall)jocjobscheduler.hibernate.cfg.xml(remains after uninstall if modified)joc.properties(remains after uninstall)log4j.properties(remains after uninstall if modified)reporting.hibernate.cfg.xml(remains after uninstall if modified)shiro.ini(remains after uninstall)shiro.ini-example(only added ifshiro.inifile is found)
temp(directory with files, remains after uninstall)webappsstart.ini(file, remains after uninstall)
Program Filessos-berlin.comjocinstall(directory with files)install_jetty_base.cmdupdate_jetty_base.cmd
jetty(directory with files)jetty_base(symlink)serviceUninstaller(directory, the empty remains after uninstall and full uninstall)uninstall.cmduninstaller.jar
.jocinstallinformation(file, remains after uninstall)joc_install.xml(file, remains after uninstall)
Default File Structure if Jetty is not Installed
If the Jetty web server provided with the JOC Cockpit is not installed and no previous configuration files are found in the Program Files\sos-berlin.com\joc directory then files will be added by default only in the Program Files\sos-berlin.com\joc directories.
If configuration files are found in Program Files\sos-berlin.com\joc directory then files will be added in the ProgramData\sos-berlin.com\joc and Program Files\sos-berlin.com\joc directories as described above.
Program Filessos-berlin.comjocinstallinstall_jetty_base.cmdshortcut.vbssleep.exeupdate_jetty_base.cmd
logs- Install_ ... .log (files will remain after uninstall)
resourcesjocjobscheduler.hibernate.cfg.xml(remains after uninstall if modified)joc.properties(remains after uninstall)joc.properties-example(only added ifjoc.propertiesfile is found at installation start)log4j.properties(remains after uninstall if modified)jobscheduler.hibernate.cfg.xml(remains after uninstall if modified)shiro.ini(remains after uninstall)shiro.ini-example(only added ifshiro.inifile is found at installation start)
serviceamd64(directory)ia64(directory)manager(directory)x86(directory)install_jetty_windows_service.cmdLICENSE.txtNOTICE.txtRELEASE-NOTES.txtset_java_home_for_jetty_windows_service.cmdstart_jetty_windows_service.cmduninstall_jetty_windows_service.cmd
Uninstaller(the empty directory remains after uninstall)jobscheduler.icouninstall.cmduninstaller.jar
webappsjoc.war
.jocinstallinformation(file, remains after uninstall)joc_install.xml(file, remains after uninstall)
Clustering and Redundancy
Multiple instances of the JOC Cockpit, with each instance running on its own server, can either be installed as an active cluster or redundantly. In both cases, installation of the JOC Cockpit instances follows the standard procedure described above. The configuration of the JOC Cockpit instances then follows the instructions provided in the Authentication and Authorization - Configuration article.
The JOC Cockpit - Clustering article provides more general information about installing and configuring multiple instances of the JOC Cockpit.
JOC Cockpit Configuration
The joc.properties File
The main configuration information for the JOC Cockpit can be found after installation in the joc.properties file.
This file is not changed during an update of the JOC Cockpit.
The default location of this file after installation is the resources/joc folder.
Detailed descriptions of each parameter are included in the file and are intended to be self-explanatory.
Explanations
https_with_hostname_verification
This setting should be considered carefully. Effectively it forces the host name in an HTTPS connection to a JobScheduler Master to be verified from the host's certificate. This guarantees that the certificate has been created for the respective host (FQDN).
- With this setting being assigned the value
falseno host name verification takes place and the HTTPS connection is vulnerable to man-in-the-middle attacks.
configuration_file
This file is used for configuration details that are independent from the JOC Cockpit installation, see chapter The
joc.configuration.propertiesFile.
truststore_path, truststore_type, truststore_password
A trust store is used if an HTTPS connection between clients, e.g. user browsers, and JOC Cockpit is used. For details see the JOC Cockpit - HTTPS Authentication article.
force_comments_for_audit_log
Comments can be added whenever an operation is performed that modifies a JobScheduler object, e.g. if a job or job chain is started.
- Basically a user can choose in his profile to add comments which pops up a dialog box to select or enter a comment. If this profile setting is not active then a number of operations, such as starting a job, are performed immediately without additional dialog.
- With the
force_comments_for_audit_logsetting in place all users are forced to add a comment when modifying a JobScheduler object - independent of their profile settings.
custom_logo_name, custom_logo_height, custom_logo_position
The custom logo is displayed on the login page.
- JOC-473 - Getting issue details... STATUS
default_profile_account- The user profile of the account specified for this setting provides the default values for the profiles of new users.
- An account is specified exactly as the user would type for login. If LDAP Configuration is in place then the domain account is specified, optionally including the domain, e.g.
domain\accountoraccount@domainor by use of thesamAccountNameor the respective LDAP attribute configured by the JOC Cockpit administrator. - JOC-477 - Getting issue details... STATUS
comments- Add/modify/replace items to the list of comments in any language.
- Each comment ends with a semicolon. If comments are to follow then the line for the current comment ends with a backslash.
The joc.configuration.properties File
This file is used for configuration details that are independent from a JOC Cockpit installation.
This file is not changed during an update of the JOC Cockpit.
The default location of this file after installation is the resources/joc folder.
Detailed descriptions of each parameter are included in the file and are intended to be self-explanatory.
Explanations
jobscheduler_url_<host>_<port>- This setting is used if a JobScheduler Master is operated, e.g. in a Docker environment, without DNS support and requires URL mapping.
- On startup of JobScheduler Master it will propagate its hostname and port to the Reporting Database.
- If this hostname is not publicly known in the network, e.g has not been added to the DNS, then JOC Cockpit cannot address the JobScheduler Master.
- This setting allows to map the URL reported by the Master to the Reporting Database to a URL that is accessible by JOC Cockpit, e.g. a URL that includes an IP address.
Database Configuration Files
Once the JOC Cockpit has been installed, the configuration for each database connection will be stored in a hibernate configuration file as follows:
- JobScheduler Database Connection:
/resources/joc/jobscheduler.hibernate.cfg.xml
- Reporting Database Connection:
/resources/joc/reporting.hibernate.cfg.xml
The following listing shows a typical hibernate database configuration file (here for the JobScheduler database connection)
The locations of these files is specified in the joc.properties file.
Log Configuration File
The logging configuration for the JOC Cockpit is saved during installation to a log4j.properties file, which can be found in the the resources/joc folder.
The following listing shows the default log configuration for the JOC Cockpit:
The most likely configuration change users are likely to make would be to:
- the log levels, which are set in lines 3 - 5, and
- the Audit Log file name, which is set in the last line.
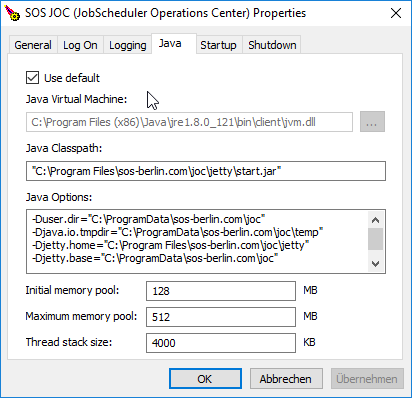
Java Options for Jetty
The Java option values for Jetty are stored after installation:
- on Linux systems in the directory:
/etc/default/jocif the installer was executed by the root account./home/<user>/jocrcif the installer was executed by a user account (./setup.sh -u <user>).- On startup JOC Cockpit will check the
/home/<user>/jocrcfile and only if this cannot be found it will check the/etc/default/jocfile.
- on Windows systems in the Registry under:
HKLM\SOFTWARE\WOW6432Node\Apache Software Foundation\Procrun 2.0\sos_joc\Parameters\Java
- Java Memory options can also be configured by opening the
sos_jocw.exewhich can be found in thejoc_home\servicedirectory.
Further Resources
Installation with Other Application Servers:
- Tips from a user on Installation with Tomcat