Introduction
- Identity Services implement Authentication Methods and access to Identity Providers, for example, credentials such as user account/password are used as an Authentication Method to access an LDAP Directory Service acting as the Identity Provider, see JS7 - Identity and Access Management.
- JOC Cockpit implements a pluggable architecture that allows to add Identity Service products with future JS7 releases.
- For compatibility reasons early releases of JS7 include the Shiro Identity Service, see
- FEATURE AVAILABILITY ENDING WITH RELEASE 2.3.0
Manage Accounts, Roles and Permissions
After installing the JOC Cockpit log in with the default root user account and root password that are available from the JS7 - JOC Identity Service. This Identity Service is active by default.
To manage accounts, roles and permissions from any JOC Cockpit page use the user menu in the right upper corner and select Manage Identity Services:
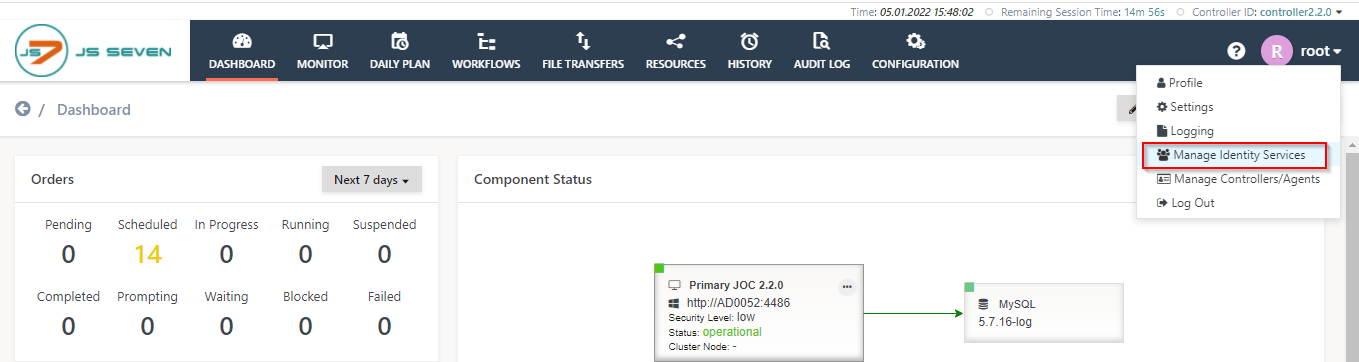
The Manage Identity Service page holds the list of the available Identity Services. By default the list is populated from the JOC Identity Service. Users can add new Identity Services to this list. From here you can select the Identity Services to manage the accounts inside it. Select the JOC from the list.

The JOC Identity Service page offers three sub-tabs:

Explanation:
- Accounts: for the configuration of User Accounts. Accounts configured in the Database and access from there only.
- Manage Roles: for the configuration of Roles that include Permissions to access JOC Cockpit and Controllers.
- Permissions: a sub-view offered to configure access to Folders and Role Permissions.
- Profiles: from this sub-view details about the last login can be checked.
These tabs will be described in the following sections.
The Accounts sub-view
The Accounts sub-view is displayed when a user selects the Identity Service from the Identity Management Service page and lists all the User Accounts that have been configured along with their Roles.

The above screenshot shows the test User Account that is manually created and assigned the role.
The Create Account button can be used to open a popup window to add a new User Account.
- The additional options (ellipsis) symbol allows an Account to be edited (change the Account Name and/or Password, select/deselect Roles) and to be copied or deleted.
- Clicking on the Account Name brings the user to the Manage Roles tab (described below) where the Controllers and Role(s) allocated for the User Account can be edited.
The Manage Roles sub-view
The main purpose of the Manage Roles tab is to allow Controller Roles and any Controller which these Roles will be restricted to be configured.
When the tab is first opened after installation of the JOC Cockpit it will be blank and no roles are created by default. In the below screenshot you can see test-role created manually.

Roles contain default in the Controller which means the role is available for all the Controllers - the default setting.
If the Manage Roles tab is opened by clicking on an Account Name in the Accounts tab (described in the previous section), the Manage Roles Tab will show those Roles that have been assigned to that Account. The Account that is active is shown in the Account button, which can also be used to select and deselect Accounts.
Positioning the mouse over a role name blends in two links as shown in the screenshot above:
- the pencil link allows the role to be edited and
- the X link allows the role to be deleted.
A set of Permissions is configured for each role. Each Permissions set can be inspected by clicking on the default from the list of roles, which will open the Permissions tab for the Role. An example Permissions set is described in the next section. A matrix showing the default Roles and their Permissions along with a description of the Permission is provided in the JS7 - Permissions article.
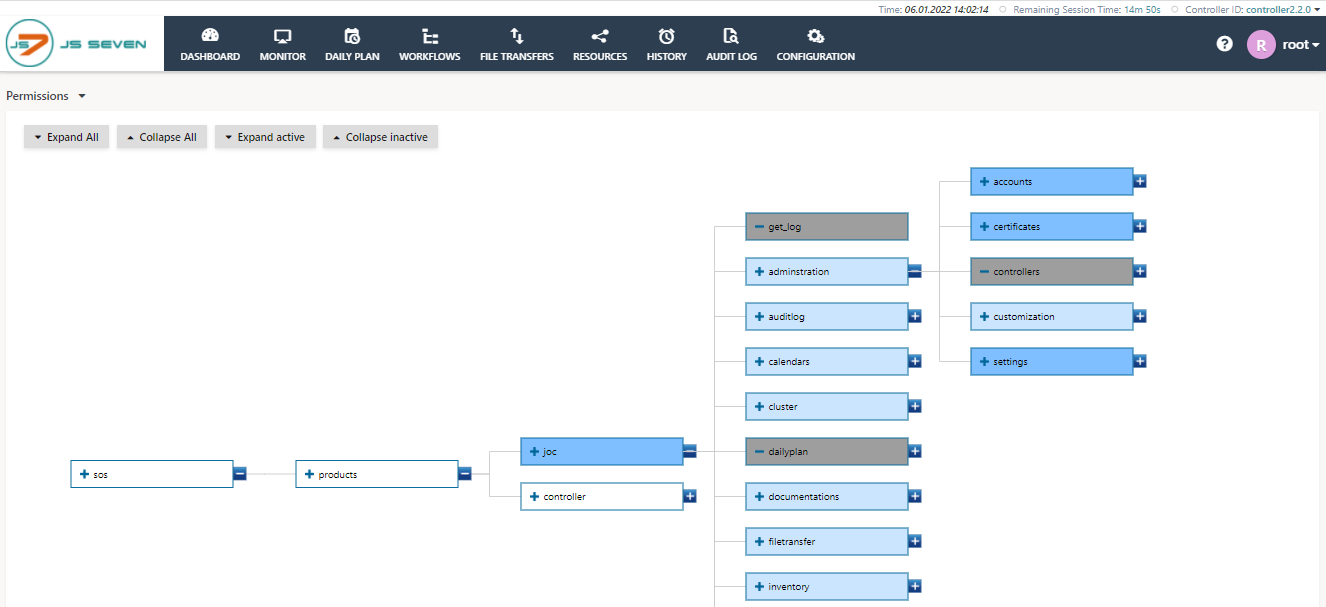
The Permissions Sub-view
The main purpose of the Permissions view is to allow Folders and Permissions to be configured for each Role.
Folder Selection
Folders are added using the Add Folder button shown in the background of the screenshot below, at the top right.

Folders themselves are selected from a simple tree view of the folders. This tree view is opened by clicking on the folder symbol shown in the screenshot.
Permissions Configuration
Two editors are available for configuration of permissions added to a Role:
- A graphical editor is available as visible from the following screenshot:
- Explanation:
- Changes to the Permissions tree are stored to the JS7 database.
- The Undo button allows the last 10 changes to be undone stepwise.
- Any changes held in the Undo button will be deleted when the Permissions sub-view is left.
- The Redo button changes the Permissions tree back to the initial state when the Permissions sub-view was displayed.
- The state held with the Redo button is deleted when the Permissions sub-view is left.
- Clicking on the middle of a Permission icon will grant the Permission for the current Role.
- Granted Permissions have a blue background and are by default recursive.
- The "+" and "-" symbols at the right edge of each permission icon open and close child branches.
- The "-" and "+" symbols at the left edge of each permission icon are used to recursively revoke permissions that are located deeper in the permissions tree.
- Permissions that are affected by revoked permissions are displayed with a gray background
- Explanation:
- A list editor is available as displayed with the following screenshot:

- Explanation:
- Individual Permissions can be modified and removed from the Role using the pencil and X symbols that are blended in when the user's mouse is moved over a Permission:
- The Edit function allows the Permission to be made subtractive - i.e. for permission granted at a higher level to be removed.
- The Folder part of the view is for restricting the Role to accessing particular Folders - and thereby particular workflow.
- Explanation:
Configuration
Manage User Accounts and Roles
administrators create and configure User Accounts and Roles, for example, to limit access to resources such as workflows and logs.
It is often easier to create Manage new Roles, assign Permissions or Folders to these Roles and then create new User Accounts and assign Roles to them.
Creating a new Role
- Roles are created in the Manage Roles sub-view using the Add Role button:

- Once a Role has been created it will be automatically added to the list of Roles displayed in the background of the above screenshot.
Configure Permissions and/or Folders for the Role
- Now expand the Role using the arrow button click on the default (blue link) to add Permissions and/or Folders in the Permissions tab. The Procedures available for adding and editing Permissions and Folders are described in the Editing User Permissions and Folders sections below.
- Note that Roles that neither have Permissions or Folders assigned to them are deleted automatically when the Manage Identity Service view is left.
Create a new User Account
- After Permissions / Folders have been configured select the Accounts tab to create a new User Account and allocate one or more Roles to this Account.

- The Edit Account function is accessed by clicking the relevant Action symbol (ellipsis) in the Actions column of the User Accounts list (visible in the background of the above screenshot). This can be used to change the Password, the Account name and add or remove Roles.
- Note that deselecting a Role in this modal window 'uncouples' the Role from the User Account - it does not delete the Role.
Manage User Permissions
Permissions Structure
Permissions are organized in a hierarchical way:
- A Role with the Permission
sos:products:controller:view'only' allows a User to view Controllers, while a user with the 'higher'sos:products:controllerpermission is able not only to view Controllers but is able to carry out additional operations - in this case, view, restart, terminate, and switch_over. - The JS7 - Permissions article contains a link to a full list of all Permissions that can be granted.
Editing Permissions
Consider any user have a role(demo-role) with the following permission:
sos:products:controller:view
This permission does not allow the demo-role to perform the operation on the Controllers. These Permissions could be granted individually with the following:
sos:products:controller:restartsos:products:controller:terminate
The following Permissions can be set to allow the demo-role Role to view, restart and terminate the Controller, but not Switch_over:
sos:products:controller:viewsos:products:controller:restart
Alternatively, it may make sense in some situations to grant the Role a higher level of Permission and then remove one or more specific Permissions. This approach is shown in the following combination:
sos:products:controller
-sos:products:controller:switch_over
where the ...sos:products:controller Permission is an overall 'Controller' Permission covering view, restart and terminate, and the - Permission is removed from the demo-role Role.sos:products:controller:switch_over
Caution
Users should have Role with the following Permission - or higher - before they are able to log into the JOC Cockpit:
sos:products:joc:administration:controller:view
Editing Procedures
Three editing procedures are available for editing Permissions:
Adding Permissions:
- The Add Permission button in the Permissions View allows a Permission to be selected from a list of all available Permissions as shown in the screenshot below.
- Note that the Permissions listed are all individual Permissions. They can be edited to make them higher level / less specific.
- For example, the screenshot below shows that the
...administration:controller:viewpermission in the process is selected.
- Selected permission can also be made subtractive - i.e. to remove a specific part of a higher level Permission.
- This is done by ticking the Excluded checkbox, which is obscured in the above screenshot.
- For example, the screenshot below shows that the
- Note that the Permissions listed are all individual Permissions. They can be edited to make them higher level / less specific.
- The Add Permission button in the Permissions View allows a Permission to be selected from a list of all available Permissions as shown in the screenshot below.
Modifying Existing Permissions:
- The pencil symbol is shown alongside existing Permissions in the Permissions view (shown in the screenshot above) can be used to change the function of a Permission in a Role - to make an additive Permission subtractive and vice-versa. It cannot be used to edit a Permission.
- The X symbol shown alongside existing Permissions in the Permissions view can be used to remove an existing Permission from a Role.
- Note that a Role must be configured to have either a Permission or a Folder or it will be deleted.
- Note that if a user does not have the following permission or higher they will not be able to log into the JOC Cockpit interface:
sos:products:joc:administration:controller:view
Graphical Permissions Editing:
- The Graphical Permissions Editor is activated by selecting the 'Tree' symbol at the top right of the Permissions section:

- The editor opens with a partially collapsed permissions tree as shown in the next screenshot:

- The Expand All button (shown in the above screenshot) can be used to open all the tree elements.
- Navigation is carried out by dragging & dropping the tree view.
- The functions available for the tree elements are (with reference to the screenshot below):
- Select / Unselect a Permission - click on the body of an unselected / selected element
- Selected Permission elements are shown in blue (see the view element in the screenshot)
- Children of selected Permission elements are shown in light blue (as shown in the screenshot)
- Select / Unselect a Permission - click on the body of an unselected / selected element
- The Graphical Permissions Editor is activated by selecting the 'Tree' symbol at the top right of the Permissions section:
- Negate a Permission - click on the plus sign at the left hand end of the element
- Remove a Permission Negation - click on a - sign at the left hand end of the element
- Show / hide child elements - click on the + / - symbols at the right hand end of an element
- In the following screenshot the administration element has been selected, automatically selecting the administration:accounts, administration:certificates, administration:controllers, administration:customization, administration:settings
- In addition, the controllers:manage child permission has been negated, meaning that only the controllers:view is active.

Manage Permissions specific for a Controller
By default User Accounts are granted permissions for all Controllers and Controller Clusters in a scheduling environment. Permissions that are applicable to a particular Controller or Controller Cluster only can be added to a role. This can be achieved in the Manage Roles sub-view of the Identity Management Service for JOC.
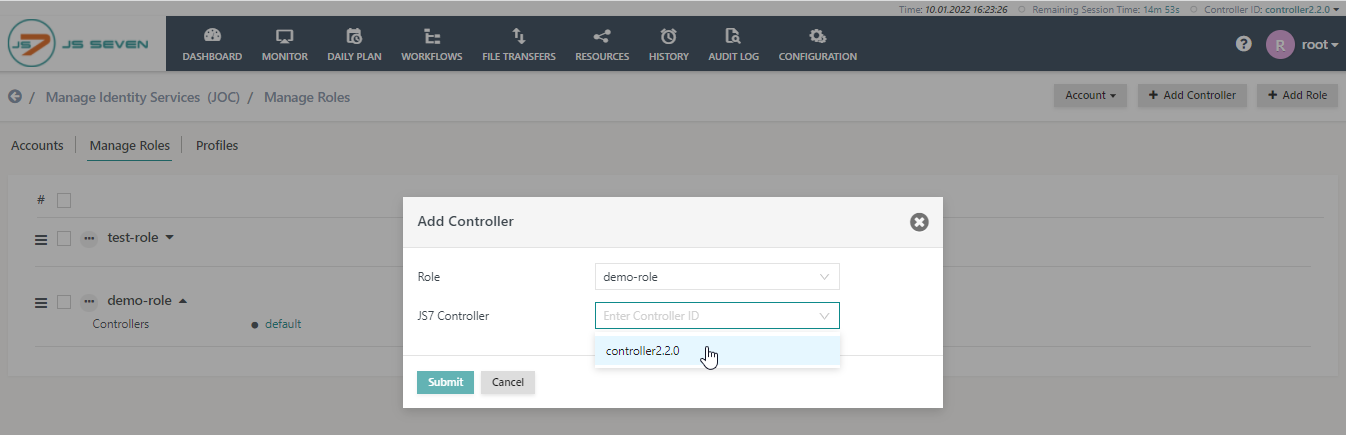
In the screenshot, the demo_role Role has been assigned for the controller with the ID controller2.2.0. and will appear in the list of the role as shown.
In this configuration, the demo_role will not yet have any Permissions that are specific to the controller2.2.0. At least one Permission needs to be added before the controller2.2.0 - demo_role configuration will be permanently saved.
The interaction of default and controllers-specific Permissions within the same Role can be illustrated as follows.
- default Permissions:
sos:products:controller:view
- Master-specific Permissions:
sos:products:controller:agents:view
The dashboard view for all controllers in the environment will show the status of the current controller but the status of Agent Clusters will only be shown for the specified controller - in this case controller2.2.0.
Manage Folder Permissions
Folders are used to restrict access to objects such as workflows and schedules. For example, users can be restricted to access objects for particular mandators / clients only.
By default permissions are granted for all folders. However, Roles can be restricted to access specific folders only.
This is achieved by adding a Folder Permission, i.e. permissions to view the content of a specific folder only. With a Folder Permission being in place the permission to access other folders is automatically revoked.
Granting Folder Permissions
Folder Permissions are granted in the Permissions sub-view. Note that before Folder Permissions can be assigned a Role, the Role has to be specified for a User. In the example below, a test user and demo_role have already been configured and the demo folder created on the file system.
To open the Permissions sub-view for a specific Role, first open the Manage Identity Services page for JOC, switch to the Manage Roles sub-view and select the Role that should be assigned Folder Permissions. For assignment click on the name of the Role in the list of Roles.
Click on the Add Folders button and in the Add Folders popup window select a root level folder or sub-folder such as /demo/*. or demo/.
Check the Recursive checkbox in the Add Folder popup window if recursive access to sub-folders is required and click the Submit button.
Any user that is assigned the demo_role will be able to access scheduling objects in the demo folder only.
Note that the test user will be able to log in to the JOC Cockpit without being assigned a Role, however, no menu items and no functionality is offered from the GUI. A minimum permission is required e.g. by a Role that grants the following permission:
sos:products:controller:view
Overview
Content Tools