Mohit Shivhare
Introduction
The SOS website offers the Try Out option form to request an immediate demo for product JS7. When requesting the demo you will receive a welcome e-mail that includes an invitation link and credentials to access the JS7 demo.
After clicking the Try-Out: Login to JS7 link from the welcome e-mail, you will be redirected to the Login window of JOC Cockpit. Use the account and password that you received with the welcome e-mail and log in to the JOC Cockpit window.
After login, you will be presented the initial view, which is referred to as the DASHBOARD, for explanations see Dashboard View. The Dashboard gives a bird's eye view of the JS7 operational status.
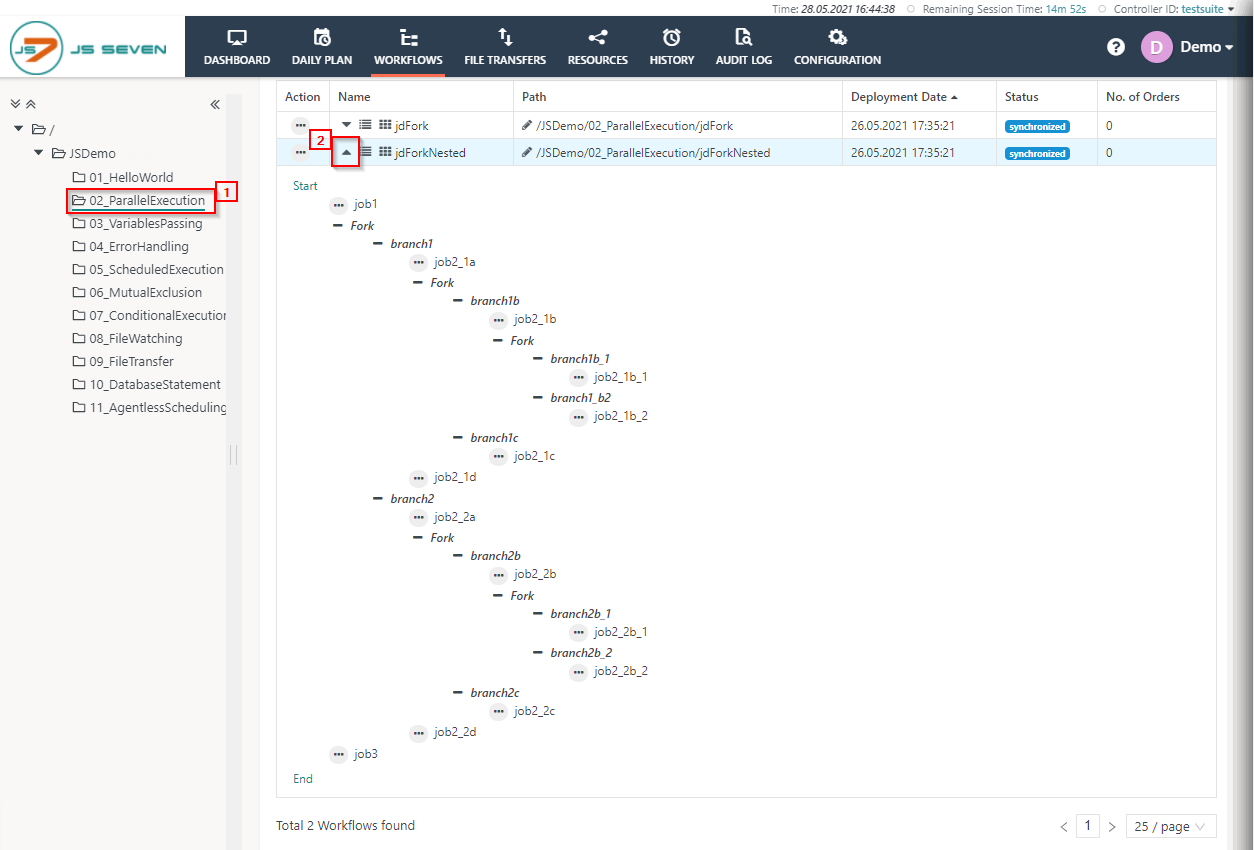
To run Workflow from the JOC Cockpit, you need to switch to the WORKFLOWS view. From the left panel, you can see the folder tree structure expand the folder by clicking the arrow.
After expanding the top folder, all the show sub-folders will display, each folder contains one or more workflow.
All examples in the demo environment follow the same pattern. Each job chain demonstrates a different JS7 feature.
Shell Script Workflow
The example 01_HelloWorld demonstrates the JobScheduler's capability to execute the shell jobs.
- To start the HelloWorld example, click on the 01_HelloWorld. From the right panel, you can see the workflow list, e.g. jdHelloWorld.
- Click on the arrow button to expand the workflow and view the number of jobs available in the workflow.

- 01_HelloWorld: the workflow includes a single job with a shell script as executable.

- To execute the workflow 01_HelloWorld click on the action menu of the workflow a drop-down menu will appear. Click on the Add Order button

- On clicking the Add Order. A popup window will appear.
- You can add the Order ID or leave the Order Id value blank it will take the default Order Id to process the Order. Click on Submit button.

- To check the status of the Order click on the Workflow name with this new Order history panel will appear.

- From the Order history panel, you can see the Order is successful and finished. Click on the Order ID to open the detail logs of execution.

- A log window will open and the order log will be displayed. The order log contains log output from all jobs executed by the order.
- You can download the log file by clicking the Download button from the upper right corner of the log window.

Parallel Execution
The JS7 - Fork / Join Instruction is used to execute the jobs in parallel within a workflow. Fork instruction allows the creation of a parallel number of branches and processes any further instructions and jobs. Branches allow to include any number of instruction and jobs. When an order is executed in a workflow the all the child process first competed in the execution and after the successful execution of the child process, the parent process will complete the task.
In this example, two workflows are available jdFork and jdForkNested.
jdFork
jdFork contains a simple example of parallel execution with two branches branch1 and branch2. While executing the Order in the workflow and when the order reached the fork statement it execute both the branches and complete the execution after that further job with executing and complete the execution process.
- Click on the folder 02_ParallelExecution and expand the jdFork workflow.

- To add the order in the workflow. Click on the action menu of the workflow and click on Add order button from the drop-down menu.

- On clicking the Add Order. A popup window will appear.
- You can add the Order ID or leave the Order Id value blank it will take the default Order Id to process the Order. Click on Submit button.

- To check the status of the Order click on the Workflow name with this new Order history panel will appear.

- From the Order history panel, you can see the Order is successful and finished. Click on the Order ID to open the detail logs of execution.

- A log window will open and the order log will be displayed. The order log contains log output from all jobs executed by the order.
- You can download the log file by clicking the Download button from the upper right corner of the log window. Also, you can expand and collapse the individual job output using the arrow button from the left corner of the log window.

jdForkNested
jdForkNested contains the nested branches in a workflow and with every branch multiples jobs are added to execute the nested workflow. All the parallel branches execute at the same time and complete the execution.
- Click on the folder 02_ParallelExecution and expand the jdFork workflow.
- To add the order in the workflow. Click on the action menu of the workflow and click on Add order button from the drop-down menu.

- On clicking the Add Order. A popup window will appear.
- You can add the Order ID or leave the Order Id value blank it will take the default Order Id to process the Order. Click on Submit button.
- To check the status of the Order click on the Workflow name with this new Order history panel will appear.
- From the Order history panel, you can see the Order is successful and finished. Click on the Order ID to open the detail logs of execution.
- A log window will open and the order log will be displayed. The order log contains log output from all jobs executed by the order.
- You can download the log file by clicking the Download button from the upper right corner of the log window. Also, you can expand and collapse the individual job output using the arrow button from the left corner of the log window.
Execute Database Statements
The JobschedulerManagedDatabase is a JITL job, it can be used to execute SQL statements or SQL scripts on a number of database products. The JobSchedulerManagedDatabase job abstracts the complexity of executing SQL statements/scripts on database systems. The JITL job uses the Java hibernate interface to connect to the database and to execute SQL statements.
In this example, you are executing a simple SQL statement on the JobScheduler Database to get the JobScheduler Host and URL. The JobSchedulerManagedDatabase job has the capability to convert results of SQL statements to order parameters which can be read by successive jobs in the job chain. This example demonstrates the feature where results from an SQL statement become available to the next job steps as order parameters, e.g. JobScheduler Host and URL values
To run the job chain
- Click on the job chain name 02_DatabaseStatement to expand the job chain details, a single order 02_execute_database_statement should be displayed:

- Click on the job chain name 02_DatabaseStatement to expand the job chain details, a single order 02_execute_database_statement should be displayed:
To run the order.
- click on the action menu of the order. A drop-down menu will appear.
- click on Start Order now option to run the order immediately.

- To check the status of the order
- Click on the job chain name 02_DatabaseStatements,
- the Order History panel will open to show the past and current executions of the job chain.

- From the log output, you will see that the SQL statement was executed for the database and the results were transferred to the next job as order parameters.
Split & Sync Using Job Stream
The JobScheduler feature Job Streams is used to implement dependencies with jobs. It provides backward dependencies using conditions. The jobs support In Conditions and Out Conditions. The In Conditions are evaluated before the job execution, whereas the Out Conditions are evaluated after the job execution.
In this example, you are executing a nested split and join processing use case using Job Streams. The jobs have dependencies implemented by the In Conditions and Out Conditions. A job will starts only if it's In Conditions expression evaluates to true. The job's Out Condition creates the events for the job in the system which is used as In Conditions for other jobs to continue the job execution.
- To run the Job Streams
- Switch to the Job Streams tab.

- Select the folder 03_JobStreams from the left tree structure. The collapsed view of the Job Stream will be displayed.

The following expressions are used as In Conditions and Out Conditions for the jobs.
S.No. Job Name Condition Expression Command / Event List 1.
job1
In Condition
-
-
Out Condition
rc:0
username_job1
2.
job2
In Condition
username_job1
startjob: now
Out Condition
rc:0
username_job2
3.
job3
In Condition
username_job1
startjob: now
Out Condition
rc:0
username_job3
4.
job4
In Condition
username_job3
startjob: now
Out Condition
rc:0
username_job4
5.
job5
In Condition
username_job3
startjob: now
Out Condition
rc:0
username_job5
6.
job6
In Condition
username_job4 and username_job5
startjob: now
Out Condition
rc:0
username_job6
7.
job7
In Condition
username_job2
startjob: now
Out Condition
rc:0
username_job7
8.
job8
In Condition
username_job6 and username_job7
startjob: now
Out Condition
-
-
Click on Expand details to display the Job Stream with it's In Condition and Out Conditions.

- Select the Start Task Now from the action menu of job1.

- The Job Streams starts its execution and the further jobs will be executed depending on the result of their In Conditions.

- Switch to the Job Streams tab.
File Watching
JobScheduler comes with the built-in File Watching feature that allows automating business processes based on the arrival of files. The file watching job chain starts automatically as soon as a file arrives in a specific folder. Once the job chain is triggered by the file, the complete file path will be available to the job as an environment variable which can be passed to the application or script called by the job.
- To make the 04_FileWatcher job chain start you need to create some files which will trigger the job chain. To this purpose, first, expand the folder and list all the job chains.
- Start the order start in the job chain 04_GenerateTestFiles

- This will generate five files in the incoming folder that will trigger the job chain 04_FileWatcher

- To check the status of the file watcher order
- click on the job chain name 04_LoadDWH,
- the Order History panel will open to show past and running executions of the job chain..

Agentless Scheduling
JobScheduler has feature-rich Agent Scheduling capabilities using the JobScheduler Universal Agent. Along with the Agent, JobScheduler supports the agentless scheduling over SSH.
This example demonstrates the simple example of executing a shell command on a remote server over SSH. The JITL job JobSchedulerSSHJob uses a built-in interface to execute tasks over SSH. Read more about job parameterization from the before-mentioned link. Find the following example for the JobScheduler SSH Job:
Run the Job
- Start the order start_order which will start the 05_execute_remote_command job.

- The job 05_execute_remote_command will connect with the remote host and will execute a simple shell command “env | sort”, the results of the command will be stored with the log file.
- To open the log file.
- click on the job chain name 05_SSHRemoteExecution, the Order History panel will open like this:

- click on the order start_order to open the log window.

- click on the job chain name 05_SSHRemoteExecution, the Order History panel will open like this:
Multiple Orders and Order Parameters
This example demonstrates the JobScheduler feature of multiple orders assigned to a single job chain and order parameters. JobScheduler job chains can be reused by assigning multiple orders using different parameter sets. This will reduce the number of identical job configurations that you run for similar tasks. The job chain 06_CRM_ERP_Backup_Process includes a single job that accepts parameters. A number of orders are configured to run the job chain.
The JobScheduler feature can be used in a classic database backup process, a common use case for example to backup two databases, e.g. ERP and CRM databases, with a frequency of daily, weekly and monthly backups. A job chain can be configured to reuse the database backup job by applying parameters from individual orders. When the order will start then the parameters from order will be available to the job as environment variables.
In the job chain CRM_ERP_Backup_Process multiple orders are used with different parameter sets. The orders are intended for daily, weekly and monthly execution.
- DailyBackup orders: are running daily according to the order's run-time.
- WeeklyBackup orders: run weekly, e.g. outside of business hours on Saturday or Sunday, according to the order's run-time.
- MonthlyBackup orders: will execute on the last day of month.
To run the job chain.
- click on job chain 06_CRM_ERP_Backup_Process and expand the job chain details like this:

To run the job chain
- click on the action menu of any order, e.g. DailyBackupERP, a drop-down menu will open.
- click on Start Order now to start the order.

To check the status of the order
- click on job chain name CRM_ERP_Backup,
- the Order History panel will open to display the execution history for past and current job chain runs.

You can review the log of the running order like this:
- Click on the DailyBackupERP order to open the log from the Order History tab.
- The log window will open and the order log will be displayed.

Managing Calendars for Run-time
JobScheduler Calendars is the method to specify on what days order has to execute. Calendars can be of two types Working Day Calendar and Non-Working Day Calendar. A Working Day Calendar specifies business dates for which job execution is targeted, where Non-Working Days Calendar includes days for which job should not be executed. The handling of days in a Calendar is simplified using Frequencies. Frequencies can be of two types inclusive and exclusive. The inclusive includes the date on which the job is to be triggered and exclusive includes the dates on which job should not be triggered.
A working day calendar is created with the validity of 5 years. The frequencies assigned to the calendar are:
- Included Frequencies: The calendar includes frequency from Monday to Friday.

- Excluded Frequencies - The days which are excluded from the calendar are the national holiday of USA.

The job chain 07_CalendarManagement is a basic job chain with three jobs. It has an order 07_Calendar_Management_Order. To assign the calendar to the Order and to add the Restrictions on it follow the below steps.
- Switch to the Job Chains tab and select folder 07_Calendar_Management from the tree structure.

- From the action menu of the order 07_Calendar_Management select Set Run-time.

- A modal window for Set Run-time opens.

- Click on Assign Working Day Calendar.

- Select the calendar from the tree and click Apply.

- On Clicking apply the select calendar is applied to the order and is shown in the List of Frequencies / Calendars.

- To add the Run-time for the job add the period for the job.

- Select the Repeat Interval, Start Time. The default values for the Repeat Interval is Single Start which means that the job or order will be executed only once. The other options are:
- Repeat End-Start - Once a job or order is executed it will repeat itself with an interval of Repeat Time according to end time of previous execution of job or order.
- Absolute Repeat Start-Start - The job execution will repeat itself with an interval of Repeat Time with respect to the start time of the job or order.
For example we want add a period as Single Start and morning 08:00:00 am.
Click Save to add the Period.
- To add a frequency to this calendar use the Restrictions.

- A window open to Add Frequencies.

- The Add Frequencies provides an option of Frequency Types. This includes various options like Weekdays, Specific Weekdays, Specific Days, etc. For example, we want to add an frequency to run this order on third Friday of the Month, then we use Frequency Type as "Specific Weekdays" and Number of Day as "Third" and then we select Weekday as "Friday". The Valid From and Valid To if left empty then it takes the date up to which the calendar is valid.

- Then click Add Frequency, then close. After this click Submit. You can see the Next Start Time will be added to the order.

Overview
Content Tools