Introduction
JobScheduler has a full JADE managed file transfer program "on board". This allows JobScheduler to be used to automate file transfer operations using the full features of JADE such as error detection, compliant logging and notifications.
JADE can be accessed from the JobScheduler using one of the JADE JITL jobs, via the JADE API. The JITL jobs are pre-configured job templates that can be used to rapidly develop job scheduling operations and are provided as standard with every JobScheduler installation package.
The configuration and use of a simple JITL job was described in JobScheduler - Tutorial 4 - Editing and Running a JITL Job: the current tutorial will build on the information provided in the Editing and Running a JITL Job tutorial and show how to configure, run and test simple file transfer operations. Users should then be able to build on this information to complete their own real-life transfer operations.
Background
The screenshots used in this tutorial were made using JobScheduler 1.9.x. All operations described have also been tested with 1.8.x. VERIFY
This tutorial assumes that a JobScheduler has been installed and is running. See for information about the requirements for the installation of JobScheduler and instructions about the installation procedure itself.
This tutorial describes how to configure the JobScheduler JITL job to carry out a relatively simple file transfer operation. The operation described has already been used in the JADE file transfer tutorial, which described how to transfer files from the online SOS demo server to the local file system. The demo server server allows read-only FTP and SFTP access and has been installed to allow users get their JADE and JADE JITL job users get their systems up, running and tested as quickly as possible.
Note that to get the file transfer operation described in this tutorial up and running, your firewall(s) will need to allow file transfer via ports 21 (for FTP) and 22 (for SFTP).
A separate installation of JADE is not required for this tutorial.
Configuration of the JADE JITL job
Initial steps
The first three steps have already been described in detail in the JobScheduler - Tutorial 2 - Editing a Simple Job with JOE tutorial and are therefore only summarized here:
- Start JobScheduler
- Open the JobScheduler Object Editor (JOE)
- Open the JobScheduler Live Folder:
- A sub-folder of the live folder is used In this tutorial for all the objects related to the tutorial, "tutorials-5-jade-jitl-job".
A link to a download file containing the contents of this file will be provided at the end of this article.
- A sub-folder of the live folder is used In this tutorial for all the objects related to the tutorial, "tutorials-5-jade-jitl-job".
- In the left hand pane of JOE mark the Jobs icon - opening the JobScheduler icon if necessary.
- Start the Wizard function by clicking on the Button of the same name as shown in the screenshot below.

- Select Order controlled job in the small window that opens and then Next, which will open the Import Jobs window as shown in the next screenshot.
- Enter a Jobname such as jitl_job_1.
- In the Jobs pane, scroll down until the two JADE-Jobs are visible and select the job with the jadeJob.xml file name.
This will cause the Title field to be filled with "API Job for JobScheduler ...." - Click on the Next button

- The Job Parameter form for the JITL job will now open.
- The use of this form to set and modify parameter values was described in detail in Tutorial 4 - Editing and Running a JITL Job.
This form is shown in the screenshot below, where it can be seen that parameters have already been selected and set. - Note that the parameter names specified in the Wizard are not identical with those set in the JADE file transfer tutorial. This JITL job Wizard still uses deprecated names without source_ or target_ prefixes. This means that the Wizard cannot be used to directly configure a file transfer from a remote source to a remote target. However this type of file transfer can be configured using a profile in a settings file, both of which can be specified using the profile and settings parameters, which are available in the Wizard. The use of a profile and settings file has already been described in the JADE file transfer tutorial and this method of configuration for this JITL job will be described below.
- The parameter values specified here and shown in the screenshot below are identical with those described for the JADE file transfer tutorial with the exception of the local_dir parameter, which in the JADE tutorial had the value
${USERPROFILE}\jade_demo\a.In the JITL job the User depends on the JobScheduler configuration and therefore the value for the local_dir parameter is specified absolutely.
- Note that this Job Parameter Wizard form can be directly opened from the Job Parameter form in JOE as can be seen in the following screenshot:


- The use of this form to set and modify parameter values was described in detail in Tutorial 4 - Editing and Running a JITL Job.
- Create new job chain

- Configure a simple job chain for the job as shown:

- Create and configure an order for the job chain

- Don't forget to save the configuration using the button as shown.
- Start Order

- Show Log

The screenshot below shows a extract from the log file for this order and the detailed log information that is available for JADE file transfer operations.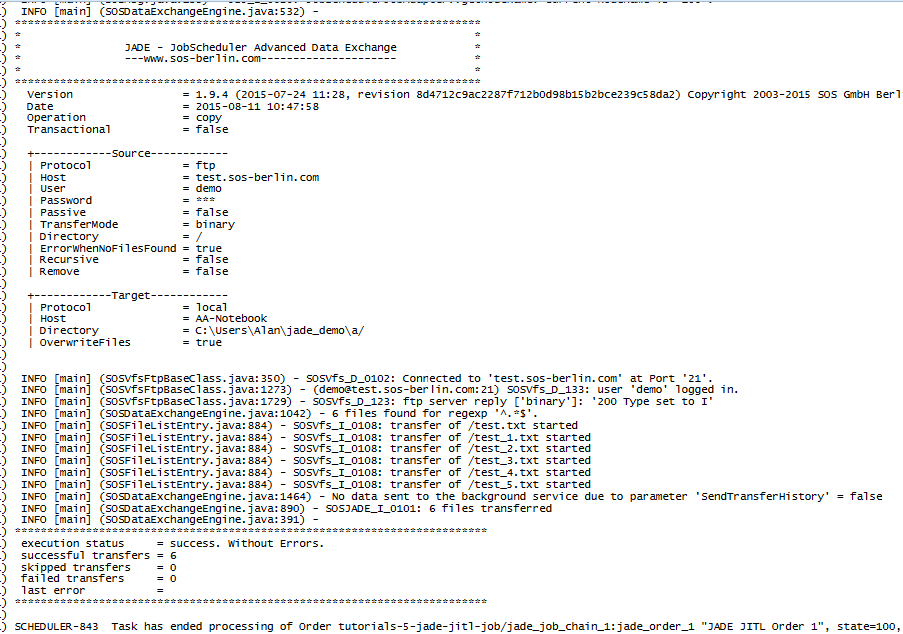
Use of a profile and settings file
qwwerrwer