Scope
The Starter means to start a Job Stream. The Starter starts the Job Streams on the basis of run-time provided to it (the starter can be started manually also using Start Now). The Starter when starts the Job Stream it creates a instance of the Job Stream called Session. Each session of the Job Stream has it's own ID. The events are now created on a session basis. The event created with Session A does not have access to Session B, the two-session are independent even if they are of the same job Streams.
FEATURE AVAILABILITY STARTING FROM RELEASE 1.13.4
Advantages of Job Streams Starter
The Starter adds new advantages to the Job Streams:
Assigning Run-time to the starter
The Job Stream Starter allows to assign a run-time to the Job Stream. Earlier it was not possible to run a Job Stream more than once without using the Reset Job Stream but now we can run the Job Stream more than once for e.g. every 5 minutes. From release 1.13.4 we don't need to specify the run-time to the first job of the Job Stream and then other jobs in the Job Streams start accordingly.
A Job Stream can even have more than one Starter and can have different run-time assigned to each starter.Assigning Run-time to the starter
The Job Starter can have set of parameter i.e. we can assign parameters to the Job Streams and that parameters will be available to each job in the Job Stream. The parameter can only be accessed by the job in the Job Stream instance which are created by this Starter. For example a parameter [name': 'value1'] will be available for the each job of the Job Stream if it is assigned to the Starter. Without the Starter we need to define the parameters for each job in the Job Stream.Starting more than 1 job at a specific time
The Job Stream Starter is assigned to the first of the Job Stream. If there are more than one jobs that starts the Job Stream then we need to assign Run-Time on each job differently. But with the Starter we can assign the starter to jobs and all the jobs will be executed at the specified run-time.Specific Job Stream history for each run
The Job Stream when now executed with the Starter creates a instance of Job Stream called session. Each created session has its own Session ID. The Job Stream now stores the history of each session, so from the release 1.13.4 Job Stream has specific history for each run which was earlier not possible.Access to event for one complete run of Job Stream
The Job Stream starter when creates a session then the events are created for this session. And the events can be accessed until the Job Stream execution is not completed i.e. we can access the event for the lifetime of one job stream run. Earlier the events for the Job Streams where only accessible for today i.e. the event cannot accessed with the expression <event_name> once the period gets completed.
Please refer to Scope of Events for reference.Accessing the events from another Job Stream
The event eventA when created in a Job Stream jsstreamA can be consumed by all the inconditions in all the Job Streams using the expression eventA till the release 1.13.3. To access the events from another Job Stream in release 1.13.4 we need to address the Job Stream i.e. from 1.13.4 when using the eventA created in jsstreamA need to be accessed with the expression jsstreamA.eventA.
How to create a Job Stream Starter
The Starter can be added either in two ways. It can be created either at the time of creating the Job Stream or can be added to the existing Job Stream.
Adding starter at the time of creating Job Stream
- Login to the JOC Cockpit, switch to the Job Streams tab.
- Click on the button Add Job Stream to add a new Job Stream.

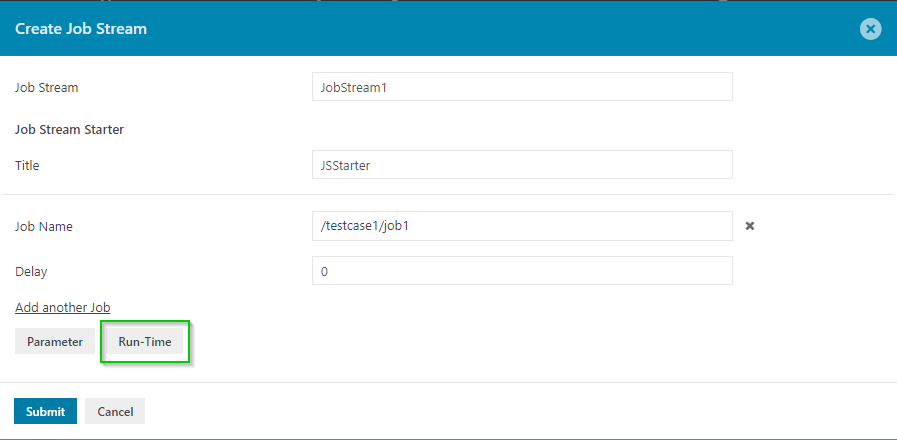
- A Create Job Stream Window opens.
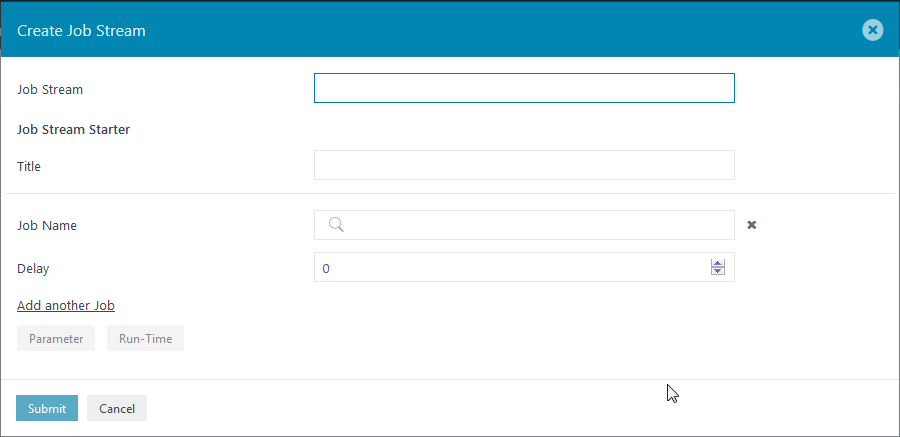
- Add the details for the Job Stream.
- Job Stream: Enter the Job Stream name. This will be the name of the Job Stream.
- Enter the Job Stream Starter detail:
- Title: Enter the Starter title. This refers to as the name of Starter
- Add the job details to which the starter is to be added:
- Job Name: Select the job from the drop-down menu to which the starter is to be attached.
- Delay: This accepts the value in seconds. The delay refers to the time (in seconds) after which the job will be executed when the Starter is started.
- Add another Job: A Job Stream starter can have more than one job. Click Add another job to add details of another job that will be attached to the starter.
- Parameter: Click on Parameter to add the Job Streams parameter. Refer to How to add parameters to the Job Streams Starter for reference.
- Run-Time: Click on Run-time to add run-time to the Job Stream. Refer to How to add Run-time to a Job Stream Starter for reference.
- Click on the Submit button to add the Job Stream.
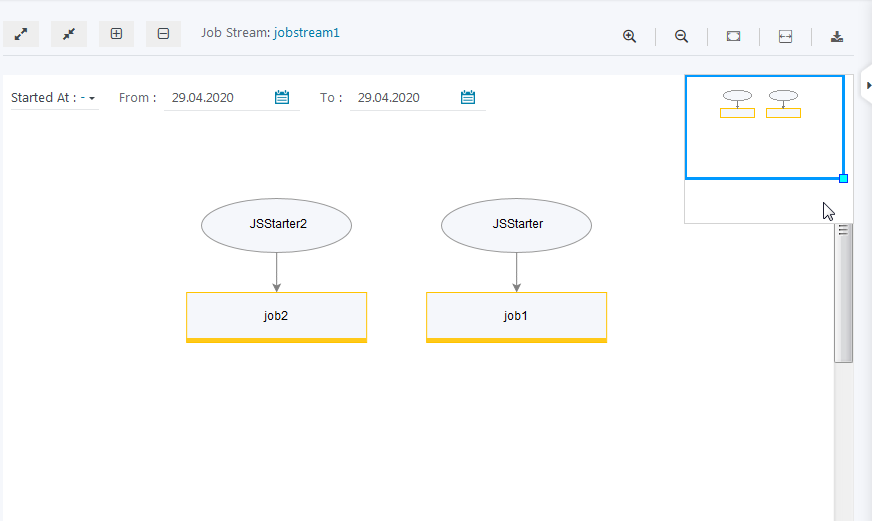
- For example: When we click on the submit button with the below details then a Job Stream will be created with a name jobstream1 with a starter name JSStarter. The Starter includes on job /testcase1/job1 with a delay of 10 seconds i.e. when the starter is started then the job /testcase1/job1 will be executed after 10 seceonds.


Note: The Job Stream requires a minimum of one Starter. We cannot create a Job Stream without a Starter.
Adding new starter to existing Job Stream
- Click on the action menu of the job stream name from the right panel and select Add New Starter.

- A Create New Job Streams Starter Menu opens.

- Add the details for the starter and click on submit.
- For example, we added another starter to the existing Job Stream jobstream1 which we created in the above example with the details Title: JSSTarter2, Job Name: /testcase1/job2 then the starter will be added to the Job Stream.
Note: We can add two or more starters to the same job also.
How to start Job Stream starter
Whenever a Job Stream starter is started it creates a new session. This session has its own events i.e. if the same Job Stream is run twice then two sessions will be created with a timestamp (say session A and session B). If any event is created in session A then it does not reflects session B.
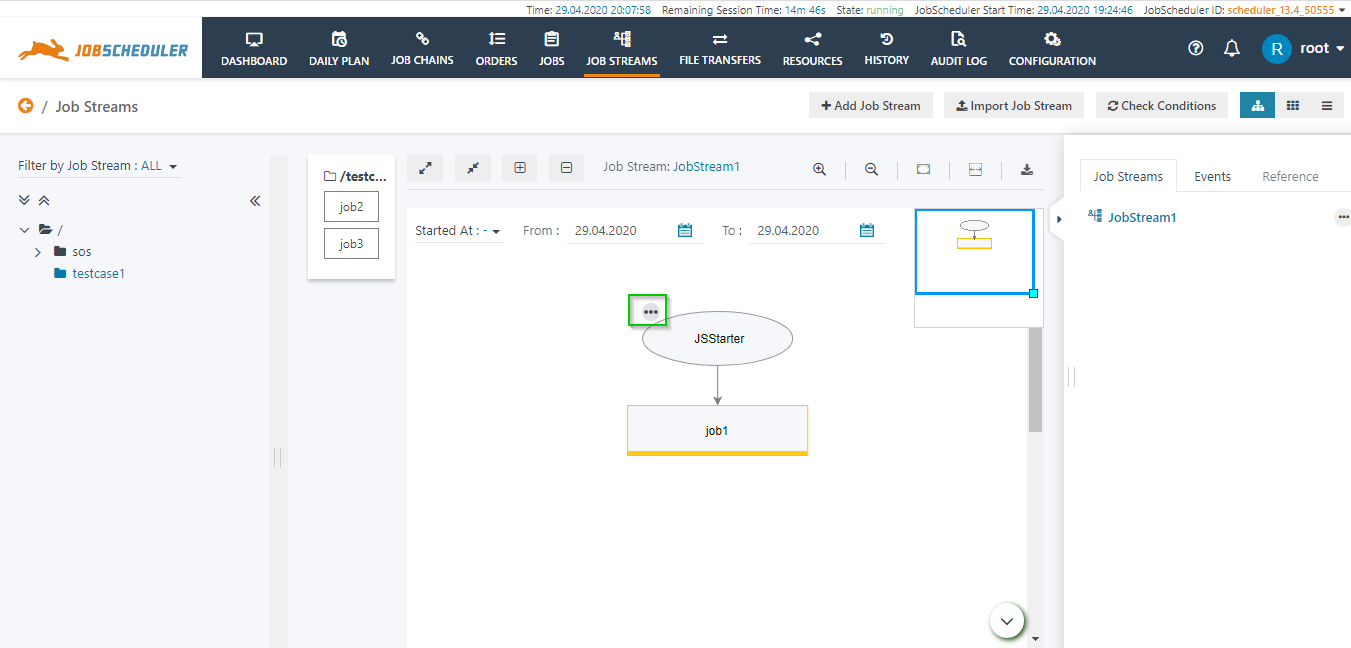
Selecting a session from the list
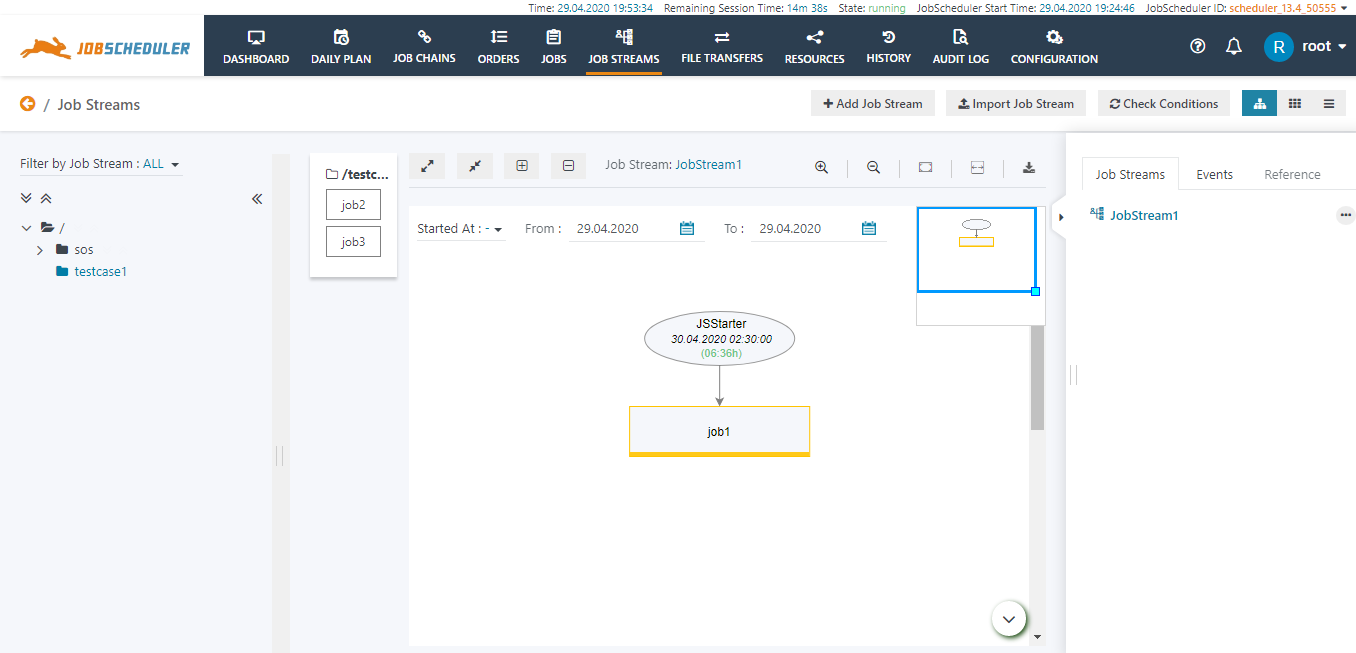
The Starter when started it creates a session. Every session is stored and each session has its own execution of Job Stream. You can view the session by clicking on the Starter At. It will display the list of session created between the dates specified in From and To.

How to add parameters to the Job Stream Starter
The parameters added in the starter are accessible by the whole Job Stream. Every Job in that session used all the parameters assigned to the starter throughout the Job Stream run.
The parameter can be added in two ways. It can be created either at the time of creating the Job Stream or can be added to the existing Job Stream.
Note: If the job contains its own parameter than both the parameters(starter and job) are used by the job at the time of execution.
Adding parameter at the time of creating Job Stream Starter
- Login to the JOC Cockpit, switch to the Job Streams tab.
- Click on the button Add Job Stream to add a new Job Stream.
- Create a Job Stream Window opens. After adding details for Job Stream, Starter, Job Name, Delay(if require) click on the parameter button.

- A new pop-up window will open. Add the parameters as per requirement and click on the Close button.
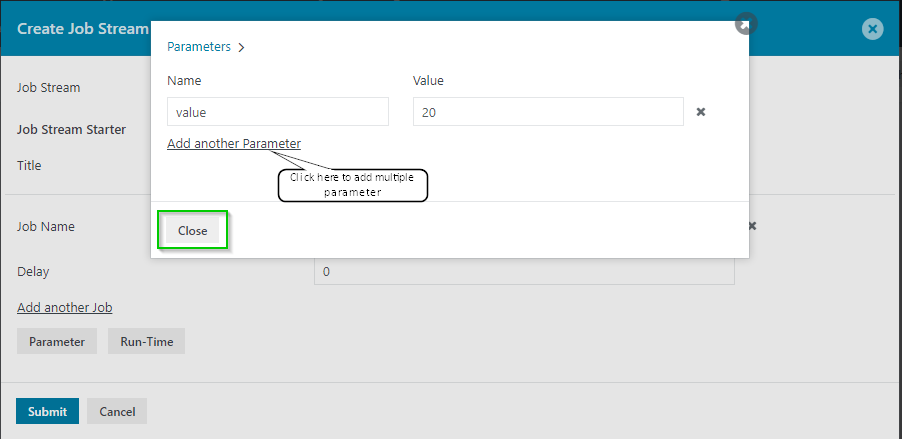
- The parameter is added to the starter. Click on the Submit button.

Adding parameter in the existing starter
If you want to add parameters in the existing starter which does not have any parameter or you want to modify the existing parameter in the starter please follow the below steps.
- Login to the JOC Cockpit, switch to the Job Streams tab.
- Click on JobStream in which the starter is already created.

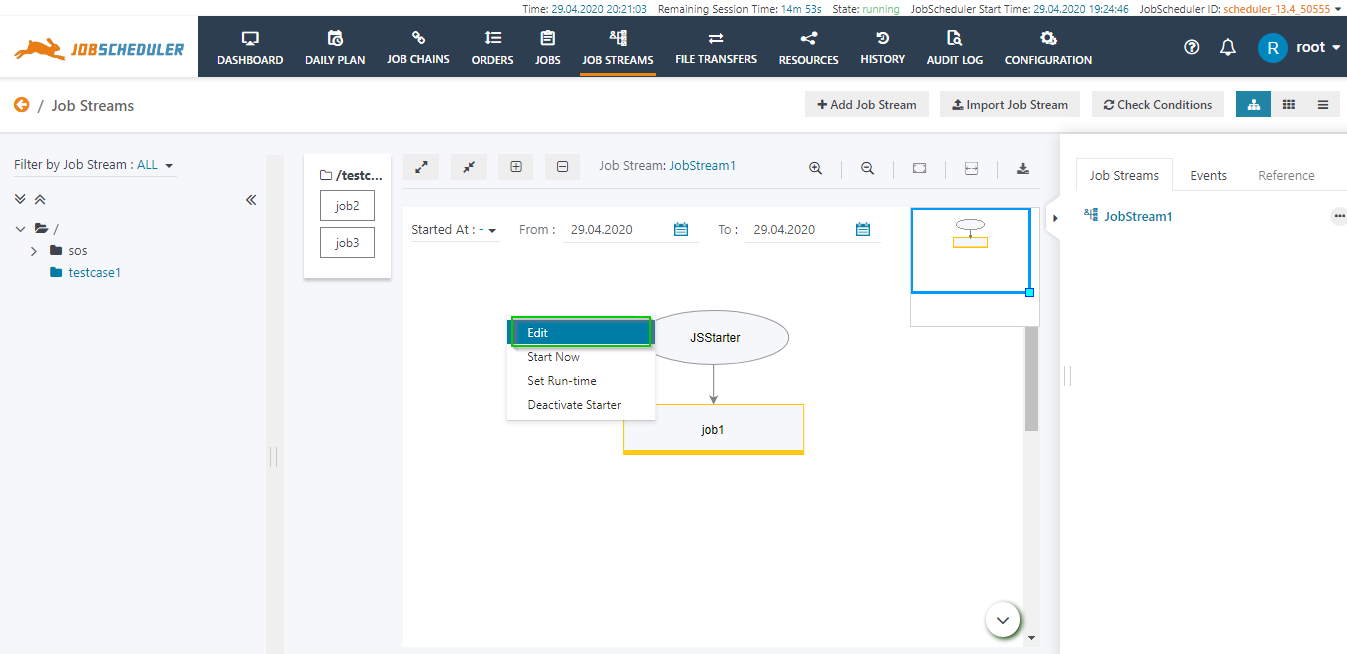
- On hover, a mouse on the starter (JSStrater) action menu will appear.
- Click on the action menu will drop-down will appear. Click on Edit to open an edit window.
- A pop-up window will open. Click on the parameters button add parameters in the Job Stream.

- A pop-up window will open to add parameters for the JobStream add the parameters as per requirements and click on the Close button.
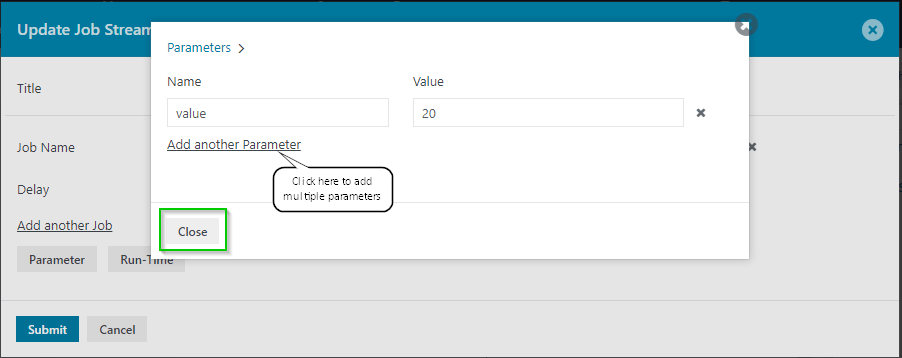
- Click on the Submit button to add the parameters in the JobStream.

Note: Parameter works the same as the Jobs, Orders view.
How to add Runtime of the Job Stream Starter
The Runtime added in the starter used to start the JobStream automatically at the given time or at any period.
The parameter can be added in two ways. It can be created either at the time of creating the Job Stream or can be added to the existing Job Stream.
Note: If the job in a Job Streams contains its own runtime and the starter starts the execution then it waits for the runtime of the job. But as the job will be executed by JobScheduler so it will be unknown for the Job Streams i.e. the event created by this job cannot be accessed in a session.
Adding runtime at the time of creating Job Stream
- Login to the JOC Cockpit, switch to the Job Streams tab.
- Click on the button Add Job Stream to add a new Job Stream.
- Create a Job Stream Window opens. After adding details for Job Stream, Starter, Job Name, Delay(if require) click on the runtime button.
- A new pop-up window will open to add run time for the Job Stream. Add the runtime as per requirement and click on the Submit button.
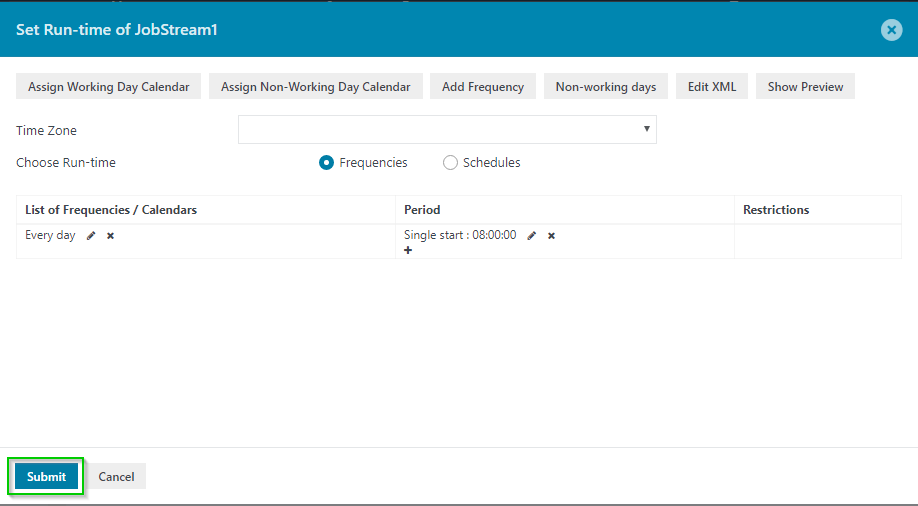
- The runtime is added to the starter.
Adding runtime in the existing starter.
If you want to add runtime in the existing starter which does not have any runtime or you want to modify the runtime of the starter please follow the below steps.
- Login to the JOC Cockpit, switch to the Job Streams tab.
- Click on Job Stream in which the starter is already created.
- On hover, a mouse on the starter (JSStrater) action menu will appear.
- Click on the action menu will drop-down will appear. Click on Set Run-time.

- A pop-up window will open to add run time for the Job Stream. Add the runtime as per requirement and click on the Submit button.
- The runtime is added to the starter.
Note: Runtime works the same as the Jobs, Orders view. But if a calendar is assigned without a period to a job in a Job Stream then the job will not be on days that are not part of the calendar. But the out-condition will be executed as it will be done with a "rc:0".
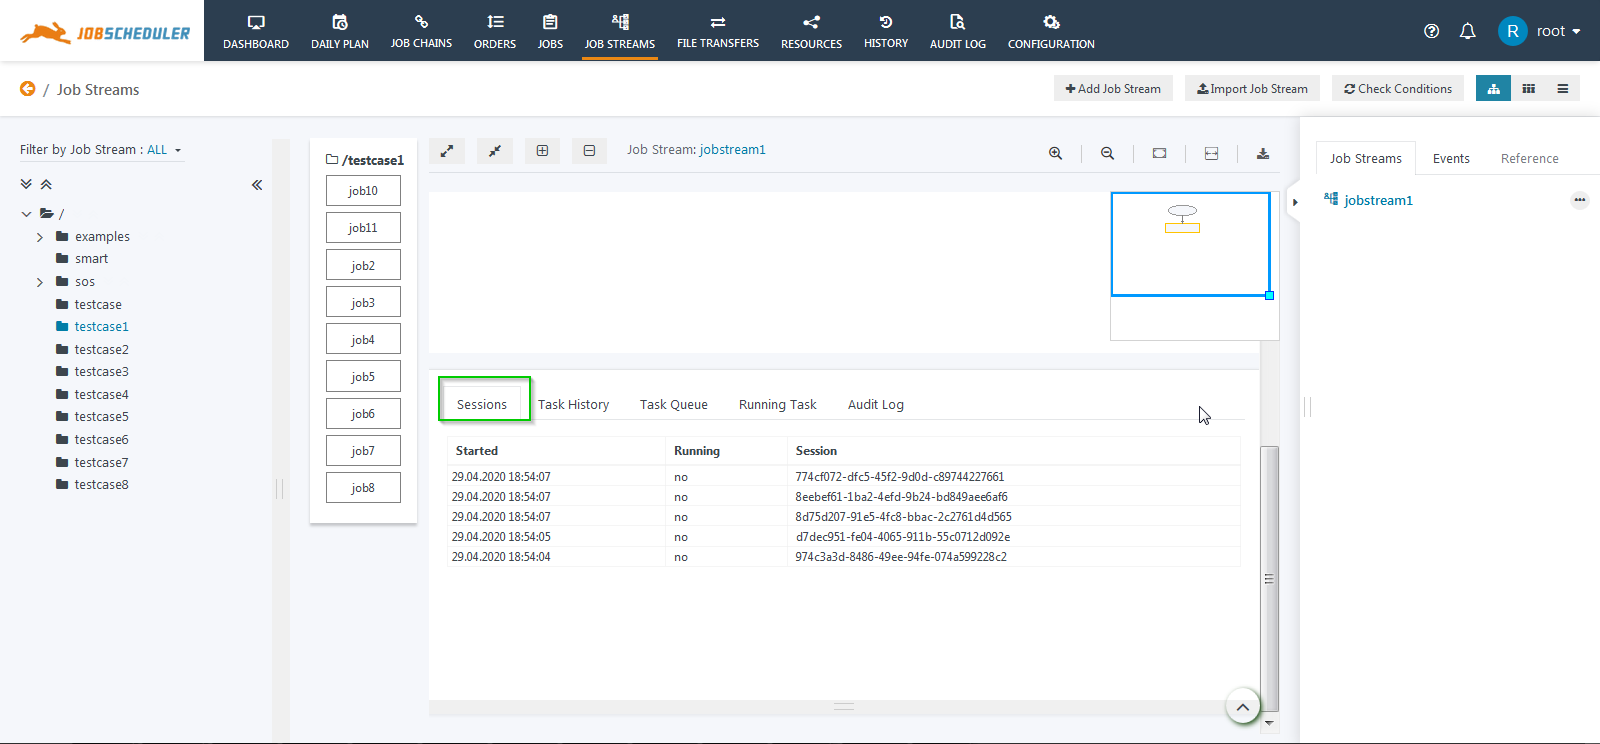
History of sessions
The new tab Sessions are added to the history view of the Job Streams. This includes the history of sessions with the session name, the current status of the session (running or completed), and the session ID. From the session tab, you can check whether the current session is still running or it has executed the Job Stream completely. If the value of Running=yes it means that the job Streams is still running for that session and has not been completed yet.