Page History
...
- Identity Services implement authentication methods Authentication Methods and access to Identity Providers, for . For example, credentials such as user account/password , are used as an authentication method Authentication Method to access an LDAP Directory Service acting as the Identity Provider, see . See JS7 - Identity and Access Management.
- JOC Cockpit implements a pluggable flexible architecture that allows to add external Identity Service products to be added with future JS7 releases.
- For compatibility reasons early releases of JS7 include the Shiro Identity Service, see
Jira server SOS JIRA columns key,summary,type,created,updated,due,assignee,reporter,priority,status,resolution serverId 6dc67751-9d67-34cd-985b-194a8cdc9602 key JOC-1145 Display feature availability EndingWithRelease 2.3.0
Matrix of Identity Services
Identity Services can be used in a number of flavors depending on the fact
...
- a specific application of the Identity Service,
- JOC Cockpit that propagates user accounts/passwords to the Identity Service but does not store such credentials with its database.
- By default JS7 ships with the following built-in Identity Services:
Display feature availability StartingFromRelease 2.2.0 - The JS7 - JOC Identity Service which includes management of user accounts with the JOC Cockpit and uses the JS7 database for persistence.
- The JS7 - LDAP Identity Service includes authentication of users with an LDAP Directory Service.
Display feature availability StartingFromRelease 2.5.0 - The JS7 - OIDC Identity Service
Jira server SOS JIRA columnIds issuekey,summary,issuetype,created,updated,duedate,assignee,reporter,priority,status,resolution columns key,summary,type,created,updated,due,assignee,reporter,priority,status,resolution serverId 6dc67751-9d67-34cd-985b-194a8cdc9602 key JOC-1370
- The JS7 - OIDC Identity Service
Display feature availability StartingFromRelease 2.6.0 - The JS7 - Certificate Identity Service
Jira server SOS JIRA columnIds issuekey,summary,issuetype,created,updated,duedate,assignee,reporter,priority,status,resolution columns key,summary,type,created,updated,due,assignee,reporter,priority,status,resolution serverId 6dc67751-9d67-34cd-985b-194a8cdc9602 key JOC-1547 - The JS7 - FIDO Identity Service
Jira server SOS JIRA columnIds issuekey,summary,issuetype,created,updated,duedate,assignee,reporter,priority,status,resolution columns key,summary,type,created,updated,due,assignee,reporter,priority,status,resolution serverId 6dc67751-9d67-34cd-985b-194a8cdc9602 key JOC-1546
- The JS7 - Certificate Identity Service
- For compatibility reasons, early releases of JS7 include the JS7 - Shiro Identity Service
Jira server SOS JIRA columns key,summary,type,created,updated,due,assignee,reporter,priority,status,resolution serverId 6dc67751-9d67-34cd-985b-194a8cdc9602 key JOC-1145 Display feature availability EndingWithRelease 2.4.0
Matrix of Identity Services
Identity Services can be used in a number of flavors depending on:
- which application manages user accounts/passwords:
- the Identity Provider that is specific to an Identity Service,
- JOC Cockpit that propagates user accounts/passwords to the Identity Service but does not store such credentials with the JS7 database.
- where assignments of roles to user accounts are stored:
- with the Identity Provider of the Identity Service,
- with the JS7 - Database.
| Identity Service | Identity Service Configuration Items | JOC Cockpit Configuration | ||||
|---|---|---|---|---|---|---|
| Service Type | Built-in | User Accounts/Passwords stored with | User Accounts/Passwords managed by | Roles/Permissions stored with | Roles->User Accounts Mapping managed with | Roles Mapping |
| JOC | yes | JS7 Database | JOC Cockpit | |||
...
stored with
managed by
stored with
managed with
| JS7 Database | JOC Cockpit | Mapping of user accounts and roles with JOC Cockpit |
| LDAP | yes | LDAP Server | LDAP Server | JS7 Database | LDAP Server | Mapping of LDAP Security Groups to JOC Cockpit Roles performed with the LDAP Server |
| LDAP-JOC | yes | LDAP Server | LDAP Server | JS7 Database | JOC Cockpit | Mapping of user accounts and roles with JOC Cockpit |
| OIDC | yes |
Manage Identity Services
...

This operation brings forward the list of available Identity Services.
...
Add Identity Service
...

Explanation:
- The
Nameof the Identity Service can be freely chosen. - The Identity Service
Typecan be selected as available from the above matrix. - The
Orderingspecifies the sequence in which a login is performed with available Identity Services. - The
Requiredthe attribute specifies if login with the respective Identity Service is required to be successful.
Manage Settings
Settings are available at a global level and per Identity Service.
Global Settings
Global settings are applied for all Identity Services.
...

Vault Identity Service Settings
For use of the HashiCorp® Vault Identity Service
...
Explanation:
Vault URL: the base URL for which the Vault REST API is availableVault Keystore Path: Should the Vault REST API be configured for HTTPS Mutual Authentication then the indicated keystore has to include the private key specified for the extended key usage ofClient Authentication.Vault Keystore Password: Should the Vault REST API be configured for HTTPS Mutual Authentication and the indicated keystore be protected by a password then the password has to be specified.Vault Key Password: Should the Vault REST API be configured for HTTPS Mutual Authentication and the indicated private key be protected by a password then the password has to be specified.Vault Keystore Type: Should the Vault REST API be configured for HTTPS Mutual Authentication then the type of the indicated keystore has to be specified being eitherPKCS12orJKS.Vault Truststore Path: Should the Vault REST API be configured for HTTPS then the indicated truststore has to include an X.509 certificate specified for the extended key usage ofServer Authentication. This can be a self-signed server certificate or a CA-signed certificate (typically the Root CA certificate is used as otherwise the complete certificate chain involved in signing the server certificate has to be available with the truststore).Vault Truststore Password: Should the Vault REST API be configured for HTTPS and the indicated truststore be protected by a password then the password has to be specified.Vault Truststore Type: Should the Vault REST API be configured for HTTPS then the type of the indicated truststore has to be specified being eitherPKCS12orJKS.Vault Application Token: The application token has to be created by Vault for JOC Cockpit. It allows to access the Vault REST API and e.g. to renew tokens for user sessions.
JOC Identity Service Settings
The built-in Identity Service does not require any settings.
The built-in Identity Service does not require any settings.
After installing the JOC Cockpit, log in with the default root:root user name and password which comes under the Shiro identity service.
The Manage Accounts section of the JOC Identity is then accessed via the Profile Menu as shown in the screenshot below. Select Identity Management Service.
The Identity Management Service window has the list of the available Identity Services which is previously created or you can also create a new Identity service. From here you can select the Identity Services to manage the accounts inside it. Select the JOC from the list.
The JOC Identity Service window has the three main section which can managed via the tabs:
- Accounts: for the configuration of User Accounts. Accounts configured in the Database and access from there only.
- Manage Roles: for configuring Roles and the Controller that can be accessed by a Role.
- Permissions: a sub-view for configuring access to Folders and Role Permissions.
- Profile: from this view user can check the last login detail.
These tabs will be described in the following sections.
The Accounts Tab
The Accounts tab is opened first when a user selects the Identity Service from the Identity Management Service window and lists all the User Accounts that have been configured along with the Roles they have been assigned.
The above screenshot shows the test User Account which is manually created with the role. Currently, JOC Identity Service does not contain any default account and roles inside it.
- The Create Account button is used to open a window to add a new User Account with name, password, and Roles.
- The additional options (ellipsis) symbol allows an Account to be edited (change the Account Name and/or Password, select/deselect Roles) and to be copied or deleted.
- Clicking on the Account Name brings the user to the Manage Roles tab (described below) where the Controllers and Role(s) allocated for the User Account can be edited.
The Manage Roles Tab
The main purpose of the Manage Roles tab is to allow Controller Roles and any Controller which these Roles will be restricted to be configured.
When the tab is first opened after installation of the JOC Cockpit it will be blank and no roles are created by default. In the below screenshot you can see test-role created manually.
Roles contain default in the controller which means the role is available for all the Controllers - the default setting.
If the Manage Roles tab is opened by clicking on an Account Name in the Accounts tab (described in the previous section), the Manage Roles Tab will show those Roles that have been assigned to that Account. The Account that is active is shown in the Account button, which can also be used to select and deselect Accounts.
Positioning the mouse over a role name blends in two links as shown in the screenshot above:
- the pencil link allows the role to be edited and
- the X link allows the role to be deleted.
A set of Permissions is configured for each role. Each Permissions set can be inspected by clicking on the default from the list of roles, which will open the Permissions tab for the Role. An example Permissions set is described in the next section. A matrix showing the default Roles and their Permissions along with a description of the Permission is provided in the JS7 - Permissions article.
The Permissions Sub-View
The main purpose of the Permissions view is to allow Folders and Permissions to be configured for each Role.
Folder Selection
Folders are added using the Add Folder button shown in the background of the screenshot below, at the top right.
Folders themselves are selected from a simple tree view of the folders. This tree view is opened by clicking on the folder symbol shown in the screenshot.
Permissions Configuration
Two editors are available for the configuration of the Permissions granted for a Role:
...
- The states saved in the Undo button will be deleted when the Permissions tab is left.
...
- The state stored in the Redo button will be deleted when the Permissions tab is left.
...
- Granted Permissions have a blue background and are by default recursive.
...
- Individual Permissions can be modified and removed from the Role using the pencil and X symbols that are blended in when the user's mouse is moved over a Permission:
- The Edit function allows the Permission to be made subtractive - i.e. for permission granted at a higher level to be removed.
- The Folder part of the view is for restricting the Role to accessing particular Folders - and thereby particular workflow.
Initial Configuration
Creating and Configuring User Accounts and Roles
System administrators will likely want to create and configure their own User Accounts and Roles, for example, limiting access to resources such as JobScheduler objects and logs.
It is often easier to create Manage new Roles, assign Permissions or Folders to these Roles and then create new User Accounts and assign Roles to them.
Creating a new Role
- New Roles are created in the Manage roles tab using the Add Role button:
- Once a new Role has been created it will be automatically added to the list of Roles shown in the background of the screenshot above.
Configure Permissions and/or Folders for the Role
- Now expand the Role using the arrow button click on the default (blue link) to add Permissions and/or Folders in the Permissions tab. The Procedures available for adding and editing Permissions and Folders are described in the Editing User Permissions and Folders sections below.
- Note that Roles that neither have Permissions or Folders assigned to them are deleted automatically when the Manage Identity Service view is left.
Create a new User Account
...
- Note that deselecting a Role in this modal window 'uncouples' the Role from the User Account - it does not delete the Role.
Editing User Permissions
Permissions Structure
Permissions are strictly hierarchical:
- A Role with the Permission
sos:products:controller:view'only' allows a User to view Controllers, while a User with the 'higher'sos:products:controllerPermission is able not only to view Controllers but able to carry out other operations - in this case, view, restart, terminate, and switch_over. - The JS7 - Permissions article contains a link to a full list of all Permissions that can be granted.
Editing Permissions
Consider any user have a role(demo-role) with the following permission:
sos:products:controller:view
This permission does not allow the demo-role to perform the operation on the Controllers. These Permissions could be granted individually with the following:
sos:products:controller:restartsos:products:controller:terminate
The following Permissions can be set to allow the demo-role Role to view, restart and terminate the Controller, but not Switch_over:
sos:products:controller:viewsos:products:controller:restart
Alternatively, it may make sense in some situations to grant the Role a higher level of Permission and then remove one or more specific Permissions. This approach is shown in the following combination:
sos:products:controller
-sos:products:controller:switch_over
where the ...sos:products:controller Permission is an overall 'Controller' Permission covering view, restart and terminate, and the - Permission is removed from the demo-role Role.sos:products:controller:switch_over
Caution
Users should have Role with the following Permission - or higher - before they are able to log into the JOC Cockpit:
sos:products:joc:administration:controller:view
Editing Procedures
Three editing procedures are available for editing Permissions:
Adding Permissions:
...
- This is done by ticking the Excluded checkbox, which is obscured in the above screenshot.
...
Modifying Existing Permissions:
- The pencil symbol is shown alongside existing Permissions in the Permissions view (shown in the screenshot above) can be used to change the function of a Permission in a Role - to make an additive Permission subtractive and vice-versa. It cannot be used to edit a Permission.
- The X symbol shown alongside existing Permissions in the Permissions view can be used to remove an existing Permission from a Role.
- Note that a Role must be configured to have either a Permission or a Folder or it will be deleted.
- Note that if a user does not have the following permission or higher they will not be able to log into the JOC Cockpit interface:
sos:products:joc:administration:controller:view
...
Graphical Permissions Editing:
- The Graphical Permissions Editor is activated by selecting the 'Tree' symbol at the top right of the Permissions section.
- The editor opens with a partially collapsed permissions tree as shown in the next screenshot:
- The Expand All button (shown in the above screenshot) can be used to open all the tree elements.
- Navigation is carried out by dragging & dropping the tree view.
- The functions available for the tree elements are (with reference to the screenshot below):
- Select / Unselect a Permission - click on the body of an unselected / selected element
- Selected Permission elements are shown in blue (see the view element in the screenshot)
- Children of selected Permission elements are shown in light blue (as shown in the screenshot)
- Select / Unselect a Permission - click on the body of an unselected / selected element
- Negate a Permission - click on the plus sign at the left hand end of the element
- Remove a Permission Negation - click on a - sign at the left hand end of the element
- Show / hide child elements - click on the + / - symbols at the right hand end of an element
...
| OIDC Identity Provider | OIDC Identity Provider | JS7 Database | JOC Cockpit | Mapping of user accounts and roles with JOC Cockpit | ||
| CERTIFICATE | yes | CA / User Private Key | CA / User | JS7 Database | JOC Cockpit | Mapping of user accounts and roles with JOC Cockpit |
| FIDO | yes | Authenticator | Authenticator | JS7 Database | JOC Cockpit | Mapping of user accounts and roles with JOC Cockpit |
| VAULT | no | Vault Server | Vault Server | JS7 Database | Vault Server | Mapping of Vault Policies to JOC Cockpit Roles |
| VAULT-JOC | no | Vault Server | Vault Server | JS7 Database | JOC Cockpit | Mapping of user accounts and roles with JOC Cockpit |
| VAULT-JOC-ACTIVE | no | Vault Server | Vault Server / JOC Cockpit | JS7 Database | JOC Cockpit | Mapping of user accounts and roles with JOC Cockpit |
| KEYCLOAK | no | Keycloak Server | Keycloak Server | JS7 Database | Keycloak Server | Mapping of Keycloak Policies to JOC Cockpit Roles |
| KEYCLOAK-JOC | no | Keycloak Server | Keycloak Server | JS7 Database | JOC Cockpit | Mapping of user accounts and roles with JOC Cockpit |
| SHIRO | yes | JS7 Database / shiro.ini | JOC Cockpit | JS7 Database / shiro.ini | JOC Cockpit | The SHIRO Identity Service Type is:
|
Management of Identity Services
Management of Identity Services is accessed from the ![]() administration menu icon that is available for administrative user accounts in the right hand upper corner of any JOC Cockpit page:
administration menu icon that is available for administrative user accounts in the right hand upper corner of any JOC Cockpit page:

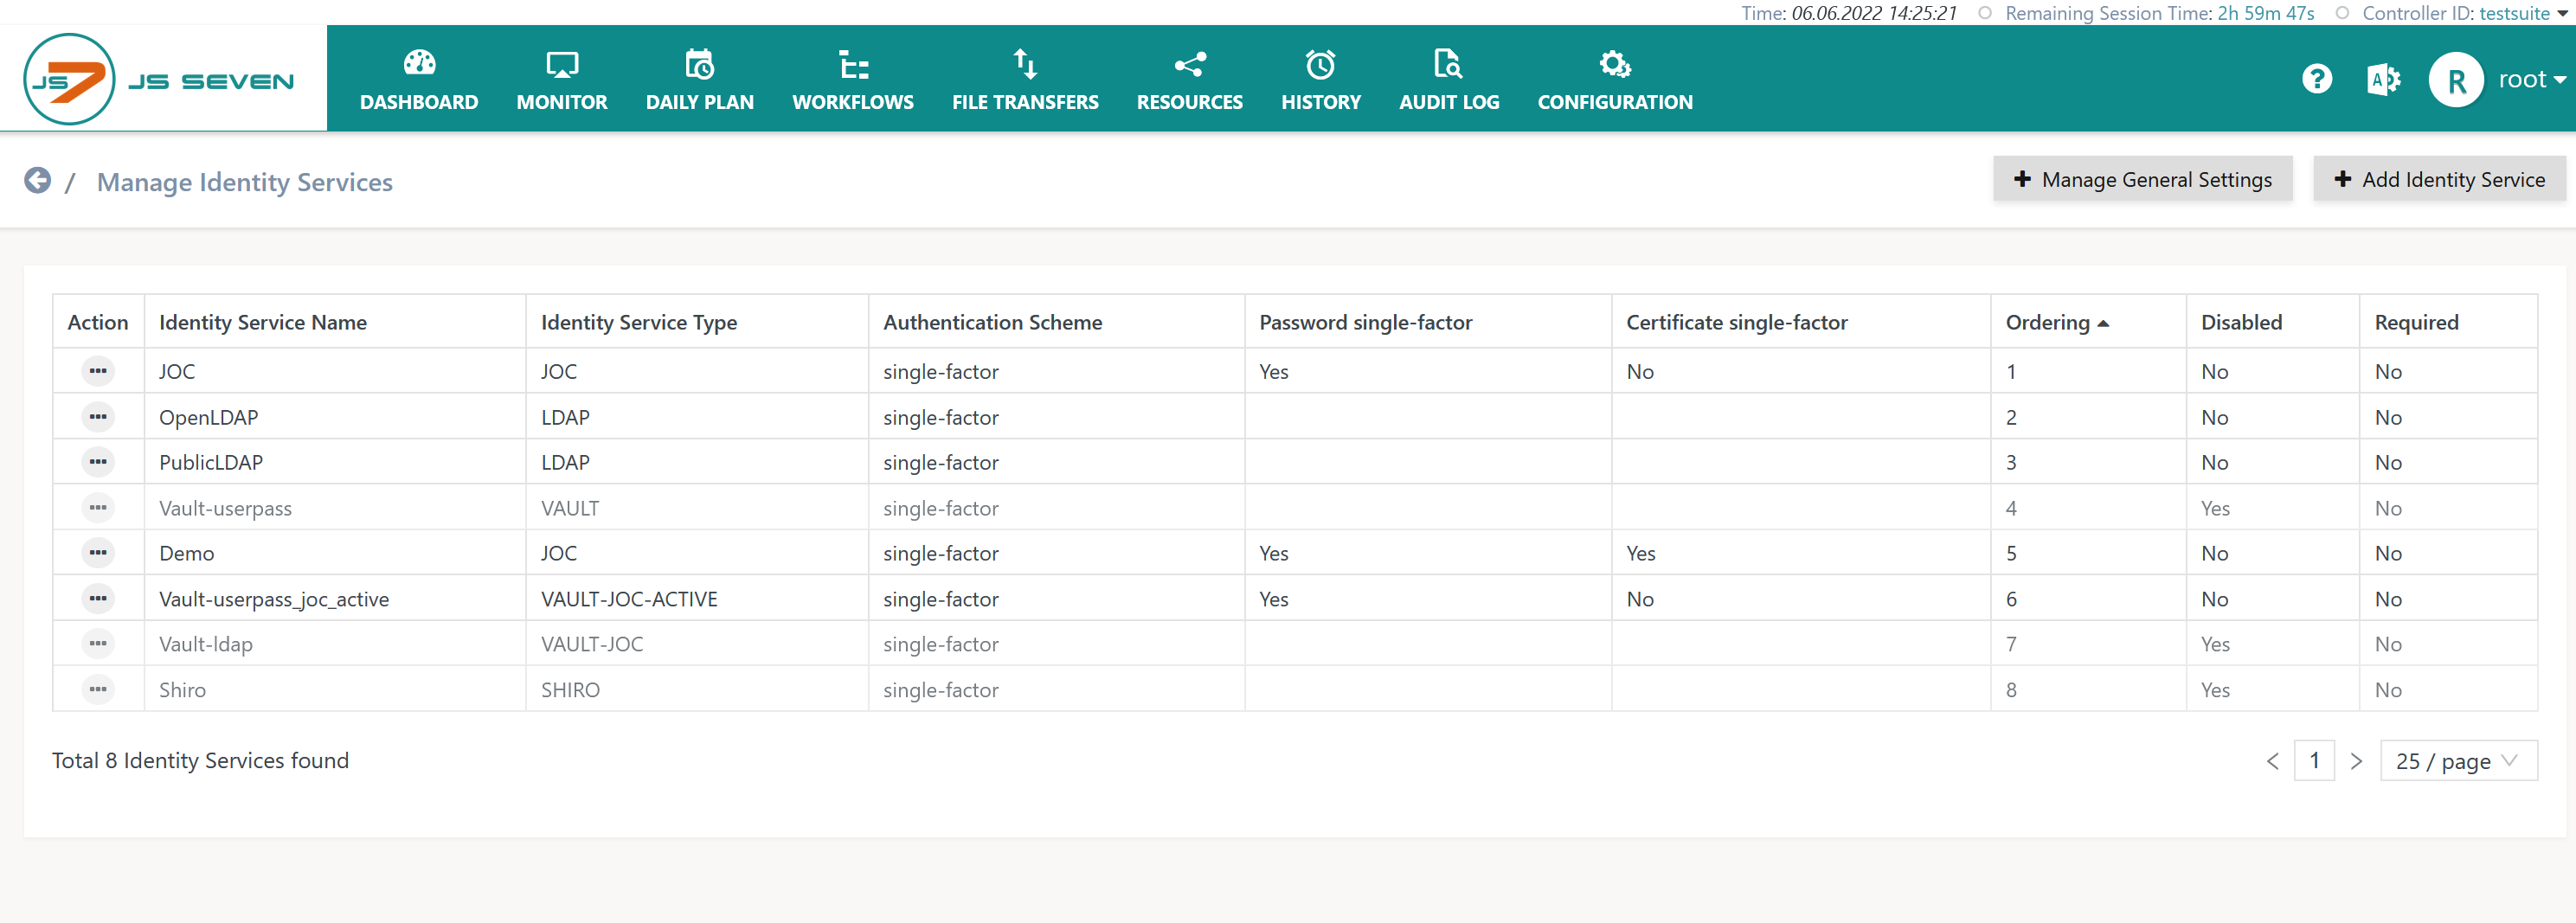
This operation brings forward the list of available Identity Services.
- By default a number of built-in Identity Services are available:
- In addition, connectors are available for external Identity Service products:
- The following Identity Services are considered to be deprecated and removed from current JS7 releases:
- The JS7 - Shiro Identity Service
Display feature availability EndingWithRelease 2.4.0
- The JS7 - Shiro Identity Service
By default users will find the JOC-INITIAL Identity Service which is added during initial installation.
- This Identity Service holds the single user account
rootwith passwordroot. - Users should modify the root user account's password.
- Users can modify the existing Identity Service or add new Identity Services.
Addition of an Identity Service
To add an Identity Service use the Add Identity Service button from the list of Identity Services shown above:
The remaining input fields for the popup window look like this:

Explanation:
- The
Identity Service Namecan be freely chosen. - The
Identity Service Typecan be selected as available from the matrix shown above. - The
Orderingspecifies the sequence in which a login is performed with the available Identity Services. - The
Requiredattribute specifies if login with an Identity Service is required to be successful, for example, if a number of Identity Services are triggered on login with a user account. - The
Identity Service Authentication Schemeallows selection of:single-factorauthentication - a single factor is sufficient for login with the Identity Service. This can be configured to use:- an optional user account and password
- an optional Client Authentication Certificate, see JS7 - Certificate based Authentication
two-factorauthentication - two factors are required for login with the Identity Service using:- a user account and password and
- a Client Authentication Certificate or FIDO Authentication Credentials.
Manage User Accounts and Roles
Manage Settings
Settings are available at global and individual Identity Service levels.
Anchor global_settings global_settings
Global Settings
| global_settings | |
| global_settings |
Global settings are applied to all Identity Services.
Explanation:
Session Idle Timeout(Default: 15 minutes)- If users are inactive for the given number of seconds then the user session expires and is terminated. Users can specify credentials and login to create a new user session.
- Should the lifetime of an access token provided by an external Identity Service be different from the maximum idle-timeout, then the JOC Cockpit will try to renew the access token with the Identity Service. Renewal of an access token does not require the user to re-specify their login credentials.
- Identity Services can restrict the lifetime of access tokens (time to live) and they can limit renewal of access tokens (maximum time to live). If an access token cannot be renewed then the user session is terminated and the user is required to perform a login.
Initial Password(Default: initial)- If an administrator adds user accounts with the JOC Cockpit and does not specify a password then the
Initial Passwordwill be used. As a general rule the JOC Cockpit does not allow the use of empty passwords but populates them with theInitial Passwordif a password is not specified by the user adding or modifying the account. - In addition, the operation to reset a user account's password is available. This replaces an existing password with the
Initial Password. - If the
Initial Passwordis assigned, then a flag is set for the user account to indicate that the password has to be changed with the next login. This behavior ensures that users cannot use theInitial Passwordexcept for an initial login.
- If an administrator adds user accounts with the JOC Cockpit and does not specify a password then the
Minimum Password Length(Default 0)- For any passwords specified - including the
Initial Password- a minimum length is indicated. - Note that the number of characters and arbitrariness of character selection are key factors for secure passwords. Password complexity requiring e.g. digits and special characters to be used do not substantially add to password security except in case of short passwords.
- For any passwords specified - including the
Settings specific to Individual Identity Services
Settings are explained for each Identity Service individually:
- JS7 - JOC Identity Service (no settings required)
- JS7 - LDAP Identity Service
- JS7 - OIDC Identity Service
- JS7 - Certificate Identity Service
- JS7 - FIDO Identity Service
- JS7 - HashiCorp® Vault Identity Service
- JS7 - Keycloak Identity Service
- JS7 - Shiro Identity Service (no settings required)
Processing of Identity Services
A number of Identity Services can be processed with the login of a user:
- Required Identity Services: user login is performed with all required Identity Services.
- No optional Identity Services are considered.
- If more than one required Identity Service is configured then a user cannot log in if the login fails with any of the required Identity Services.
- Permissions are applied from roles assigned by all Identity Services in the sequence of enabled Identity Services which are required to authenticate a user account.
- Optional Identity Services: with the first successful login to an Identity Service the user is considered to have logged in.
- No further optional Identity Services are consulted if a user login is successful with one of the optional Identity Services.
- For example, if two optional Identity Services
JOCandLDAPare configured in this sequence then the login to theJOCIdentity Service can fail and still the user might successfully login with theLDAPIdentity Service. - Permissions from the successful login to an optional Identity Service are used.
- Disabled Identity Services are not considered for user login.
Identity Services are ordered to specify the sequence of preferred use for authentication.
Note that a number of Identity Providers, for example LDAP being used for Active Directory access, might not accept repeatedly failed login attempts and might block the relevant user account.
Multi-factor Authentication
Identity Services can be used with Multi-factor Authentication (MFA). This includes to use two separate factors for authentication that are located in different media:
- User/password credentials are what a user remembers and manually types in the JOC Cockpit GUI.
- Certificates are located on the machine from which the user operates the browser to access the JOC Cockpit GUI.
- FIDO can be used for a variety of authentication methods, including use of roaming authenticators, for example a USB stick, and platform authenticators, for example from the OS or from a smart phone.
Find the following matrix of Identity Services for use as a first factor and a second factor:
| First Factory | Second Factor | |
|---|---|---|
| JOC | CERTIFICATE | FIDO |
| CERTIFICATE | FIDO | |
| FIDO | CERTIFICATE | |
| LDAP | CERTIFICATE | FIDO |
| LDAP-JOC | CERTIFICATE | FIDO |
| OIDC | CERTIFICATE | FIDO |
| OIDC-JOC | CERTIFICATE | FIDO |
| KEYCLOAK | CERTIFICATE | FIDO |
| KEYCLOAK-JOC | CERTIFICATE | FIDO |
Single Sign-On
The JS7 - OIDC Identity Service allows single sign-on for the underlying Identity Provider:
- Users who have been previously authenticated with the same Identity Provider as used by the OIDC Identity Service can access JOC Cockpit from their browser without specifying credentials.
- Users who initially authenticate with an Identity Provider by use of JOC Cockpit can open additional tabs in their browser without specifying credentials.
Further Resources
| Display children header |
|---|
| Display content by label | ||||
|---|---|---|---|---|
|
...
Controllers-Specific Permissions
By default User Accounts are granted Permissions for all the Controller and Controller Clusters in a scheduling environment. Permissions that are only applicable to a particular Controller or Controller Cluster can be added in a role. This is done in the Manage Roles tab of the Identity Management Service for JOC.
In the screenshot, the demo_role Role has been assigned for the controller with the ID controller2.2.0. and will appear in the list of the role as shown.
In this configuration, the demo_role will not yet have any Permissions that are specific to the controller2.2.0. At least one Permission needs to be added before the controller2.2.0 - demo_role configuration will be permanently saved.
The interaction of default and controllers-specific Permissions within the same Role can be illustrated as follows.
- default Permissions:
sos:products:controller:view
- Master-specific Permissions:
sos:products:controller:agents:view
The dashboard view for all controllers in the environment will show the status of the current controller but the status of Agent Clusters will only be shown for the specified controller - in this case controller2.2.0.
Folders
Folders are used to restrict User access to the objects such as workflows and Schedules. This means that, for example, Users can be restricted to accessing only objects for particular mandators / clients.
By default, Permissions are granted for all the folders. However, Roles can be restricted to accessing specific folders.
This is done by granting a Folder Permission, i.e. Permissions to view the content of a folder. When this is done, the Permissions to view all other folders are automatically revoked.
Granting Folder Permissions
Folder Permissions are granted in the Permissions View. Note that before Folder Permissions can be saved for a Role, the Role has to be specified for a User. In the example below, a test user and demo_role have already been configured and the demo folder created on the file system.
To open the Permissions view for a particular Role, first open the Identity Management Service for JOC view, switch to Manage Roles and select the Role that is to be granted Folder Permissions. To do this, click on the Role name in the Roles list.
Now click on the Add Folders button and in the Add Folders modal window, select the subfolder or the parent folder demo/ or /demo/*.
Check the Recursive box in the Add Folders modal window if required and then click on Submit.
Any User that is allocated this demo_role will now only be able to see JobScheduler objects in the demo folder.
Note that the test user will only be able to log in to the JOC Cockpit if they have at least one Role granting them the following Permission:
sos:products:controller:view
Roles with Folder Permissions are often configured for Users in combination with default Roles.
Shiro Identity Service Settings
The Shiro Identity Service does not require any settings.
Overview
Content Tools