...
How are Jobs, Job Chains and Orders Configured?
- JobScheduler objects (jobs, job chains, orders, schedules, process classes and locks) are all configured using plain XML files. These files are saved in the so-called Live Folder (the default location of this folder or directory is
./config/live, relative to the scheduler_data directory). The configuration for every JobScheduler object is saved individually in this folder or one of its sub-folders. - Changes to these object configuration files become effective without a restart of the JobScheduler being necessary, although on Unix® systems it may take up to a minute for a change to become effective.
- Objects can be created and modified using JOE - JobScheduler Object Editor. New objects are configureded by either duplicating an already existing object in JOE, and then modifying it, or by creating and configuring a completely new object.
- A text editor could also be used to create and modify objects but working in this way requires detailed knowledge of the XML structure of each JobScheduler object (see the JobScheduler Reference documentation for more information).
- Jobs and Orders are run - i.e. started, paused, stopped, etc. - and monitored using the JOC Cockpit interface. This interface also allows job starts configured with JOE - in the form of either Run Times or Schedules - to be temporarily overwritten. The JOC Cockpit also allows users to review the current workplan and history.
Other tutorials in this series
- JobScheduler - Tutorials - Introduction and Requirements
- JobScheduler - Tutorial 1 - Running a simple job using the JOC Cockpit
- JobScheduler - Tutorial 2 - Editing a Simple Job with JOE
- JobScheduler - Tutorial 3 - Running an Order Using the Run Time Parameter
- JobScheduler - Tutorial 4 - Configuring and Running a JITL Job
- JobScheduler - Tutorial 5 - The YADE JITL Job - Configuring and running file transfer jobs
- JobScheduler - Tutorial 6 - Configuring and Running Standalone Jobs (this article)
Configuring a Standalone Job
There are two ways to Configure the Standalone Job for this tutorial. Either:
- follow the step-by-step instructions in this tutorial or
- download and installing the completed configuration file.
Step-by-Step Configuration using the JobScheduler Object Editor
- Start JOE (the JobScheduler Object Editor) using one of the following scripts:
%SCHEDULER_HOME%\bin\jobeditor.cmd( Windows™ )$SCHEDULER_HOME/bin/jobeditor.sh( Unix™ )- Once started JOE should look similar to the screenshot:
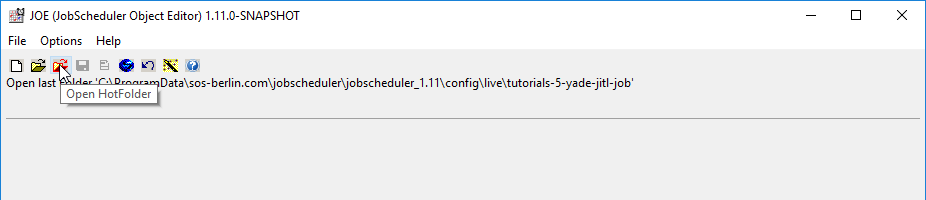
- Open the live folder in JOE:
- Use the key combination ctrl+D or
select File -> Open HotFolder from JOE's main menu or click the red folder icon in the menu bar.
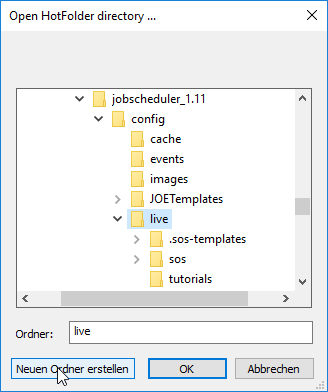
The live folder should be selected by default: if not, navigate to./config/live. - Add a folder for your Standalone Jobs using the Make New Folder button as shown in the screenshot below:
- Once the standalone_-jobs folder configured in the first part of this tutorial previous step has been opened in JOE, click on the Jobs element in the left hand Scheduler Elements pane. This will open the Jobs panel as shown in the next screenshot:
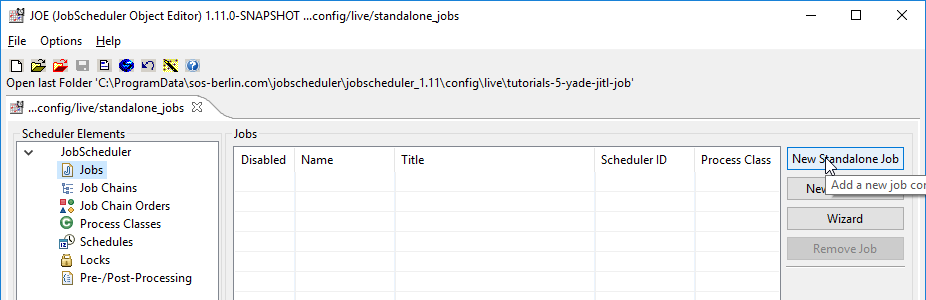
- Now click on the New Standalone Job button to create a first job. This new Job, with Name job1, will be shown in both the Jobs and Scheduler Elements panes:
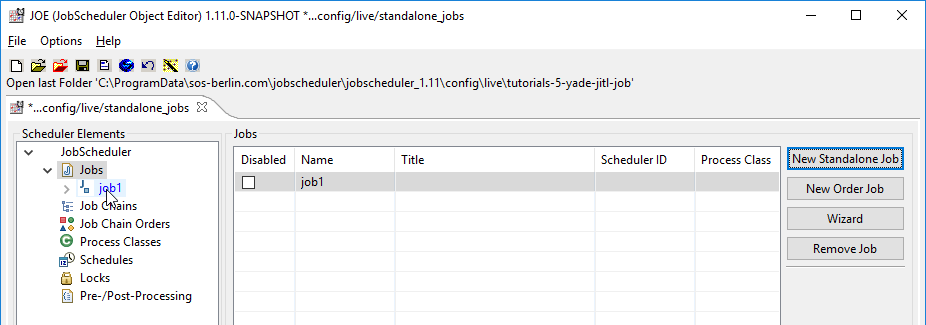
- Click on the job1 element in the Scheduler Elements pane to allow the Job to be configured as shown in the next screenshot:
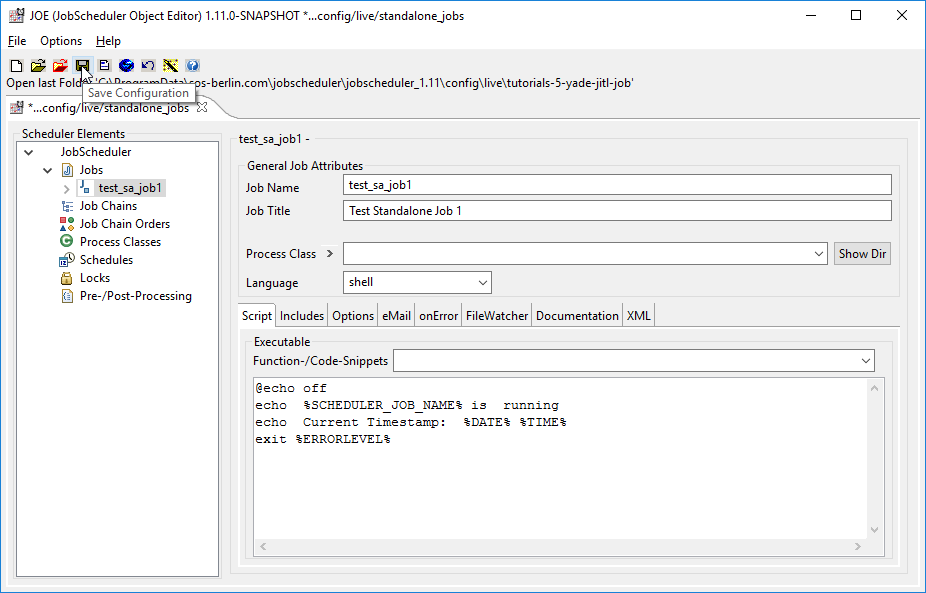
For the purposes of this tutorial we only need to configure:- the Job Name and
add a simple script using the code from one of the following code blocks, according to the operating system:
Code Block language xml title Example Script: for Microsoft® Windows® @echo off echo %SCHEDULER_JOB_NAME% is running echo Current Timestamp: %DATE% %TIME% exit %ERRORLEVEL%
Code Block language xml title Example Script: for Unix® #!/bin/sh echo "$SCHEDULER_JOB_NAME is running" echo "Current Timestamp: `date`" exit $?
- In addition, the Job has been given a Title, although this is not mandatory.
- The Job can now be saved using the Save Configuration icon near the top of the browser window.
Downloading and Installing the Configuration File
The Configuration file for the Standalone Job can be downloaded from jobscheduler-tutorials-6-standalone-job.zip.
- Unpack the .zip archive and copy the
standalone_job-jobsfolder and its contents to the JobScheduler'slivefolder. This will be one of the following directories:C:\ProgramData\sos-berlin.com\jobscheduler\myJobSchedulerID\config\live( Windows™ ) or~/sos-berlin.com/jobscheduler/myJobSchedulerID/config/live- Where
myJobSchedulerID
Running the Standalone Job
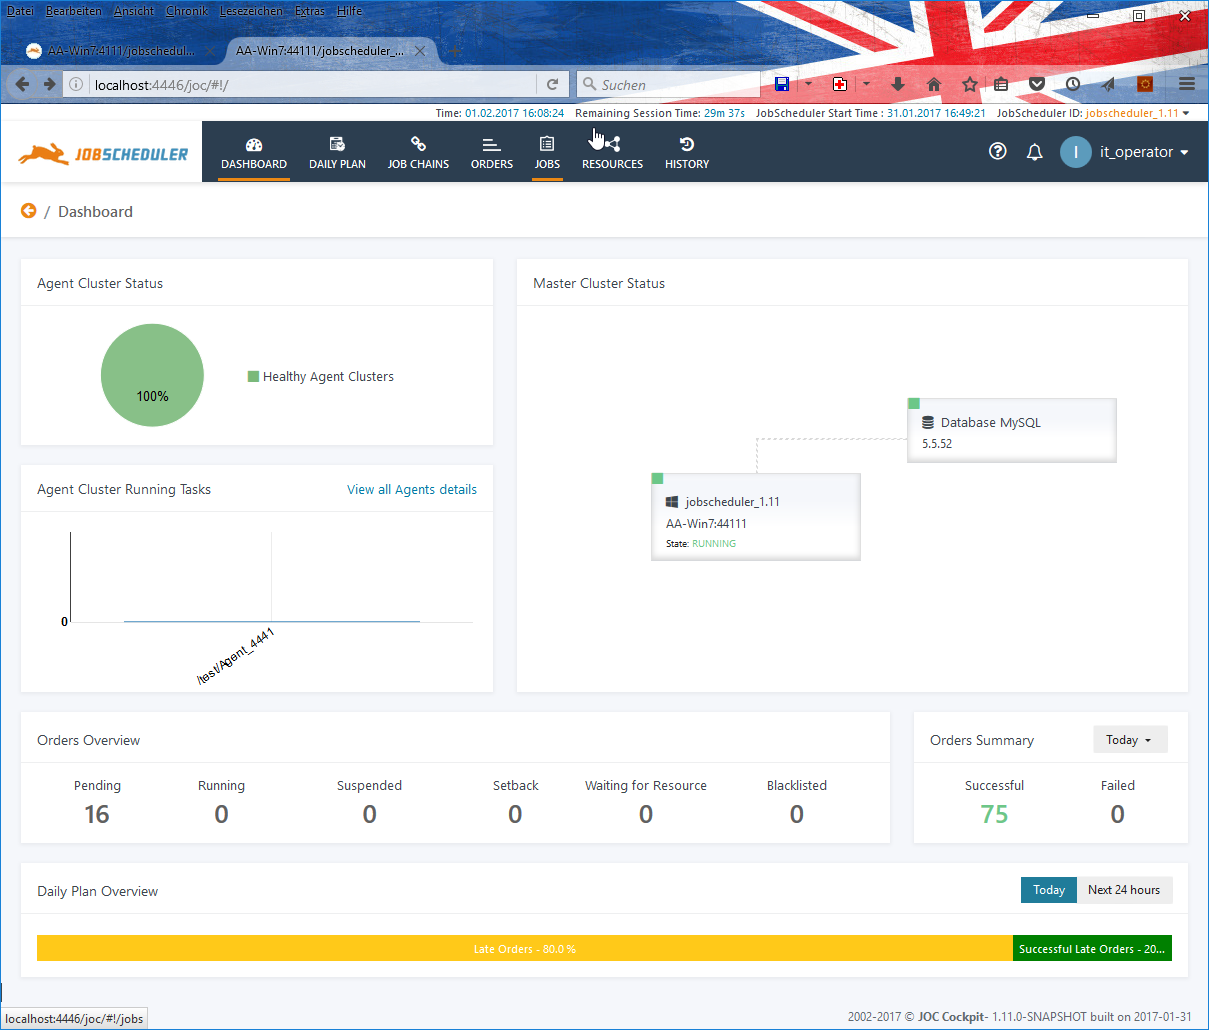
- Open the JOC Cockpit.
You open JOC in a browser by entering the address such ashttp://localhost:4446/joc/The exact address along with the account name and password you will require to log in will have been set by the system administrator that installed the JOC Cockpit. - Once you have logged in to the JOC Cockpit you will see the Dashboard view, which presents an overview your system as shown in the next screenshot.
- Change to the Jobs view by clicking on the button Jobs item in the main menu bar at the top of the window.
Standalone Jobs - and their containing folders - are only visible in this view. This is in contrast to Order Jobs which are most often viewed in the Job Chains view.- Click on the standalone_jobs folder in the tree menu to view the jobs in this folder.
(If necessary first use the Expand All link to open the Live folder.)
- Click on the standalone_jobs folder in the tree menu to view the jobs in this folder.
- Start the Job using by selecting Start Task from the Job Card menu with the ellipsis symbol as shown in the next screenshot:

- Before the Job starts a Write a Comment form will open. Completion of this form may be mandatory, depending on the configuration of your JOC Cockpit. The default setting is that the completion is not mandatory.
Reasons entered with this form are added to the JOC Cockpit Audit Log. Reasons can be added for every change to the state of a JobScheduler object: changes of state include starting a task as here, terminating an Order, etc. See the JOC Cockpit - Audit Log Article for more information.
- Enter a reason: either standardized reasons can be selected from the selection offered when Pre-Defined Reason is selected or custom, when Individual Reason is selected, as shown.
- When the Write a Comment form closes, the Task will start and Status element in the Job Card view may change from pending to running, depending on how quickly the job is completed.
- Before the Job starts a Write a Comment form will open. Completion of this form may be mandatory, depending on the configuration of your JOC Cockpit. The default setting is that the completion is not mandatory.
- The History for the Job - i.e. the Task History for standalone jobs can be accessed in two ways. Either:
- In the Jobs view:
- Change to the Jobs List view using the button with the three horizontal bars at the very right of the View Header menu.
- Click on the 'test_sa_job1' link in the Job Name column of the list which will open the Job History as shown in the next screenshot:
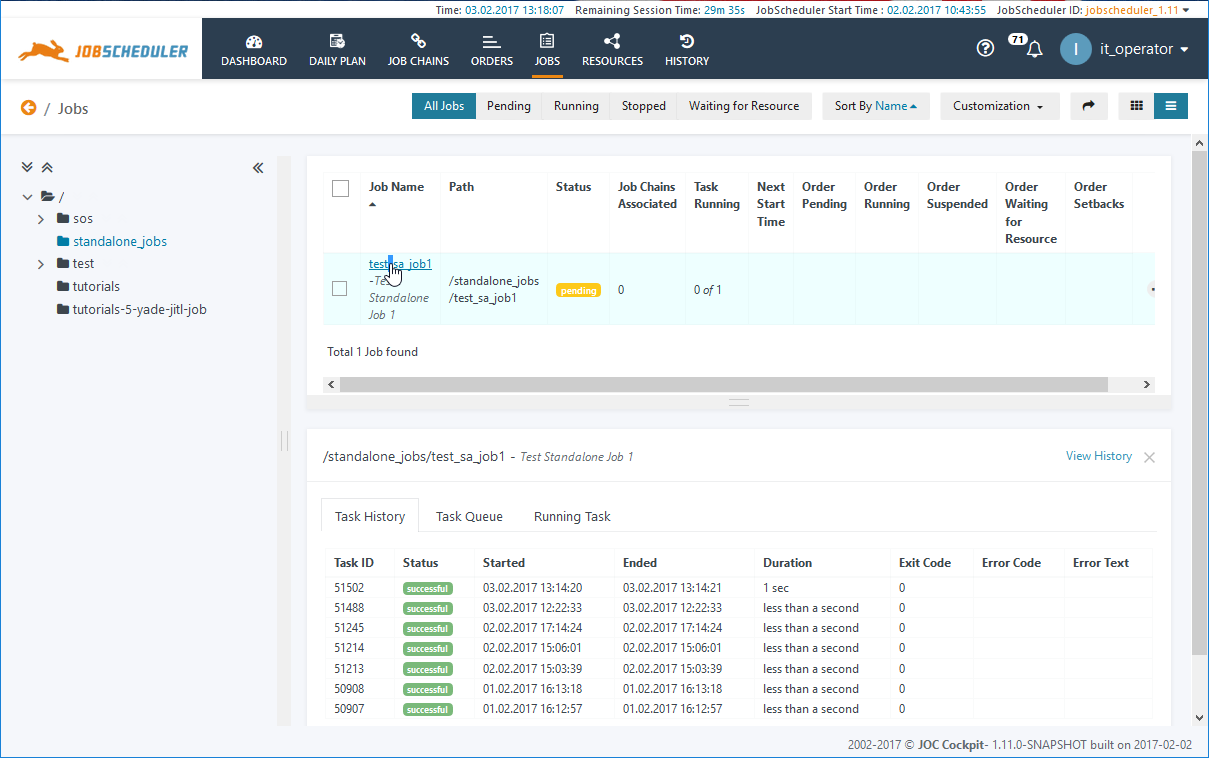
- The Log file for any given task in the History can now be opened by clicking on any one of the elements listed.
- In the Jobs view:
Congratulations!
You have successfully configured and run your first Standalone Job.
Scheduled Job Starts
In the following example a Standalone Job is configured to start daily at 12:00 o'clock and at 14:00.
You will find the Run Time->Everyday function in the element tree in the left hand pane of JOE: this is a sub-element available for both Jobs and Orders. Use the New Period button (positioned on the right hand side) to add a new start period. Use the Apply Period button to save your input after you have selected Single Start 12:00:00 in the Start Time field. Repeat this procedure for Single Start 14:00:00.
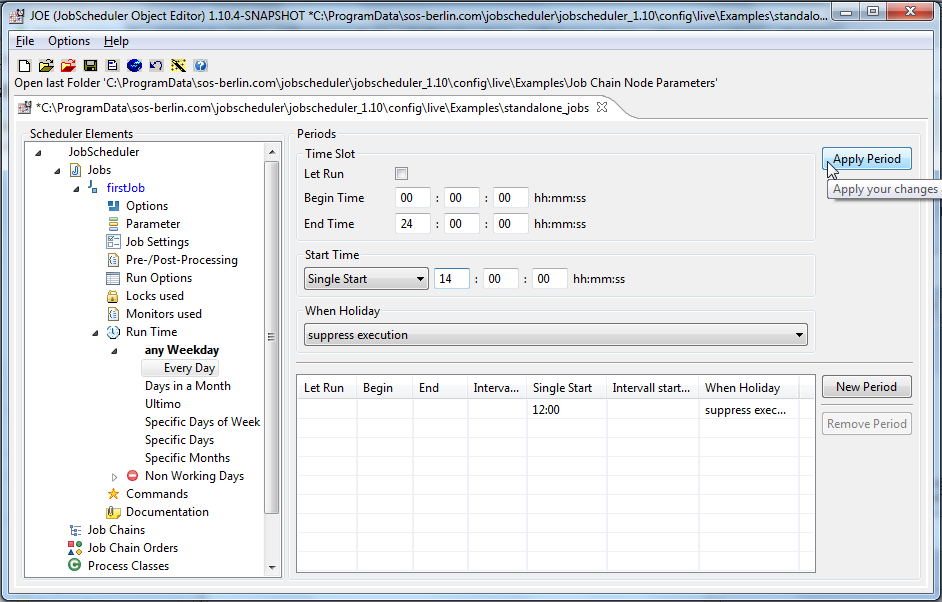
Note that in addition to the fixed start times (Single Start), it is also possible to set the following starting modes:
- repeat intervals (Interval end/start, Interval start/start).
- run-time period when a Job is to be started outside of the Job's time period, the Job will be queued and started once its run-time period has been reached.
Status title TO CHECK
Standalone Jobs can still be started manually, regardless of whether a start time or run period has been set. It is also possible to combine the scheduled starting of a Standalone Job with Directory Monitoring.
Configuration as XML
The code used to specify the firstJob job at the times specified in schedule1 and with the Directory Monitoring also described is shown in the code block below:
| Code Block | ||||||
|---|---|---|---|---|---|---|
| ||||||
<spooler>
  <config>
    <jobs>
      <job name="firstJob">
        <script language="shell"><![CDATA[@echo off
echo  %SCHEDULER_JOB_NAME% is  running echo  Current Timestamp:  %DATE% %TIME%
exit %ERRORLEVEL%]]></script>
        <run_time>
          <weekdays>
            <day day="1 2 3 4 5 6 7">
              <period single_start="12:00" />
              <period single_start="14:00" />
            </day>
          </weekdays>
        </run_time>
      </job>
    </jobs>
  </config>
</spooler> |
Further References
- A Overview of the JobScheduler Documentation