...
- Start JobScheduler
- Open the JobScheduler Object Editor (JOE)
- Open the JobScheduler Live Folder:
- A sub-folder of the live folder is used In this tutorial for all the objects related to the tutorial, "tutorials-5-jade-jitl-job".
A link to a download file containing the contents of this file will be provided at the end of this article.
- A sub-folder of the live folder is used In this tutorial for all the objects related to the tutorial, "tutorials-5-jade-jitl-job".
- In the left hand pane of JOE mark the Jobs icon - opening the JobScheduler icon if necessary.
- Start the Wizard function by clicking on the Button of the same name as shown in the screenshot below.

- Select Order controlled job in the small window that opens and then Next, which will open the Import Jobs window as shown in the next screenshot.
- Enter a Jobname such as jitl_job_1.
- In the Jobs pane, scroll down until the two JADE-Jobs are visible and select the job with the jadeJob.xml file name.
This will cause the Title field to be filled with "API Job for JobScheduler ...." - Click on the Next button

- The Job Parameter form for the JITL job will now open.
- The use of this form to set and modify parameter values was described in detail in Tutorial 4 - Editing and Running a JITL Job.
This form is shown in the screenshot below:
- Note that some of the parameter names specified in the Wizard - e.g. local_dir - are similar to but not identical with those set in the JADE file transfer tutorial. This is because the JITL job Wizard still uses deprecated parameter settings without the source_ or target_ prefixes that were specified in the JADE job. This considerably restricts the configuration of the JITL Job and the general use of the Wizard to directly configure a file transfer by directly selecting parameters is not recommended.
- NEW SCREENSHOTS & MODIFIED TEXT REQUIRED FROM HERE ON
- ... from a remote source to a remote target. However this type of file transfer can be configured using a profile in a settings file, both of which can be specified using the profile and settings parameters, which are available in the Wizard. The use of a profile and settings file has already been described in the JADE file transfer tutorial and this method of configuration for this JITL job will be described below. The parameter values specified here and shown in the screenshot below are identical with those described for the JADE file transfer tutorial with the exception of the local_dir parameter, which in the JADE tutorial had the value
- Instead it is recommended that the Wizard is closed at this point - click on the Finish button - and that parameters are entered manually. There are a number methods where this can be done:
- Use JOE'S job Parameter form to enter parameter name / value pairs. This is the simplest approach and will be used in this tutorial.
- Specify a
settings.inifile and profile in JOE'S job Parameter form and then enter the necessary parameters in this file using a text editor. This procedure will be described .....Status colour Yellow title ToDo - Create a custom JITL job by duplicating the JADE JITL jjob in the JobScheduler data jobs folder and directly editing this file. This procedure will be described .....
Status colour Yellow title ToDo
${USERPROFILE}\jade_demo\a.In the JITL job the User depends on the JobScheduler configuration and therefore the value for the local_dir parameter is specified absolutely.
Note that this Job Parameter Wizard form can be directly opened from the Job Parameter form in JOE as can be seen in the following screenshot:
- The use of this form to set and modify parameter values was described in detail in Tutorial 4 - Editing and Running a JITL Job.
- Manually enter parameter name / value pairs in the Job Parameter form as shown in the next screenshot:
- The Job Parameter form is opened by clicking on the Parameter icon for jitl_job_1 in the left hand pane of JOE.
- Parameters are entered by simply typing names and values in the corresponding fields and then clicking the Apply button.
- The screenshot shows all the parameters required to implement the simple JADE file transfer profile listed at the start of this tutorial.
- The parameters shown are identical to those used in the JADE profile with the exception of the target_dir parameter which has been given an absolute value.
This is because the JobScheduler on the system used to develop this tutorial does not run under the normal user Windows user account and therefore the ${USERPROFILE} variable would return the wrong path. - Information about parameter reference information will be given later on in this tutorial.
Status colour Yellow title ToDo
- The parameters shown are identical to those used in the JADE profile with the exception of the target_dir parameter which has been given an absolute value.
- Create a Create new job chain for the job:

- Add the job to the job chain along with two end nodes as shown:

- Create and configure an order for the job chain:

- Don't forget to save the configuration using the dark grey button as shown:

Start the Order in JOC, the JobScheduler Operations Center using the Order menu button as shown

- Open the log file after the order has run using the Show Log link as shown in the next screenshot:

The screenshot below shows a extract from the log file for this order and the detailed log information that is available for JADE file transfer operations: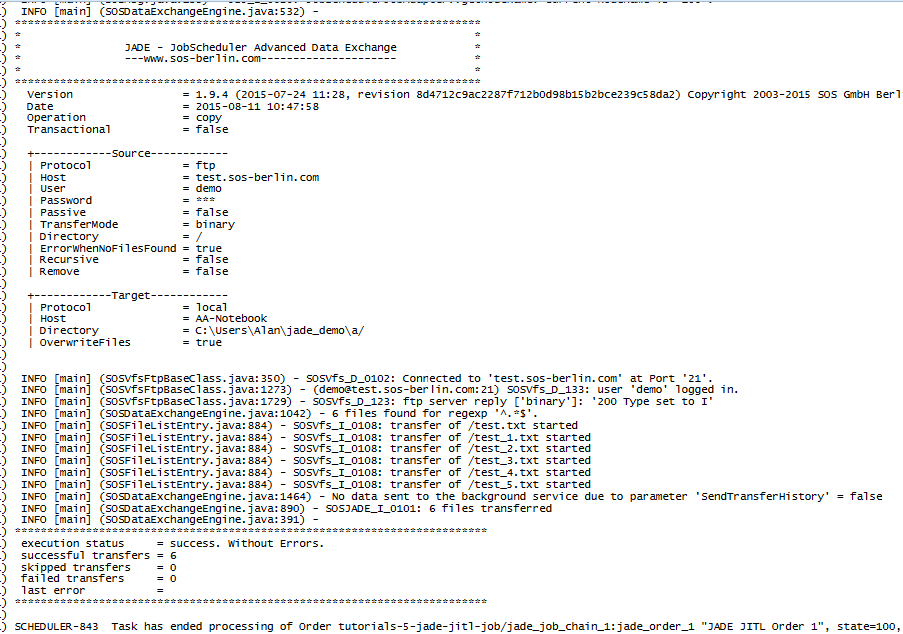
As can be seen from the log file, seven six files have been copied to the...\jade_demo\afolder. These were all the files in the remote folder as a filter was not used specified to select particular files.
...
JADE and therefore the JADE JITL Job can be configured to use a range of protocols, the most important of which is SFTP, and to use public/private key authentication.
...
The JADE JITL Job can also be configured to use file transfer configurations specified in the form of one or more profiles saved in a settings.ini file. This configuration method is used in th JADE Command Line Client up to Release 1.10 of JADE and JobScheduler and is described in the next tutorial....
| Status | ||||
|---|---|---|---|---|
|
Error handling, notifications and monitoring
...