Introduction
The SOS web site offers the Try Out option form to request an immediate product demo. When requesting the demo you will receive a welcome e-mail that includes an invitation link and access data for the JobScheduler demo.
After clicking the Try-Out: Login JOC Cockpit link in the welcome e-mail, you will be presented the JobScheduler Operations Center ( JOC) Login. Use the account and password that you received with the welcome e-mail.
After login you will be presented the initial view, which is referred to as the DASHBOARD, for explanations see Dashboard View. The Dashboard gives a bird's eye view of the JobScheduler's operational status.
To run job chains from JOC Cockpit, you need to switch to the JOB CHAINS view. To expand the list of folders and to see available job chains, in the left panel navigate the tree and click on the arrows and folders, for detailed explanations refer to Navigation and Usability.
After expanding, the top folder will show sub-folders, each including one or more job chains.
All examples in the demo environment follow the same pattern. Each job chain demonstrates an important JobScheduler feature, and most of the job chains use a minimum of two Orders to simulate successful and failed processing.
Shell Script Job
The example 01_JobChainShellJob demonstrate the JobScheduler's capability to execute shell jobs.
- To start the example, first you should to list the job chains in the folder. Therefore click on the sub-folder, e.g. 01_JobChainShellJob. The list of job chains will appear in the right panel.

- 01_JobChainShellJob: the job chain includes some simple jobs with a shell script as executable. The job chain can be started by two permanent orders to run the job chain with “success” and “error” execution results.
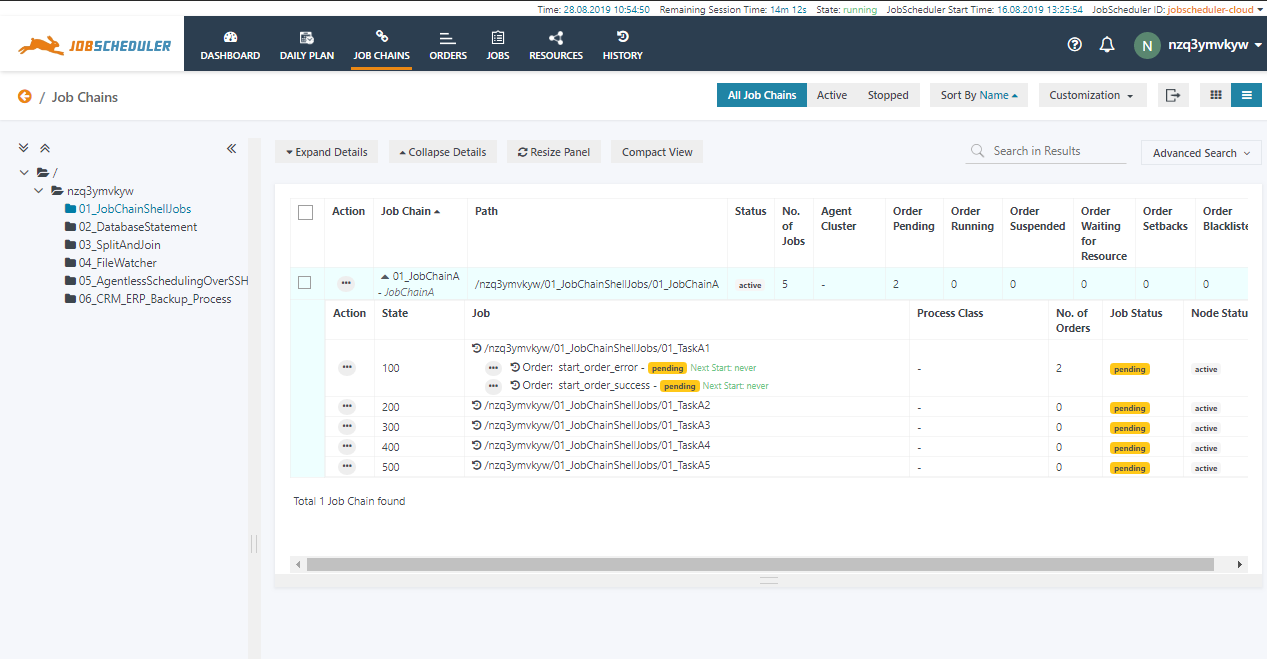
The job chain 01_JobChainShellJobs includes 5 job nodes with 2 orders to demonstrate successful and failed execution.
The order start_order_success will simulate successful execution, the order start_order_error will raise an error during execution.
To run any of the orders
- click on the action menu of the order, a drop-down menu will appear like this:

- click on the Start Order now option to run the order immediately. The order will start, you can see the order passing from one job node to then next.
- click on the action menu of the order, a drop-down menu will appear like this:
To check the status of the order
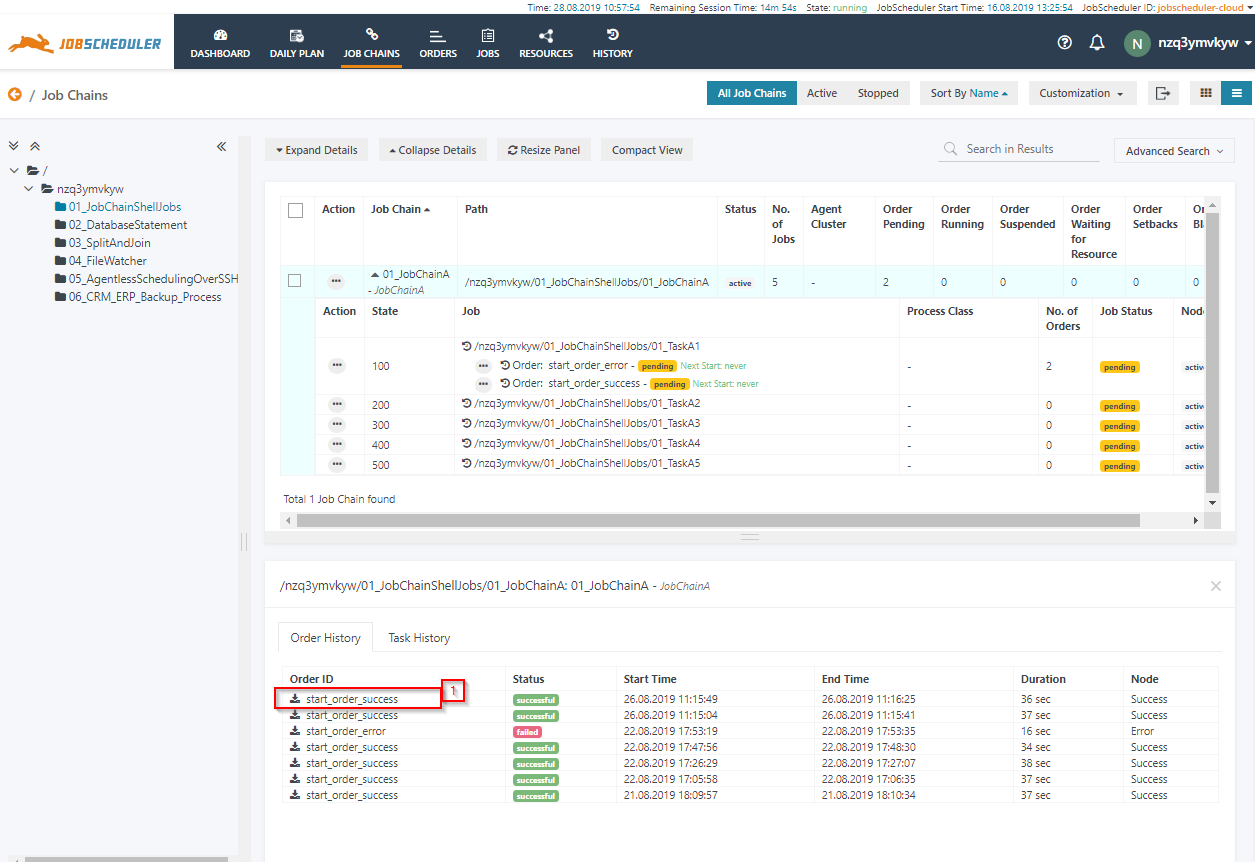
- click on the job chain name 01_JobChainShellJobs, the Order History panel will open at the bottom section of the page.
- the Order History panel shows the execution history of past and current job chain runs..

- The Order History panel shows the last few executions of a job chain, you can use the HISTORY view for a full report. The Order History offers to view the log of past and running orders:
- Click on the most recent entry of the start_order_success order to access the log of the order's last run.
- A log window will open and the order log will be displayed. The order log contains log output from all jobs executed by the order.
- You can download the log file by clicking the Download button from the right upper corner of the log window.

- Click on the most recent entry of the start_order_success order to access the log of the order's last run.
Execute Database Statements
The JobschedulerManagedDatabase is a JITL job, it can be used to execute SQL statements or SQL scripts on a number of RDBMS database systems. The JobSchedulerManagedDatabase job abstract the complexity of executing SQL statements/scripts on any RDMBS system. The JITL job uses the Java hibernate to connect and execute the statements.
In this example, we are executing a simple SQL statement on the JobScheduler Database to get the JobScheduler Host and URL. The JobSchedulerManagedDatabase has the capability to convert results of SQL statement into order parameters which can be read by successive jobs in the job chain. This example demonstrates the feature where results from SQL statement will be available to next job step as order parameters e.g. JobScheduler Host and URL values
To run the job chain.
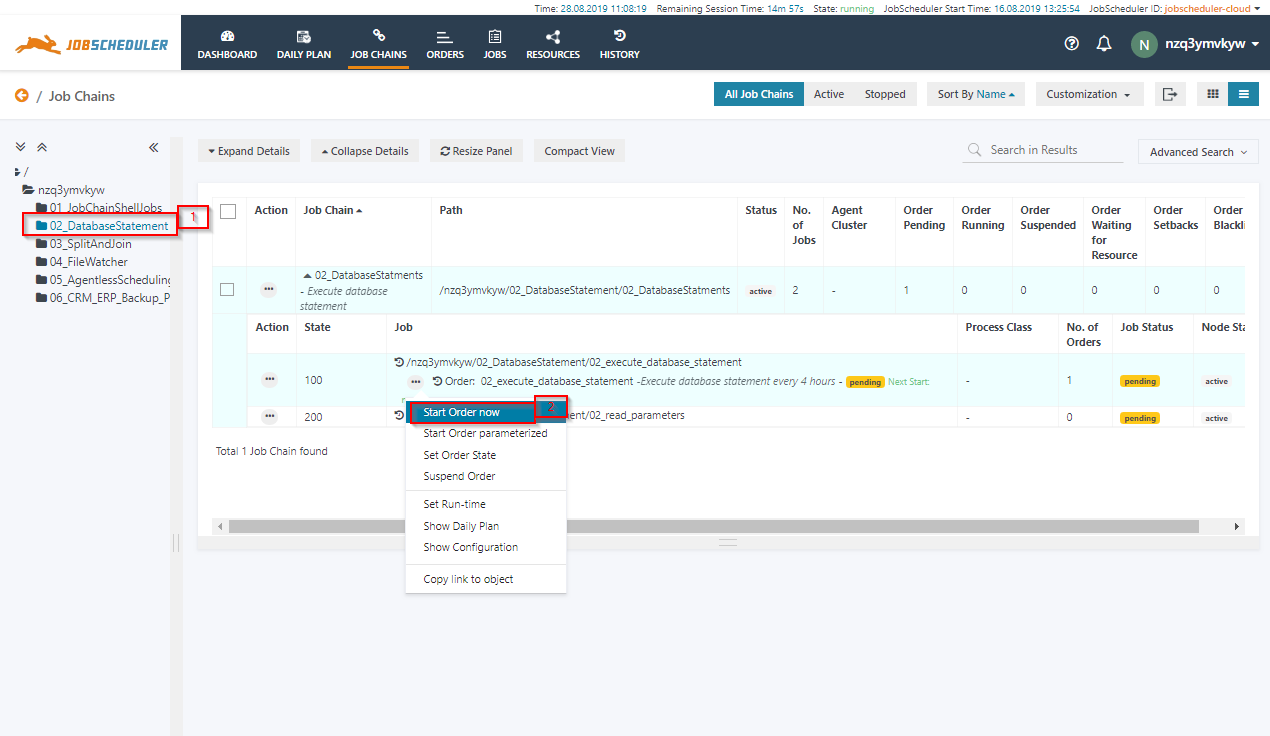
- Click on job chain name 02_DatabaseStatement to expand the job chain details. A single order 02_execute_database_statement should be displayed:

- Click on job chain name 02_DatabaseStatement to expand the job chain details. A single order 02_execute_database_statement should be displayed:
To run the order.
- click on the action menu of the order. A drop-down menu will appear.
- click on Start Order now option to run the order immediately.
- To check the status of the order
- click on the job chain name 02_DatabaseStatements,
- the Order History panel will open to show the past and current executions of the job chain.

- From the log output you will see that the SQL statement was executed for the database and the results were transferred to the next job as order parameters.
File Watching
JobScheduler comes with the built-in File Watching feature that allows to automate business processes based on the arrival of files. The file watching job chain starts automatically as soon as a file arrives in a specific folder. Once the job chain is triggered by the file, the complete file path will be available to the job as an environment variable which can be passed to the application or script called by the job.
- To make the 04_FileWatcher job chain start you need to create some files which will trigger the job chain. To this purpose, first, expand the folder and list all the job chains.
- Start the order start in the job chain 04_GenerateTestFiles

- This will generate five files in the incoming folder that will trigger the job chain 04_FileWatcher

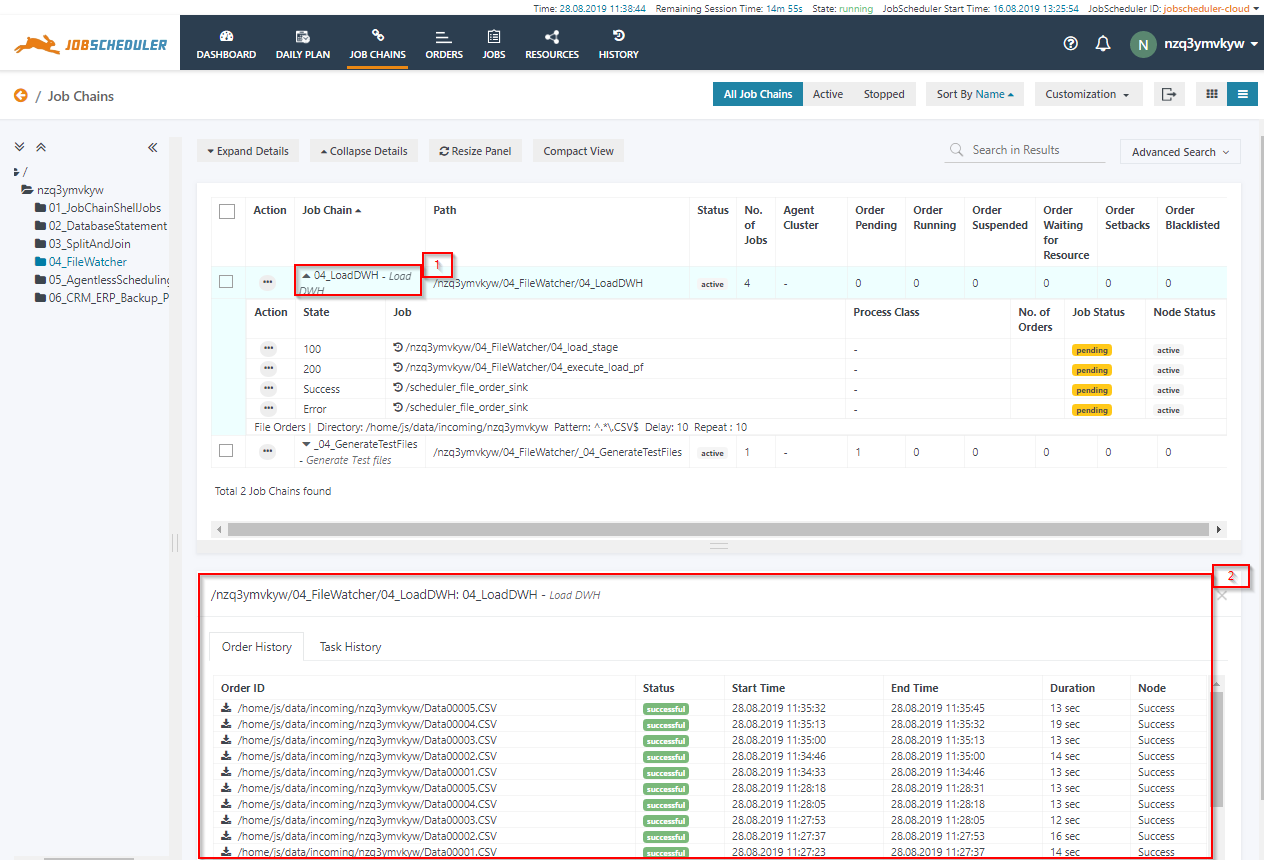
- To check the status of the file watcher order
- click on the job chain name 04_LoadDWH,
- the Order History panel will open to show past and running executions of the job chain..
Agentless Scheduling
JobScheduler has feature-rich Agent Scheduling capability using JobScheduler Universal Agent. Along with JobScheduler universal agent, JobScheduler also supports the agentless scheduling over SSH.
This example demonstrates the simple example of executing a shell command on a remote server over SSH. The JobScheduler JITL job JobSchedulerSSHJob is an inbuilt interface to execute tasks over SSH. Read more about JobSchedulerSSHJob parameterization on KB article Example for the JobScheduler SSH Job
Start the Job
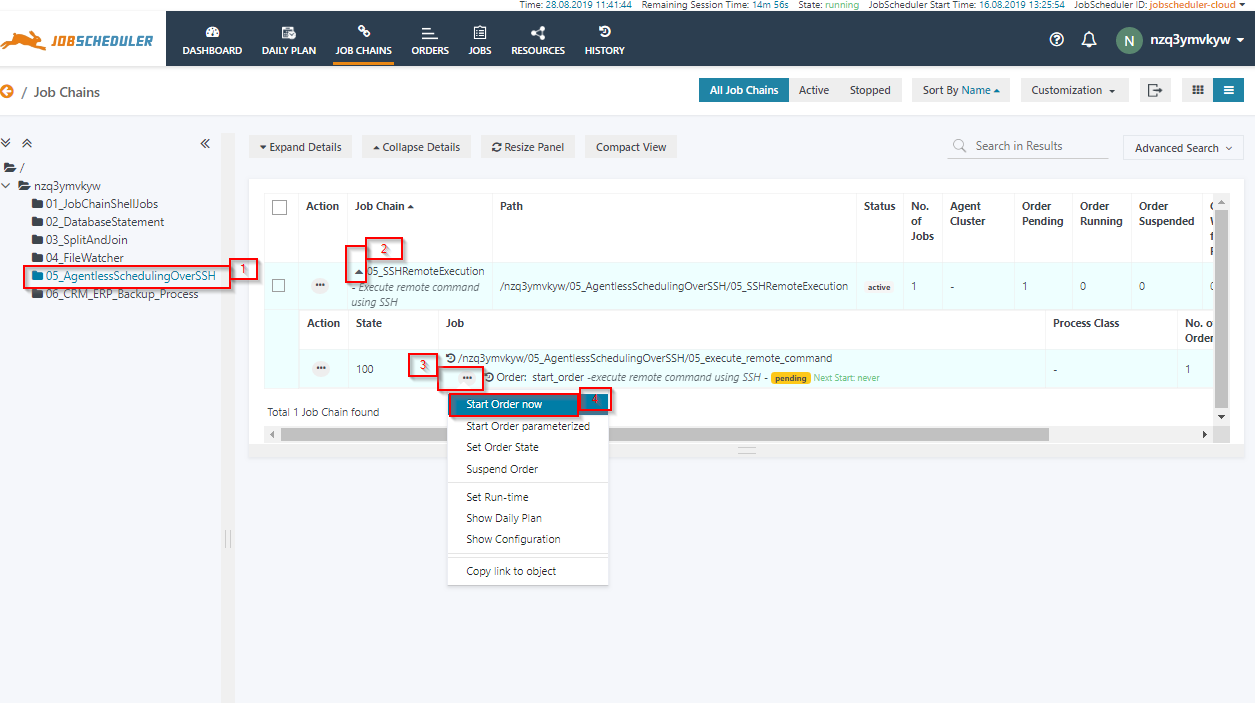
- Start the order “start_order” which will start the job 05_execute_remote_command.
- The job 05_execute_remote_command will connect with the remote host and will execute simple shell command “env | sort”, the results from the command will be stored in the log files.
- To open the log file.
- Click on the job chain name "05_SSHRemoteExecution", new order history panel will open

- Click on the order "start_order" to open the log window.

- Click on the job chain name "05_SSHRemoteExecution", new order history panel will open
Multiple Order and Order Parameter
This example demonstrate the JobScheduler feature of multiple orders assigned to a single job chain and order parameters. JobScheduler job chains can be reused by assigning multiple orders consist of different parameter set, which in turn reduce the number of identical job configuration. the job chain, "06CrmErpBackupProcess" one single job accept parameters is configured with multiple orders in it.
The JobScheduler feature can be used in a classic database backup process, One of the most common use case is the database backup job chains, for example to backup two databases e.g., ERP and CRM databases, with the frequency of Daily, Weekly and Monthly. A job chain can be configured to reuse the database backup job by parameters from the orders. When the order will start the parameters from order will be available to the job as environment variables.
06CrmErpBackupProcess
In the job chain “06CrmErpBackupProcess” the multiple order is used with multiple parameters. Which run on the Daily, weekly and Monthly basic to
- DailyBackup orders: The orders executed daily according to runtime time of orders.
- WeeklyBackup orders: The orders run weekly according (mostly executed in free time Saturday or Sunday) to the runtime of orders.
- MonthlyBackup: The orders will execute on the last day on the month
To run the job chain.
- Click on job chain “06_CRM_ERP_Backup_Process” and expand the job chain details

To add run job chain manually
- Click on the action menu of any order e.g. “DailyBackupERP”. A drop-down menu will open.
- Click on Start Order now to start the order.

To check the status of the order
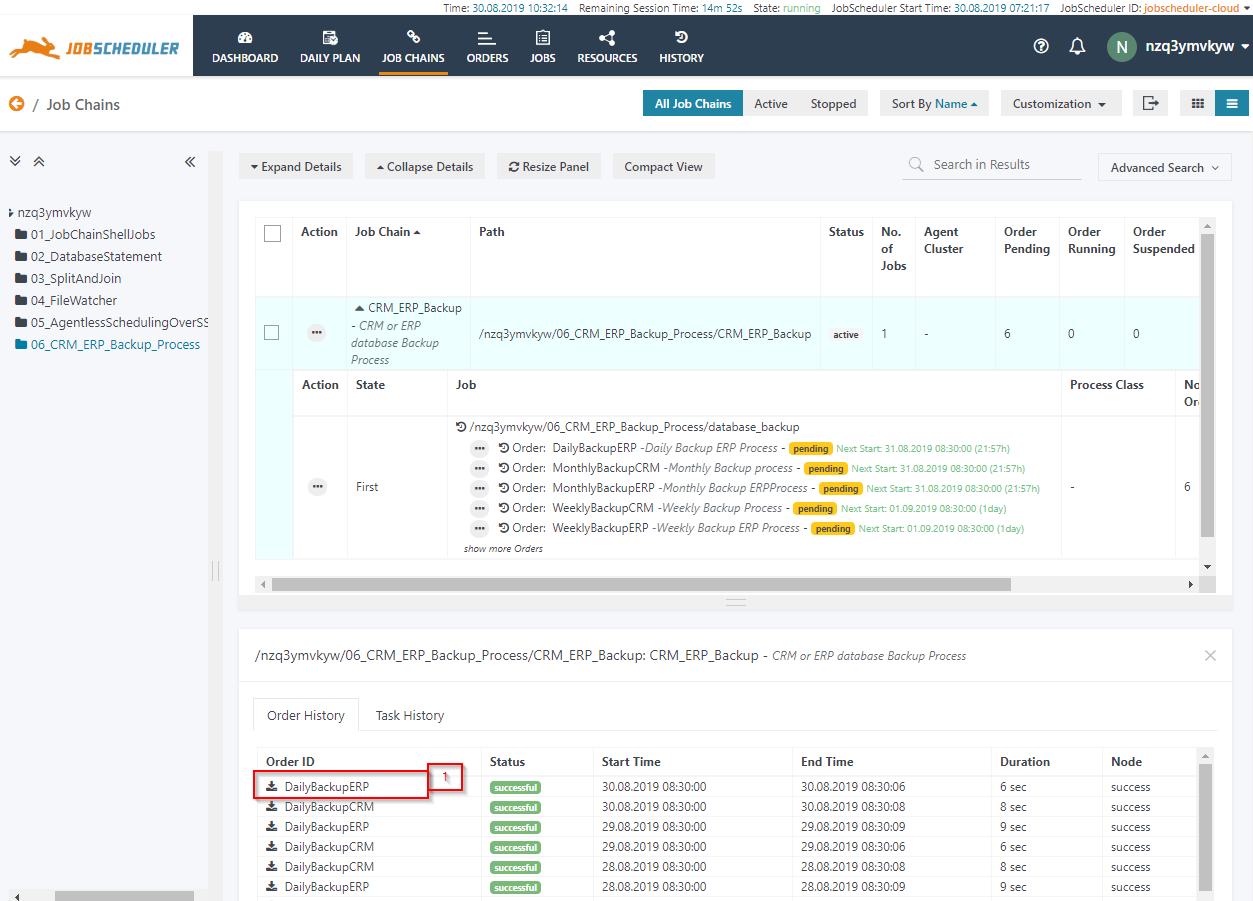
- Click on JobChain name "CRM_ERP_Backup"
- New Order History panel will open to show the order history.

You can also review the log of the running order.
- Click on “DailyBackupERP” order to open logs from order history tab.
- The log window will open, and the complete Order log will be shown