Introduction
JobScheduler can manage workflows according to the results of jobs, i.e. their return codes. It can use job return codes to:
- define the next job node to be executed in the same job chain and
- start orders for other job chains.
Feature History
Workflow control by return code handling was introduced with release 1.9.0.
Issues
Feature support is subject to the following issues:
Use Cases
Workflow control by job return codes allows conditional job chain execution and the representation of more dynamic and complex processes than was previously possible with JobScheduler.
The return codes from individual jobs in a job chain can be used to:
- start one or more job chains
- dynamically generate order IDs and assign parameters
- extend the range of error handling possibilities.
Feature Scope
Feature Implementation
The feature uses the inverse logic of return codes: an exit code of 0 is returned when a job has run successfully and all other return codes (i.e. non 0) are returned when a job ends in error.
The feature has been implemented to use individual return codes (0, 1, 2, etc.) or return code ranges (1-5, 6-9, etc.).
A typical implementation within a job chain would be:
- a return code of 0 will cause an order to move to the next_state in the job chain.
- a return code between 1 and 5 will cause the order to move to the cleanup_files state.
- a return code between 6 and 9 will cause the order to proceed to the error state.
A typical implementation for additional job chains:
- a return code of 0 will cause an order to move to the next_state in the job chain and to generate an order for an additional job chain.
- a non-zero return code causes an order to proceed to the error_state and start a second, error handling job chain.
Alternative commands
The JobScheduler's next_state (true), error_state (false) and add_order commands can also be used to provide a limited control of work flow within a job chain (see How to configure the handling of exit codes by jobs and the JobScheduler <job_chain_node.job_chain> Element reference).
However, these commands are job-specific and will be applied every time the job is called, limiting the extent to which the job can be reused.
Comparison
The implementation of return_codes is specified for a job chain node and is part of the job chain object. The implementation of return_codes is therefore independent of the job specified for a node and can be used more flexibly than next_state, error_state and add_order.
Example: Starting an order according to the exit code returned by a job chain node
Demonstration Files
Download: JobChainReturnCodes Example working example (Windows Version), for Linux simply change the job's shell scripts with Linux scripts.
Example
Consider two job chains where one of the chains will only be started if a job in the other chain has beens successfully completed.
Such a configuration is shown in the diagram below:
- JobChain0 has 6 shell jobs 1, 2 ,3, 4, 5 and 6 and JobChain1 has 2 shell jobs.
- JobChain1 should only start if Job 3 in JobChain0 ends successfully.
Processing the return codes
The configuration of the exit codes takes place in two stages:
- The standard progression through the job chains:
- When any of the jobs in either chain ends with an exit code = 0, i.e. successfully, it will proceed to the job defined by the next_state.
- When any of the jobs ends with an exit code other than 0, i.e. in error, then processing of the order will be stopped and the order will proceed to the error_state.
- Generation of the order to start JobChain1:
- If Job 3 ends with an exit code = 0 then the Order 1 for JobChain1 will be generated by JobScheduler and started. This is configured using the on_return_codes attrbute.
- If Job 3 ends with an exit code = 0 then the Order 1 for JobChain1 will be generated by JobScheduler and started. This is configured using the on_return_codes attrbute.
Configuring the return codes
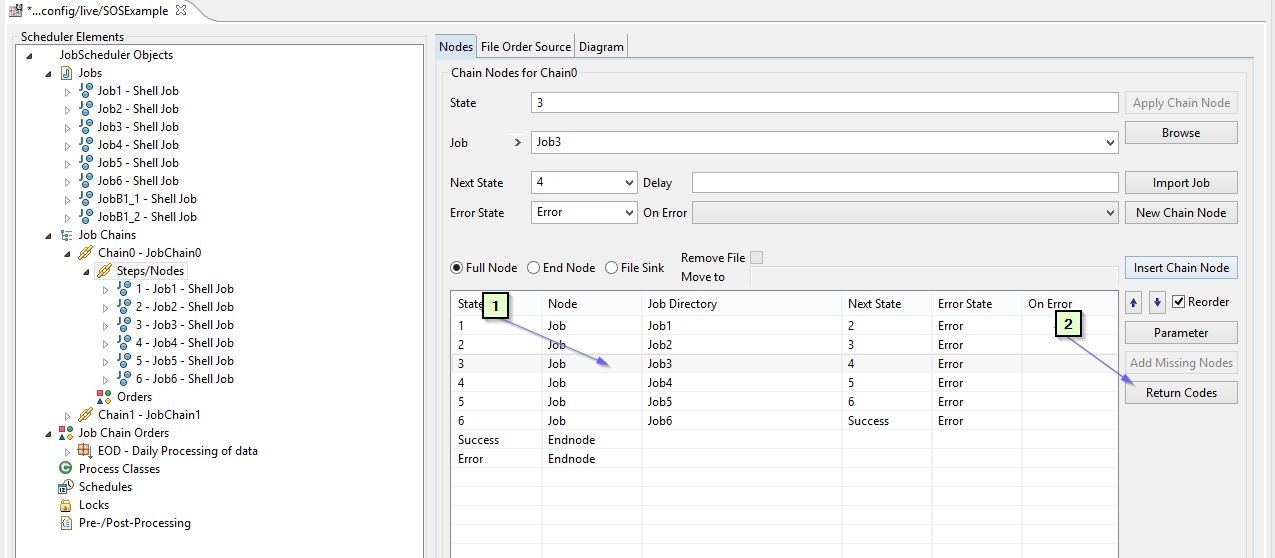
This is done in the Nodes tab of the JobScheduler Object Editor JOE for JobChain0 as shown in Screenshot 1 below.
A more detailed description of how to use JOE to configure a job chain can be found in JobScheduler Tutorial 2 - Editing a Simple Job with JOE
- The standard progression through the job chains is configured in the NextState and ErrorState fields of the form.
- Generation of the order to start JobChain1 is configured as shown in the screenshot:
- 1) Select Job3 since we want to start JobChain1 if this job ends successfully
- 2) Click on the Return Codes button to open the Return Code configuration form
Screenshot 1
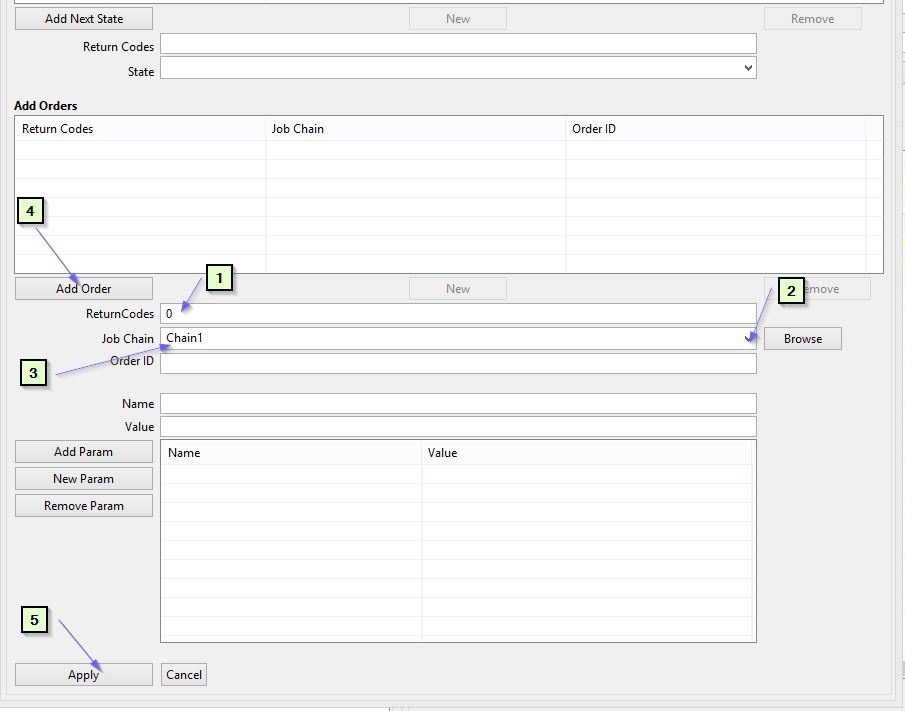
- 1) Give the return code e.g
. return_code = 0is success in the ReturnCodes field- Syntax:
- Individual return codes are separated by blank spaces (e.g. 1 2).
- Return code ranges are inclusive and written 1..5 6..9
- Return codes can only be specified once
- Behavior:
- Note that non-zero return codes can be used but will be seen as an errors in the originating job chain.
- Should no
<on_return_code>element match the current return code then JobScheduler will apply thejob_chain_node@next_state(return code 0) orjob_chain_node@error_state(other return codes) attribute.
- Syntax:
- 2), 3) Select the target job chain e.g. JobChain1 from the drop down list
 only job chains present in the same folder will be available in the Job Chain dropdown list
- Other job chains can be:
- navigated to using the Browse button.
- specified using the syntax:
/myFolder/myJobChain.
- 4) Click on Add Order button to assign the Order to the
JobChain1 - 5) Click on Apply (at the foot of the form) to make the changes in the job chain configuration
- Save the job chain configuration.
Screenshot 2
Example Job Chain Code
<job_chain title="JobChain0">
	<job_chain_node error_state="Error" job="Job1" next_state="2" state="1"/>
	<job_chain_node error_state="Error" job="Job2" next_state="3" state="2"/>
	<job_chain_node error_state="Error" job="Job3" next_state="4" state="3">
		<on_return_codes>
			<on_return_code return_code="0">
				<add_order xmlns="https://jobscheduler-plugins.sos-berlin.com/NodeOrderPlugin" job_chain="Chain1"/>
			</on_return_code>
		</on_return_codes>
	</job_chain_node>
	<job_chain_node error_state="Error" job="Job4" next_state="5" state="4"/>
	<job_chain_node error_state="Error" job="Job5" next_state="6" state="5"/>
	<job_chain_node error_state="Error" job="Job6" next_state="Success" state="6"/>
	<job_chain_node state="Success"/>
	<job_chain_node state="Error"/>
</job_chain>
Further Examples
The following subjects have not been covered in this article:
- Workflow within a job chain (to_state)
- Error handling in the event of non-zero return codes
- Dynamic modification of parameters within a job chain
- Setting parameters and IDs for orders for additional job chains
Delimitation
Consider the situation where orders to start either one of two job chains are to be started according to the result of a job in the middle of a job chain:
- One of the orders could be generated when the job returns 0 and the original job chain would processing at the next_state.
- The other order could be generated when the job returns a specific non-zero code such as 1.
- This code would then be seen as an error and per default cause processing of the original job chain to revert to the error state.
- The non-zero return code could however be used to specify a to_state parameter for the original job chain. This would ensure that processing of the original job chain could continue from a state (i.e. job) specified for the to_state parameter.
References
- The Knowledge Base Articles on Exit Code handling:
- JobScheduler Reference Documentation: