WORK IN PROGRESS
Introduction
JobScheduler can manage work flow according to the results of jobs - i.e. their return codes. It can use job return codes to:
- define the next job to be executed in the same job chain and
- start orders for other job chains.
Feature History
Workflow Control by return code handling was introduced with Release 1.9.0.
Issues
This feature support is subject to the following issues:
Use Cases
- Welche Rolle ist für den Fall verantwortlich? Wer will etwas? Engineering, Operating, Business
- Was ist das Ziel? Was ist das Mittel? Was ist die Motivation?
Start one or multiple job chains
Assign Unique Order IDs
Parameter handling
Example Exit code range
Feature Scope
Feature Implementation
The feature uses the inverse logic of return codes: an exit code of 0 is returned when a job has run successfully and all other return codes (i.e. non 0) are returned when a job ends in error.
The feature has been implemented to use individual return codes (0, 1, 2, etc) or return code ranges (1-5, 6-9, etc).
A typical implementation within a job chain would be:
- a return code of 0 will cause an order should go to the next_state in the job chain.
- a return code between 1 and 5 will cause the order should go to the cleanup_files state.
- a return code between 6 and 9 will cause the order to go to the error state.
A typical implementation:
Alternative commands
The JobScheduler's next_state (true), error_state (false) and add_order commands can also be used to provide a limited control of work flow within a job chain (see the JobScheduler ).
However, these commands are job-specific and will be applied every time the job is called, limiting the extent to which the job can be reused.
The implementation of return_codes is specified for a job chain node and is part of the job chain object. The implementation of return_codes is therefore independent of the job specified for a node and can be used more flexibly than next_state, error_state and add_order.
Example: Starting an order according to the exit code returned by a job chain node
Demonstration Files
Download: JobChainReturnCodes Example working example (Windows Version), for Linux simply change the job's shell scripts with Linux scripts.
Example
Consider two job chains where one of the chains will only be started if a job in the other chain has beens successfully completed.
Such a configuration is shown in the diagram below:
- JobChain0 has 6 shell jobs 1, 2 ,3, 4, 5 and 6 and JobChain1 has 2 shell jobs.
- JobChain1 should only start if Job 3 in JobChain0 ends successfully.
Configuration return codes
The configuration of the exit codes takes place in two stages:
- The standard progression through the job chains:
- When any of the jobs in either chain ends with an exit code = 0 (i.e. successfully) it will proceed to the job defined by the next_state.
- When any of the jobs ends with an exit code other than 0 (i.e. in error) then processing of the order will stopped and the chain will go to the error_state.
- Generation of the order to start JobChain1:
- If Job 3 ends with an exit code = 0 then the Order 1 for JobChain1 will be generated by JobScheduler and started. This in configured using on_return_codes.
- If Job 3 ends with an exit code = 0 then the Order 1 for JobChain1 will be generated by JobScheduler and started. This in configured using on_return_codes.
Configuring the return codes
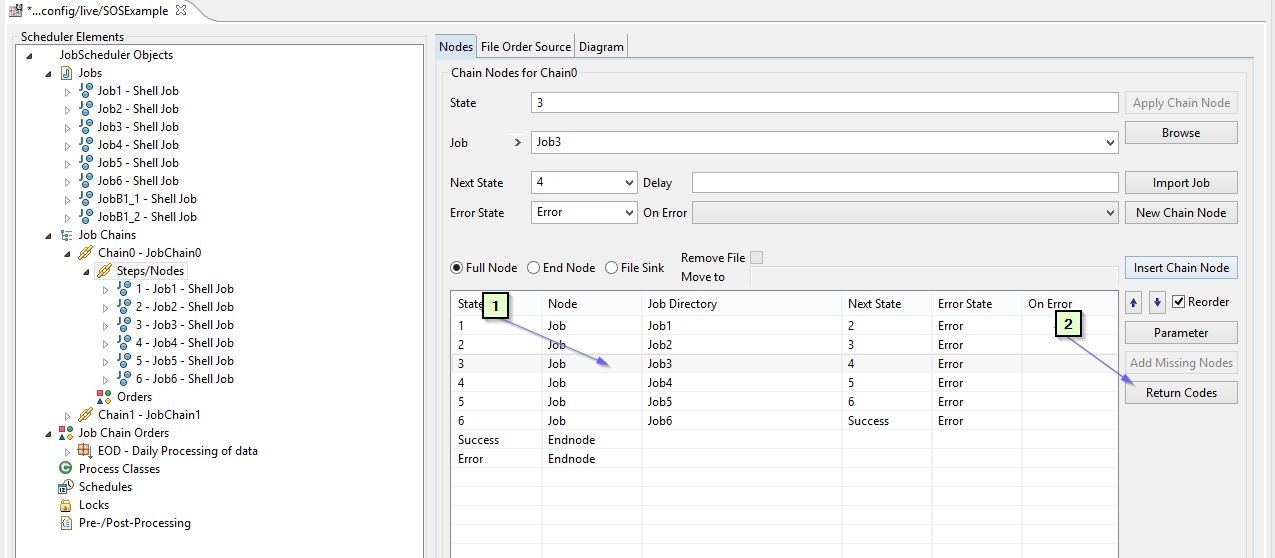
This is done in the Nodes tab of the JobScheduler Object Editor JOE for JobChain0 as shown in Screenshot 1 below.
A more detailed description of how to use JOE to configure a job chain can be found in JobScheduler Tutorial 2 - Editing a Simple Job with JOE
- The standard progression through the job chains is configured in the NextState and ErrorState fields of the form.
- Generation of the order to start JobChain1 is configured as shown in the screenshot:
- 1) Select Job3 since we want to start JobChain1 if this job ends successfully
- 2) Click on the Return Codes button to open the Return Code configuration form
Screenshot 1
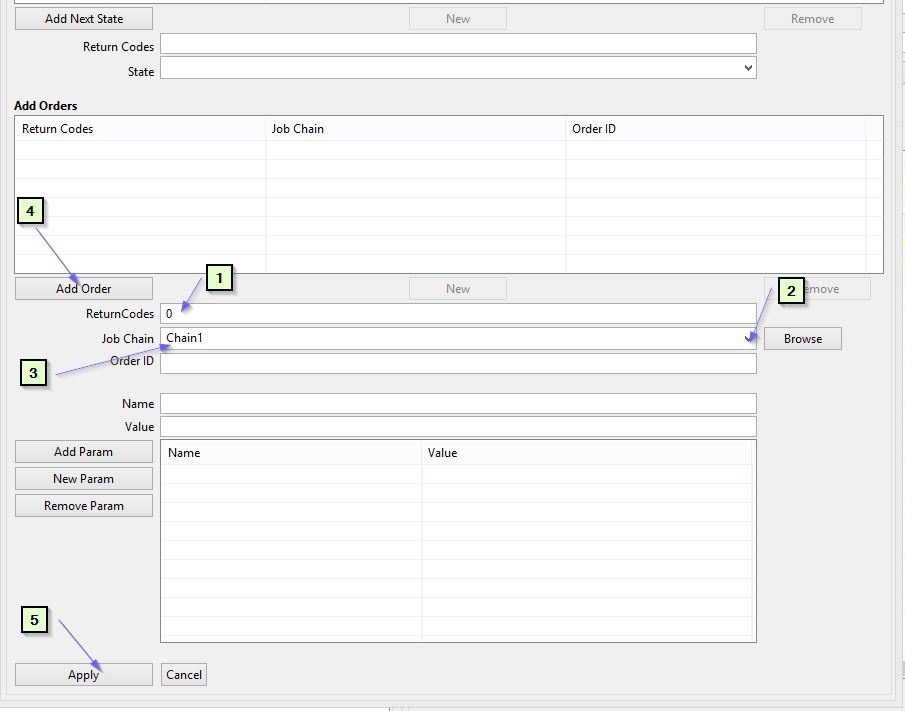
- 1) Give the return code e.g
. return_code = 0is success in the ReturnCodes field- Syntax:
- Individual return codes are separated by blank spaces (e.g. 1 2).
- Return code ranges are inclusive and written 1..5 6..9
- Return codes can only be specified once
- Behavior:
- Note that non-zero return codes can be used but will be seen as an errors in the originating job chain.
- Should no <on_return_code> element match the current return code then JobScheduler will apply the job_chain_node/@next_state (return code 0) or job_chain_node/@error_state (other return codes) attribute.
- Syntax:
- 2), 3) Select the target job chain e.g. JobChain1 from the drop down list
 only job chains present the same folder will be available in the Job Chain dropdown list
- Other job chains can be:
- navigated to using the Browse button
- specified using the syntax:
/myFolder/myJobChain
- 4) Click on Add Order button to assign the an Order to the
JobChain1 - 5) Click on Apply (at the foot of the form) to make the changes in the job chain configuration
- Save the job chain configuration.
Screenshot 2
Example Job Chain Code
<job_chain title="JobChain0">
	<job_chain_node error_state="Error" job="Job1" next_state="2" state="1"/>
	<job_chain_node error_state="Error" job="Job2" next_state="3" state="2"/>
	<job_chain_node error_state="Error" job="Job3" next_state="4" state="3">
		<on_return_codes>
			<on_return_code return_code="0">
				<add_order xmlns="https://jobscheduler-plugins.sos-berlin.com/NodeOrderPlugin" job_chain="Chain1"/>
			</on_return_code>
		</on_return_codes>
	</job_chain_node>
	<job_chain_node error_state="Error" job="Job4" next_state="5" state="4"/>
	<job_chain_node error_state="Error" job="Job5" next_state="6" state="5"/>
	<job_chain_node error_state="Error" job="Job6" next_state="Success" state="6"/>
	<job_chain_node state="Success"/>
	<job_chain_node state="Error"/>
</job_chain>
.
Further Examples TO REDO
- Workflow within Job Chain & Error handling
- Setting Parameters and Order Ids
Delimitation TO REDO
Workflow in the event of error is possible but does not suppress the error:
- If an order for another job chain is to be generated in the event of an error occurring in a job ->
- If alternative job chains are to be started depending on the return code (OR) then only one of the alternatives can not result in an error (only one success code poss)
References
- JobScheduler Reference Documentation:
~ ~ ~ ~ ~ ~ ~ ~ ~ ~ ~ ~ ~ ~ ~ ~ ~ ~ ~ ~ ~ ~ ~ ~ ~
Scope
- Worum geht es? In einem Satz.
- Für welches Release? (Confluence Macro display_feature_availablity)
Use Case
- Welche Rolle ist für den Fall verantwortlich? Wer will etwas? Engineering, Operating, Business
- Was ist das Ziel? Was ist das Mittel? Was ist die Motivation?
Implementierung
- Wie ist die Lösung implementiert? Mit welchen Mitteln?
Delimitation
- Abgrenzungen, was ein Feature nicht leistet, z.B. nur für bestimmten Plattformen verfügbar
- Funktionalität, die eben nicht bereitgestellt wird
- Limitation (technische Beschränkungen)
Example
- Beispiel Code und Erläuterungen
- Code Beispiel via Confluence Code Macro
- Beispiel Objekte
- Ganze Objekte wie jobs, orders etc nur als Anhang
References
- Change Management References
- JIRA Issues
- Documentation
- XML Element in der Referenzdokumentation
~ ~ ~ ~ ~ ~ ~ ~ ~ ~ ~ ~ ~ ~ ~ ~ ~ ~ ~ ~ ~ ~ ~ ~ ~
JS-1190 - Control the workflow of a job chain by exit codes
Workflow Control
This feature allows to configure the next job node in a job chain for a range of exit codes of the current job.
In addition to controlling the workflow by next_state (true) and error_state attributes the exit code of shell processes can be used directly. The return values true and false of API tasks are are mapped to the same result as exit code 0 (success) and 1 (error).
Use Cases
- If the exit code of the current task returns 3 then the next state for the order should be the error state. Other exit codes are considered to represent the successful execution of the task.
- If the exit code of the current task returns one of the values 3-9 then the order should be assigned a specific state and should be continued by the respective job node.
Examples
<job_chain
        xmlns:xsi="http://www.w3.org/2001/XMLSchema-instance"
        xsi:noNamespaceSchemaLocation="http://www.sos-berlin.com/repository/scheduler/1.9/scheduler.xsd">
    <job_chain_node state="100" job="/test-a"/>
    <job_chain_node state="200" job="/test-a">
        <on_return_codes>
            <on_return_code return_code="7..9 100..199 -99999..-1000">
                <to_state state="end"/>
            </on_return_code>
        </on_return_codes>
    </job_chain_node>
    <job_chain_node state="300" job="/test-a"/>
    <job_chain_node.end state="end"/>
</job_chain>
Explanations
- Should the element <to_state> be missing, then JobScheduler will apply the job_chain_node/@next_state or job_chain_node/@error_state attribute.
- For return_code single values can be specified and closed intervals [i, j] separated by spaces, e.g. "1..5 7 12..15".
- Each return code can only be used once..
- The attributes next_state and error_state are applied if no on_return_code element is used.
- Should no <on_return_code> element match the current return code then JobScheduler will apply the job_chain_node/@next_state (return code 0) or job_chain_node/@error_state (other return codes) attribute.
~ ~ ~ ~ ~ ~ ~ ~ ~ ~ ~ ~ ~ ~ ~ ~ ~ ~ ~ ~ ~ ~ ~ ~ ~
JS-1193 -Start of an order should be possible depending on the result of a task of a job chain node
Plugin
- A Plugin is provided that handles the return code of a previous job node:
<NodeOrderPlugin:add_order NodeOrderPlugin:job_chain="/test-b"/>
- The following modes are available for the handling of the Order ID when adding orders:
- If no Order ID is specified then the order receives the Order ID of the current order. A different job chain has to be specified and that job chain must not contain an order with same Order ID.
- The order is assigned an individual Order ID and job chain (which includes assigning the current job chain). The Order ID of the current order can be referenced by using the variable $ {ORDER_ID}
.
- Examples
- <add_order job_chain="..."/> adds an order with the same Order ID as the current order to a different job chain.
- <add_order id=“${ORDER_ID}.1” job_chain="..."/> adds an order with parts of the Order ID being created from a reference to the Order ID of the current order. The current job chain or a different job chain can be used.
- The handling of parameters is applied as follows:
- A newly added order receives a copy of the parameters of the current order.
- Additional parameters can be added by using the elements <add_order><params><param name="..." value="..."/>.... Additional parameters have precedence to parameters of the current order.
- Any errors when adding the order to the job chain are logged and ignored.
Configuration
Following configuration has to be applied to scheduler.xml to enable the corresponding plugin:
<?xml version="1.0" encoding="utf-8"?>
<spooler xmlns:xsi="http://www.w3.org/2001/XMLSchema-instance" xsi:noNamespaceSchemaLocation="http://www.sos-berlin.com/repository/scheduler/1.7/scheduler.xsd">
    <config>
        <plugins>
            <plugin java_class="com.sos.scheduler.engine.plugins.nodeorder.NodeOrderPlugin"/>
        </plugins>
    </config>
</spooler>
Complete sample job chain
<?xml version="1.0" encoding="utf-8"?>
<job_chain
        xmlns:xsi="http://www.w3.org/2001/XMLSchema-instance"
        xsi:noNamespaceSchemaLocation="http://www.sos-berlin.com/repository/scheduler/1.9/scheduler.xsd"
        xsi:schemaLocation="https://jobscheduler-plugins.sos-berlin.com/NodeOrderPlugin NodeOrderPlugin.xsd"
        xmlns:NodeOrderPlugin="https://jobscheduler-plugins.sos-berlin.com/NodeOrderPlugin">
    <job_chain_node state="200" job="/test-exit-7">
        <on_return_codes>
            <on_return_code return_code="7">
                <NodeOrderPlugin:add_order NodeOrderPlugin:job_chain="test-a"/>
            </on_return_code>
            <on_return_code return_code="5">
                <NodeOrderPlugin:add_order NodeOrderPlugin:job_chain="./test-b"/>
                <NodeOrderPlugin:add_order NodeOrderPlugin:job_chain="/other-folder/test-c" NodeOrderPlugin:id="${ORDER_ID\u0022}-copy"/>
            </on_return_code>
            <on_return_code return_code="9">
                <add_order xmlns="https://jobscheduler-plugins.sos-berlin.com/NodeOrderPlugin" job_chain="/x">
                    <params>
                        <param name="a" value="AAA"/>
                        <param name="b" value="BBB"/>
                    </params>
                </add_order>
                <to_state state="end"/>
            </on_return_code>
        </on_return_codes>
    </job_chain_node>
    <job_chain_node.end state="end"/>
</job_chain>
Explanations
- The NodeOrderPlugin allows to specify absolute and relative paths for job chains. Relative paths are based on the location of the current job chain.
- Multiple orders (in different job chains) can be started for the same return code.
- The job chain path of the new order can be used relative to the current job chain. Just let the path start with "./".
- Mixed usage for orders that should be added and for the job node state that an order should move to is possible.
To use the plugin, it has to be included in the JobScheduler configuration file scheduler.xml:
<?xml version="1.0" encoding="utf-8"?>
<spooler xmlns:xsi="http://www.w3.org/2001/XMLSchema-instance" xsi:noNamespaceSchemaLocation="https://www.sos-berlin.com/repository/scheduler/1.9/scheduler.xsd">
    <config>
        <plugins>
            <plugin java_class="com.sos.scheduler.engine.plugins.nodeorder.NodeOrderPlugin"/>
        </plugins>
    </config>
</spooler>
Restriction
- As of now JobScheduler release 1.9.RC1 there is a restriction on target job chain configuration.
- If a target job chain is present in same folder where job chain configured to send order is present, target job chain can not be referred directly.
- Which means target job chain can only be referred with a relative or absolute path.
- Please see the example of restriction;
<add_order xmlns="https://jobscheduler-plugins.sos-berlin.com/NodeOrderPlugin" job_chain="03_JobChainB"/> - Above mentioned configuration of target job chain will not work.