Requirements
- Java Runtime Environment 1.8 or newer is required.
Installation
Extract the downloaded archive
jobscheduler_windows_universal_agent_installer.x.x.x.zipto an arbitrary directory, e.g.C:\Temp.The installer can run with or without a GUI.
- Make sure that all JobScheduler Universal Agent instances are stopped that are installed in the same location and therefore use the same Agent libraries.
- The installer asks for elevated administrator privileges, therefore it is not necessary to change the permissions in the
.\servicedirectory and the installer sets read/write permissions for the log directory. - After the installation you will find ...
- a Windows service "SOS JobScheduler Agent -port=<http-port>"
- an executable
.\service\sos_jobscheduler_agent_<http-port>.exethat is started by the Windows service - an instance script (
.\bin\jobscheduler_agent_<http-port>.cmd) of the JobScheduler Agent that is called by the.\service\sos_jobscheduler_agent_<http-port>.exe
Installation with GUI
Run the installer dialog for the JobScheduler Universal Agent using
Windows command to open the installer GUI> C:\Temp\jobscheduler_windows_universal_agent_installer.x.x.x\setup.cmd
- The installer asks for elevated administrator permissions.
- The installer opens a GUI to specify the installation path after you accepted the terms of the license agreement.

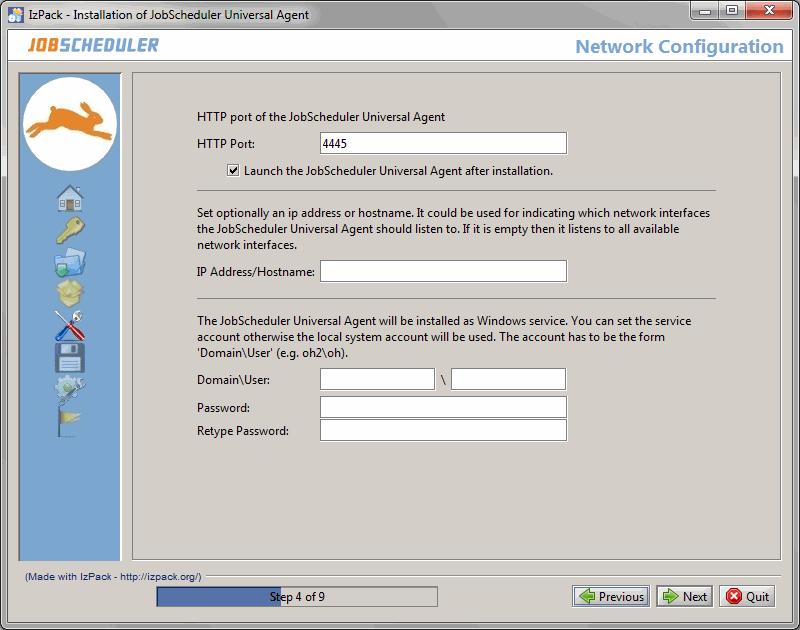
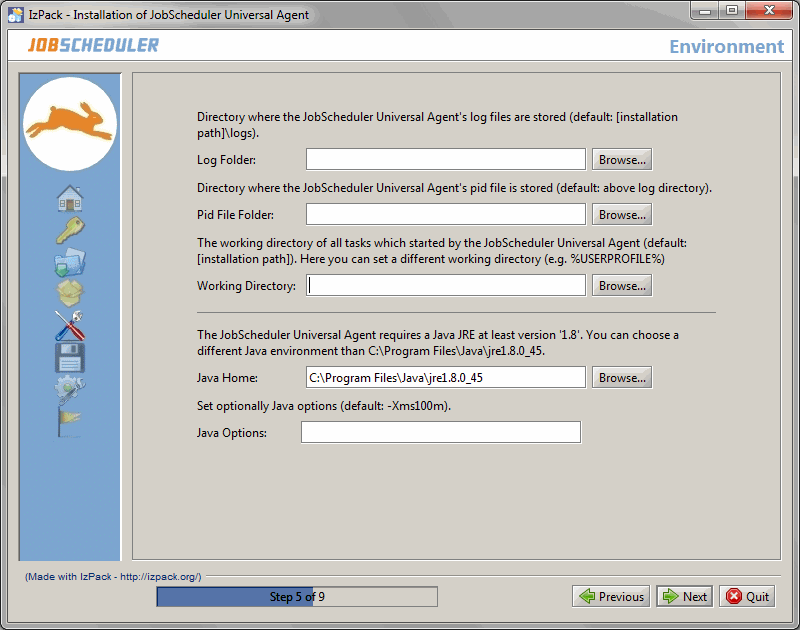
- In the next two forms you can specify the environment variables of the JobScheduler Universal Agent instance that are explained in the JobScheduler Universal Agent - Installation & Operation article.
- Make sure that the HTTP port is available, i.e. not otherwise used. If you run other applications that use this port then choose a different port.
- If you specify a service account then make sure that this account has "Log on as service rights".
- If you selected the installation path to be located in
C:\Program Filesthen it is recommended to choose the log directory outside of the installation path, e.g.C:\ProgramData\sos-berlin.com\jobscheduler\agent\logs. - The installer sets read/write permissions for the specified Windows service user but normally exclusively the adminstrator group should have write permissions for
C:\Program Files. - If multiple instances will be installed then it is recommended to use the same log directory for all instances.
Installation without GUI
Run the installer for JobScheduler Universal Agent parametrized with the
jobscheduler_universal_agent_install.xmlfile that is included with the extracted archive.This parameter file is preconfigured, i.e. you can run it without any changes.
Windows command to open the installer GUI> cd C:\Temp\jobscheduler_windows_universal_agent_installer.x.x.x > setup.cmd jobscheduler_universal_agent_install.xml
- If you run the installer without modifications in
jobscheduler_universal_agent_install.xmlthen- the installation path is
C:\Program Files\sos-berlin.com\jobscheduler\agent - the http port is
4445 - the log folder is
C:\ProgramData\sos-berlin.com\jobscheduler\agent\logs
- the installation path is
If you want to modify the default options then edit the
jobscheduler_universal_agent_install.xmlfile before you start the installerContent of jobscheduler_universal_agent_install.xml<?xml version="1.0" encoding="UTF-8" standalone="no"?> <!-- XML configuration file for JobScheduler Universal Agent If you call the installer with this XML file then you accept at the same time the terms of the SOS GmbH freeware license agreement; see http://www.sos-berlin.com/freeware-license-agreement --> <AutomatedInstallation langpack="eng"> <com.izforge.izpack.panels.UserInputPanel id="home"> <userInput/> </com.izforge.izpack.panels.UserInputPanel> <com.izforge.izpack.panels.HTMLLicencePanel id="license"/> <com.izforge.izpack.panels.TargetPanel id="target"> <!-- SELECT THE INSTALLATION PATH It must be absolute! For example C:\Program Files\sos-berlin.com\jobscheduler\agent --> <installpath>C:\Program Files\sos-berlin.com\jobscheduler\agent</installpath> </com.izforge.izpack.panels.TargetPanel> <com.izforge.izpack.panels.UserInputPanel id="network"> <userInput> <!-- HTTP port of the JobScheduler Universal Agent --> <entry key="schedulerPort" value="4445"/> <!-- Set optionally an ip address or hostname. It could be used for indicating which network interfaces the JobScheduler Universal Agent should listen to. If it is empty then it listens to all available network interfaces. --> <entry key="schedulerHost" value=""/> <!-- Launch the JobScheduler Universal Agent after installation? (yes|no) --> <entry key="launchScheduler" value="yes"/> <!-- The JobScheduler Universal Agent will be installed as Windows service. You can set the service account otherwise the local system account will be used. The account has to be the form 'Domain\User'. --> <entry key="serviceAccount" value=""/> <entry key="servicePassword" value=""/> </userInput> </com.izforge.izpack.panels.UserInputPanel> <com.izforge.izpack.panels.UserInputPanel id="environment"> <userInput> <!-- Directory where the JobScheduler Universal Agent's log files are stored (default: '[installation path]\logs'). --> <entry key="logPath" value="C:\ProgramData\sos-berlin.com\jobscheduler\agent\logs"/> <!-- Directory where the JobScheduler Universal Agent's pid file is stored (default: above log directory). --> <entry key="pidFilePath" value=""/> <!-- Working directory for all jobs which started by the JobScheduler Universal Agent e.g. %USERPROFILE% (default: [installation path]) --> <entry key="workPath" value=""/> <!-- The JobScheduler Universal Agent requires a Java JRE at least version '1.8'. You can choose a different Java environment than the Java which is used during this installation. --> <entry key="javaOptions" value=""/> <!-- Set optionally Java options (default: -Xms100m). --> <entry key="javaHome" value=""/> </userInput> </com.izforge.izpack.panels.UserInputPanel> <com.izforge.izpack.panels.UserInputPanel id="end"> <userInput/> </com.izforge.izpack.panels.UserInputPanel> <com.izforge.izpack.panels.InstallPanel id="install"/> <com.izforge.izpack.panels.ProcessPanel id="process"/> <com.izforge.izpack.panels.FinishPanel id="finish"/> </AutomatedInstallation>
Change Management References for Windows Service