Solution
Download
- Download the attached archive:
- Windows operation system example FileWatching.zip
- Linux operating system example FileWatchingLinux.zip
- Unzip the archive to the
livefolder of your JobScheduler installation - Create inbound, success and error directories
- Adjust the configuration to your environment
Components
- A job chain that monitors the directory for incoming files
- A job that prints the name of the incoming file to stdout
Introduction
This feature can be useful to dynamically process large number of incoming files, e.g. upload transactions into a database, convert meta files to PDF files, convert image file formats etc.. JobScheduler's File Order Source feature simplifies business processes that should be triggered on arrival of a file.
A job chain can be triggered by two types of orders:
- Time based orders
- File based orders. By use of a File Order Source a job chain can be configured to start immediately on arrival of a file in a directory.
A File Order Source requires two parameters
Directorythat specifies the file system location where JobScheduler should watch for incoming filesRegexthat is the Regular Expression that names of incoming files have to match to trigger the job chain. A most simple example of File Order Source is<file_order_source directory="c:\sandbox\outgoing" regex="^test.txt$"/>.
How to configure a job chain for a File Order Source
To learn how to create a job chain, refer following the article JobScheduler - Tutorial 2 - Editing a Simple Job with JOE.
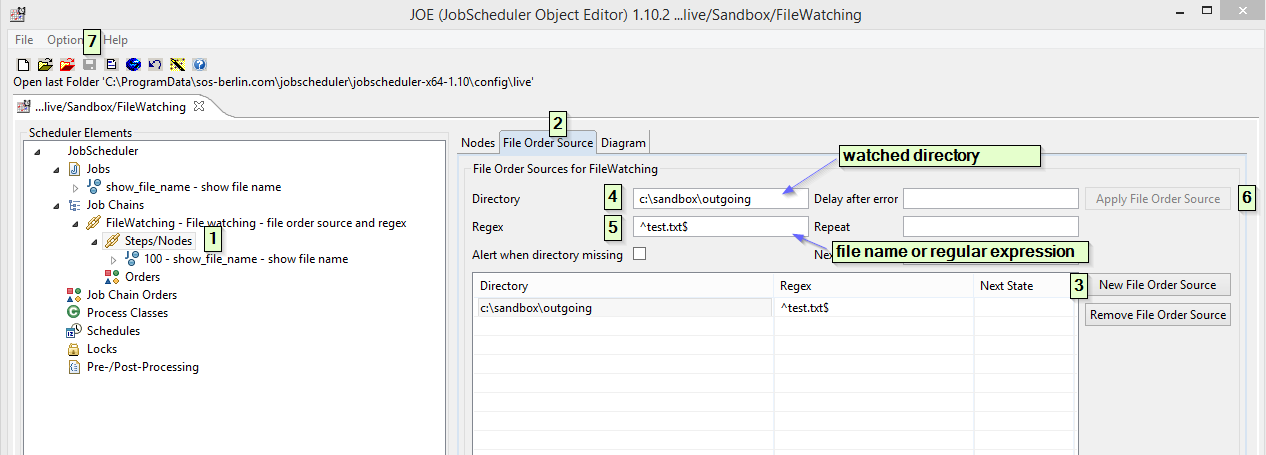
- Open your job chain in JOE (JobScheduler Object Editor), expand job chain configuration by clicking on
Job Chains --> FileWatchingand click onSteps/Nodes. - From right window pan select
File Order Sourcetab. - Click on
New File Order Source, this will open a dialog to create a new File Order Source configuration. - Click in the text filed in front of
Directoryparameter, configure directory which should be watched for arrival of file e.g.c:\sandbox\outgoing. - Click in the text field in-front of
Regexparameter, configure file name or Regular Expression e.g.^test.txt$. - Click
Apply File Order Sourcebutton to apply your configuration. - Click
Saveto save job chain.
Example: job chain - FileWatching
<?xml version="1.0" encoding="ISO-8859-1"?>

<job_chain  title="File watching - file order source and regex" name="FileWatching">
    <file_order_source  directory="c:\sandbox\outgoing" regex="^test.txt$"/>
    <job_chain_node  state="100" job="show_file_name" next_state="success" error_state="error"/>
    <file_order_sink  state="success" remove="yes"/>
    <file_order_sink  state="error" remove="yes"/>
</job_chain>
Explanation
Following example is a Windows operation system FileWatching job chain example. Job chain FileWatching is configured to start as soon as the file test.txt arrives in the directory c:\sandbox\outgoing. The File Order will processed as a normal JobScheduler Order through job chain, one step to the next, until the Order reaches end node of job chain. In this example there are two distinct job chain end nodes, each one for success and error state of File Order processing.
Example: job - show_file_name
<?xml version="1.0" encoding="ISO-8859-1"?>

<job  order="yes" stop_on_error="no" title="show file name" name="show_file_name">
    <script  language="shell">
        <![CDATA[
@echo %SCHEDULER_JOB_NAME% : job starting
@echo .
@echo .
@echo %SCHEDULER_JOB_NAME% :Start processing for file [ %SCHEDULER_PARAM_SCHEDULER_FILE_PATH% ].....
@echo .
@echo File Name :  %SCHEDULER_PARAM_SCHEDULER_FILE_PATH%
@echo .
@echo %SCHEDULER_JOB_NAME% :End processing for file [ %SCHEDULER_PARAM_SCHEDULER_FILE_PATH% ] .....
@echo .
@echo .
        ]]>
    </script>
    <run_time />
</job>
Explanation
By default JobScheduler creates few internal environment variables during the Order processing. All the JobScheduler environment variables are prefixed by SCHEDULER_PARAMS_ prefix. JobScheduler store the trigger file's path in the environment variable SCHEDULER_PARAM_SCHEDULER_FILE_PATH. In the following job example JobScheduler's inbuilt environment variable SCHEDULER_PARAM_SCHEDULER_FILE_PATH will be used to output trigger file name on the console (stdout).
How to configure File Order Sink - job chain
Every File Order is associated with a file on file system. JobScheduler offers two options to handle files associated with a File Order, Once a File Order reaches to the end success/error node of job chain. File associated with File Order Source either can be remove or move to a different directory on file system.
Remove File
A file_order_sink node can be configured to remove file after processing e.g.( <file_order_sink state="success" remove="yes"/> ). If File Order Source's parameter remove=yes is set, file associated with the File Order will be deleted from file system location configured in the directory parameter.
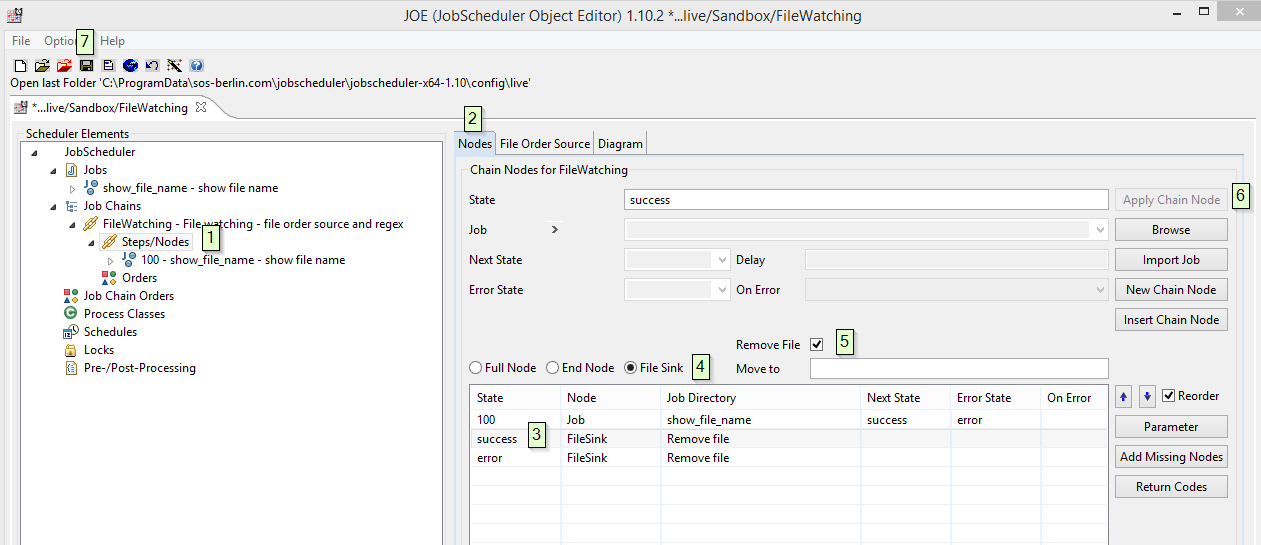
- Open your job chain in JOE (JobScheduler Object Editor), expand job chain configuration by clicking on
Job Chains --> FileWatchingand click onSteps/Nodes. - From the right window panel select the
Nodestab. - Click on state
success, this will enable the dialog to configure the FIle Sink for success state. - Select radio option
File Sink. - Select the check box
Remove Fileto delete incoming files after successful processing. - Click the
Apply Chain Nodebutton to apply your configuration. - Click
Saveto save the job chain. - Repeat steps 3 to 7 for the error state too.
Move File
A file_order_sink node can be configured to move incoming files after processing to a different directory e.g. <file_order_sink state="success" remove="no" move_to="c:\sandbox\success"/>).
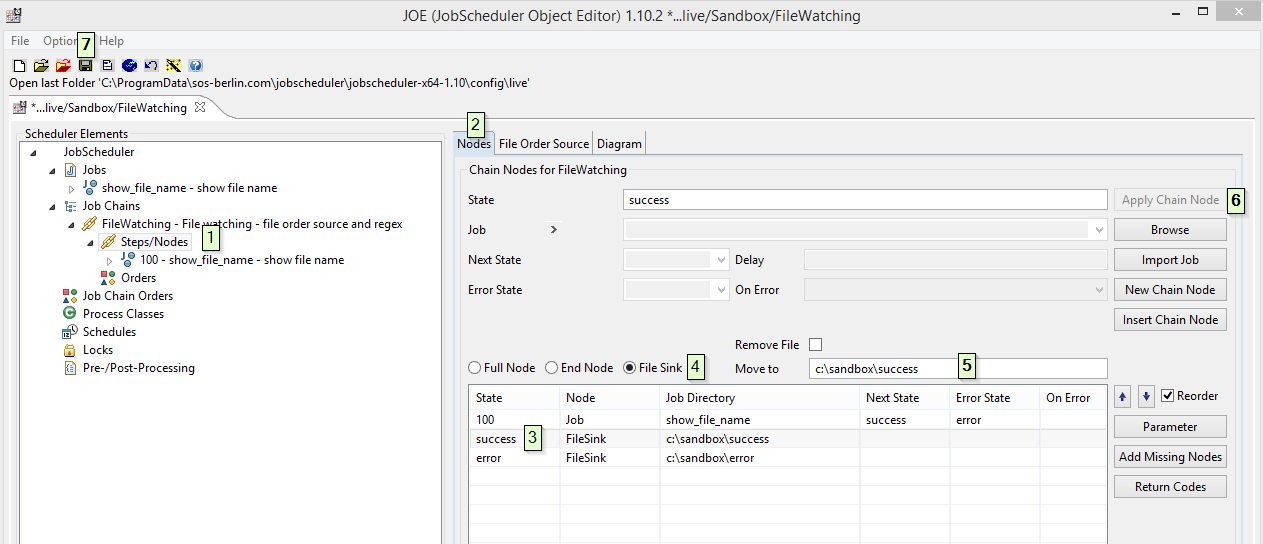
- Open your job chain in JOE (JobScheduler Object Editor), expand job chain configuration by clicking on
Job Chains --> FileWatchingand click onSteps/Nodes. - From the right window panel select the
Nodestab. - Click on state
success, this will enable the dialog to configure File Order Sink for success state. - Select the radio option File Sink.
- Click in the text field in-front of
Move toparameter, configure directory location where file should be move after successful processing e.g.c:\sandbox\success. - Click
Apply Chain Nodebutton to apply your configuration. - Click
Saveto save job chain. - Repeat steps 3 to 7 for the error state too.
Operation
To trigger the FileWatching job chain, create a file test.txt in the directory c:\sandbox\success. As soon as the file is created, JobScheduler will start the FileWatching job chain. You can check the job chain log with the Order History tab in the JobScheduler Operation Center (JOC).
See also
- How to monitor a folder for more than one file name pattern
- How to monitor incoming files, check the file for a string and parameterize subsequent jobs
- How to prevent an error when a file order directory is missing