Web Services
Any job or job chain in the JobScheduler can be exposed as a Web Service. The JobScheduler accepts SOAP requests and sends a standard SOAP response.
The JobScheduler can be configured to accept requests to start jobs and job chains
via a generic JobScheduler Web Service interface:
<web_service
     ...
     name = "scheduler"
     url_path = "/scheduler" >
</web_service>
via a specific Web Service interface for an individual job or job chain:
<web_service
     ...
     name = "start_backup"
     url_path = "/start_backup" >
</web_service>
It is important here to distinguish between the two types of Web Service requests.
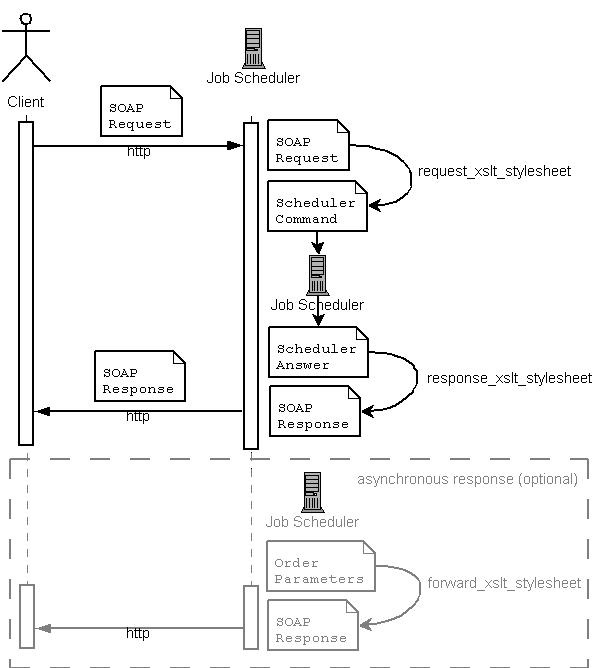
Asynchronous Web Service Requests
FEATURE AVAILABILITY ENDING WITH RELEASE 1.10
The Asynchronous Web Services Request feature is deprecated, see
JS-1347
-
Getting issue details...
STATUS
The caller receives an acknowledgement that his request has been accepted by the JobScheduler and will be processed. Job execution is done asynchronously i.e. at a later run time. This is useful if batch jobs need execution time or should start at a predefined point in time.
No changes to job implementations are required for asynchronous web service processing.
Configure JobScheduler
Update
scheduler.xmlwith a generic web service interface. The following configuration will enable the JobScheduler to accept a variety of SOAP requests.<http_server > <web_service debug = "no" request_xslt_stylesheet = "config/scheduler_soap_request.xslt" response_xslt_stylesheet = "config/scheduler_soap_response.xslt" name = "scheduler" url_path = "/scheduler" > </web_service> </http_server>- After the update to the
scheduler.xmlfile to make the configuration effective restart the JobScheduler service (Windows) or daemon (Linux). Now the JobScheduler is accessible via a SOAP web service. The web service can be accessed with URL
http://<jobscheduler-host>:<jobscheduler-port>/schedulere.g. http://localhost:4444/scheduler
Start a job chain
To start a job chain via SOAP web service the SOAP client should send a post request to the JobScheduler with the following SOAP format:
- Above given SOAP request will submit an order to the job chain
example/01_JobChainShellJobs/01_JobChainA. The order will also have two parametersSOAP_PARAM1=Value1andSOAP_PARAM2=Value2that will be passed to the job chain. With the SOAP request being received the JobScheduler will immediately add the order and send back the order id with the SOAP response.
Check Order Status
- To check the status of the order that has been sent to JobScheduler you can send the below SOAP request to the JobScheduler.
For possible errors with this operation see JS-1183 - Getting issue details... STATUS for more information.
Start a Job
To start a job via SOAP web service the SOAP client should send a post request to the JobScheduler with the following SOAP format.
- Above given SOAP request will start the job
sos/housekeeping/scheduler_rotate_log. The job will be started 60 seconds after arrivall of the SOAP request. With the SOAP request being received the JobScheduler will immediately process the task and the task id will be sent back with the SOAP response.
Synchronous Web Service Requests
Should a request be received by the JobScheduler then it will be instantly processed. The caller receives the job execution result on the fly. Jobs have to be prepared to handle this kind of request.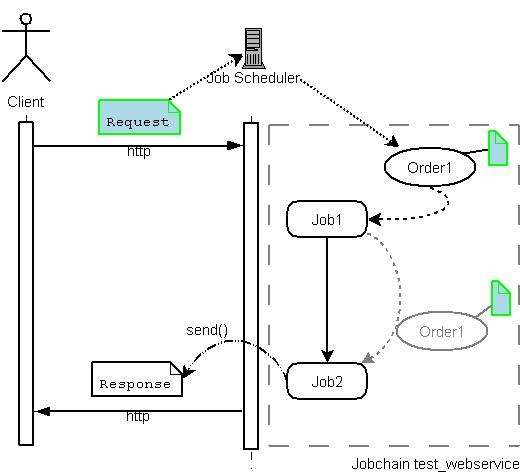
Configure JobScheduler
In order to use the synchronous web service feature a new web service has to be created in the <web_services> element as follows and it is required to configure a job chain, e.g. web_service_test in the scheduler.xml configuration file.
Update the
scheduler.xmlfile with a web service interface.<http_server > <web_service name="test" job_chain="web_service_test" url_path="/test"/> </http_server>To make changes to the
scheduler.xmlfile effective restart the JobScheduler service (Windows) or daemon (Linux).
Configuration of a Synchronous Web Service
The following job chain and job elements have to be configured:
Job Chain
Job
The purpose of this job is to interpret possible protocols such as SOAP. The job receives the request content in either binary or string format. Note that in order to keep this example simple XML will not be interpreted as this would make the code longer and more complicated. The use of DOM is also not covered by this tutorial. Therefore the following job only logs the request content and returns a string containing the Task ID.
The Creation of Jobs for Synchronous Web Services
The following JavaScript solution shows a simple implementation of the request/response mechanism:
The purpose of this implementation is to interpret possible protocols such as SOAP. The job receives the request content in either binary or string format. Note that in order to keep this example simple XML will not be interpreted as this would make the code longer and more complicated. The use of DOM is also not covered by this tutorial. Therefore the following job logs the request content and returns a string containing the Task ID.
The web_service_operation() call is placed in a try-catch block at the start of the job. This is required as it is possible that the job has to process an order that was created by the JobScheduler but that has not been processed before the JobScheduler terminated. In this case the JobScheduler would load the order from its database although the HTTP connection to the wb service client no longer exists. Further, the Web_service_operation object would no longer exist. The job should catch this error and decide how to handle the order.
The request content is retrieved from the Web_service_request object and written in the log.
The answer is added to the Web_service_response object and synchronously sent back to the web service client using send().
In practice the Web_service_request would be retrieved by one job and the Web_service_response set by another. It is possible to create a job chain in which the first job reads the Web_service_request object and evaluates and writes the request parameters to the order payload. Subsequent jobs would then process the order payload and only the last job would write to the Web_service_response object and call the send() method.
References
Change Management References