Introduction
This tutorial will show how to take two of the JobScheduler's JITL (JobScheduler Template Library) Jobs and configure them for your environment.
The JITL Jobs are intended to be easy to configure and help users get started with the most common job scheduling tasks.
Note that the other tutorials in this series are:
- JobScheduler - Tutorials - Introduction and Requirements
- JobScheduler - Tutorial 1 - Running a simple job using the JOC Cockpit
- JobScheduler - Tutorial 2 - Editing a Simple Job with JOE
- JobScheduler - Tutorial 3 - Running an Order Using the Run Time Parameter
- JobScheduler - Tutorial 4 - Editing and Running a JITL Job (this tutorial)
- JobScheduler - Tutorial 5 - The YADE JITL Job - Configuring and running file transfer jobs
- JobScheduler - Tutorial 6 - Configuring and Running Standalone Jobs
About JITL jobs
JITL Jobs provide users with a way of quickly implementing realistic job scheduling functions without having to start to writing their own jobs from scratch. As the name implies, JITL - the JobScheduler Integrated Template Library - Jobs are a template which is "filled" with parameters.
You can find out more about JITL Jobs in the Library of Standard Jobs - JITL article.
All JITL jobs are included in the JobScheduler installation. The JITL jobs that are most likely to be of immediate use are pre-installed in the JobScheduler's live/sos folder and can therefore be called directly from the JOC Cockpit. They are grouped together in a number of sub-folders and can be easily seen in the JOC Cockpit Jobs view as shown in the screen-shot below: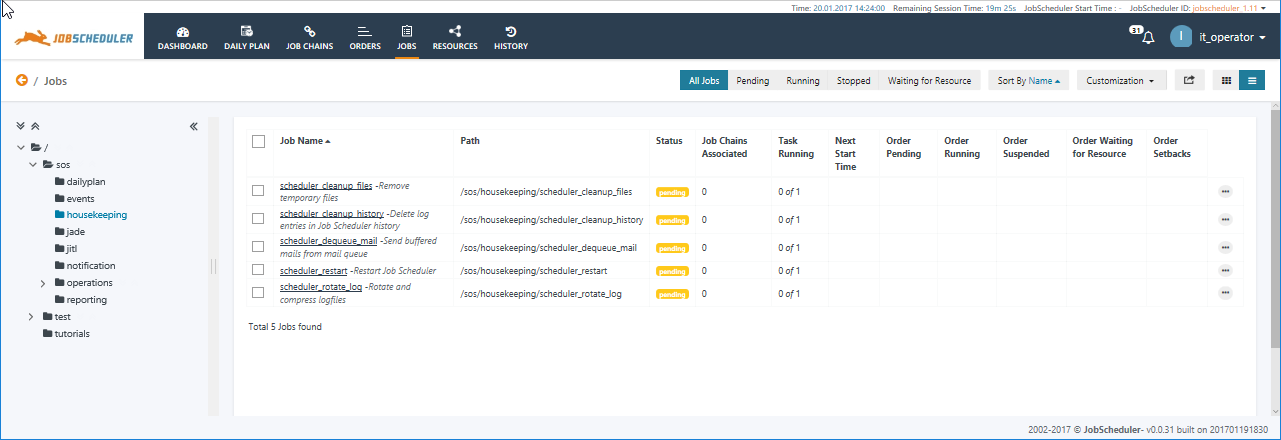
Please note:
- The pre-installed JITL Jobs are grouped into folders, with the exact list of folders and Jobs depending on the packages that selected during installation of your JobScheduler. The full list of folders is:
- dailyplan - the jobs for updating the Daily Plan are always installed
- events - the jobs for event management are installed if the "Configure JobScheduler as event handler" option was selected during installation
- housekeeping - is only installed if the Housekeeping Jobs package was selected during installation
- jitl - is always installed - the three jobs in this folder are included to ensure backward compatibility with legacy solutions.
- notification - the JobScheduler Monitoring Interface jobs for integration with a system monitor are always installed
- operations - the jobs in this folder are used by the JobScheduler /JOC Cockpit
- reporting - ditto
- Some of the Jobs come with Orders - these can be seen using the Orders view in the JOC Cockpit:
- Some of these Orders are active - a Next start time is listed - for example, the orders for the dailyplan jobs
- Other Orders - such as those for the notifications jobs - have the Status pending and will only run if a start time is added by the user. The Next start time of these orders is shown as "never".
- A brief description of the function of each JITL Job can be found in the full list of JITL jobs.
Further JITL Jobs
- Comparing the list of jobs shown above with the full list of JITL jobs will quickly show that a large proportion of the JITL jobs are not shown in the above screenshot.
All the JITL jobs are available by way of a wizard that is integrated in the JobSchedulerEditor, JOE.
About this Tutorial
The Housekeeping Jobs are probably the most important JITL Jobs for users considering regular use of their JobScheduler and in particular:
- the scheduler_rotate_log job (job documentation ) that rotates and compresses the JobScheduler's main log files and
- the scheduler_cleanup_files job (job documentation) that removes temporary files that have been "left behind" by jobs.
These jobs prevent an accumulation of temporary files or over-large log files from slowing down JobScheduler and possibly its host computer.
The configuration and scheduling of these Jobs has been selected as the subject of this tutorial because of their practical use.
Note that we recommend that you configure these jobs to run on every computer on which you use the JobScheduler Master regularly and schedule them to run automatically.
This tutorial will use the scheduler_rotate_log job to show how to set Parameters and Run Times and to see how the job is running. It should then be easy to repeat the process for the scheduler_cleanup_files job.
Configuring the scheduler_rotate_log Job in JOE
Setting the job Parameters
- Follow the procedures already described in these tutorials to start JOE and open the
./live/sos/housekeepingfolder, which contains the scheduler_rotate_log job.
- Open the Jobs element in the Scheduler Elements pane by clicking on the '>' symbol to the left of the Jobs Icon and repeat the procedure to open the scheduler_rotate_log element.
- Select the Parameter element, which will open the Parameter form at the Parameter tab as shown in the screen-shot below:
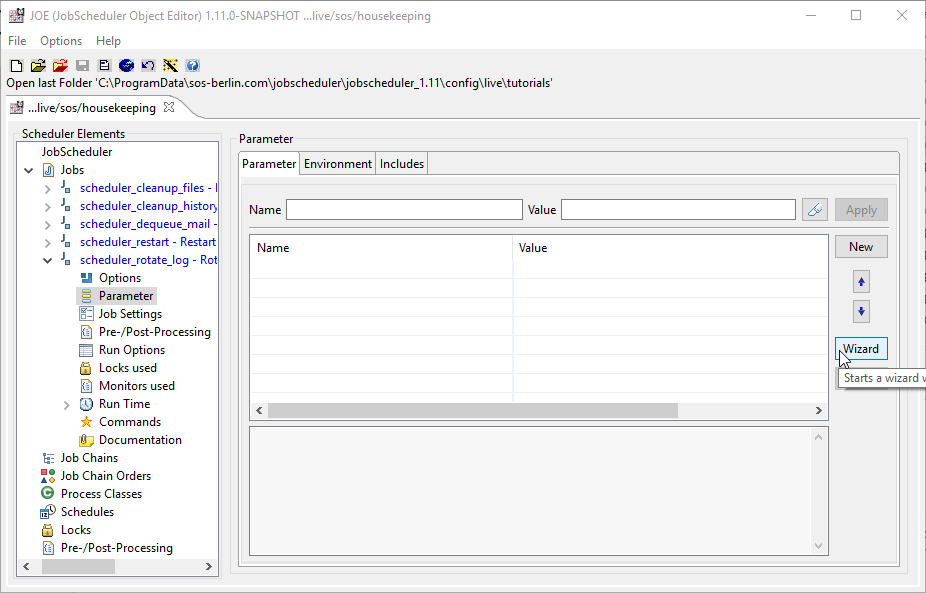
- Click on the Wizard button at the right as shown in the screen-shot above.
This will open the wizard mentioned in the introduction to this tutorial which will guide through configuring the Job..
The wizard opens with the form shown in the screen shot below.
Note that this form is listed as "Step 3 of 8". This is because the scheduler_rotate_log job has already been configured and steps 1 and 2 of the wizard have already been completed.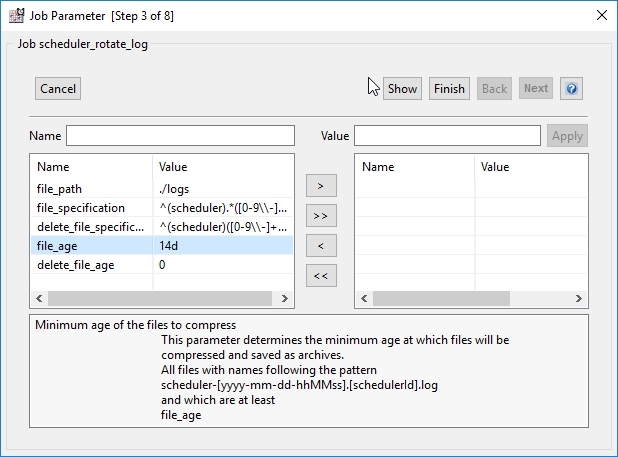
- All the parameters for the scheduler_rotate_log Job are shown together with their default values in the screenshot above.
To demonstrate the configuration of this Job and yet remain within the scope of a simple tutorial, we recommend that at this stage you start by changing the file_age parameter, which is highlighted in the screenshot above, and the delete_file_age parameters from their default values:
- the file_age parameter determines the age in days after which files are compressed and
- the delete_file_age parameter, which determines the age after which log files are deleted.
Note that if you have used a custom path for your log files when installing your JobScheduler, you will also need to modify the file_path parameter, which is also visible in the above screen shot.
Modifying Parameters
The procedure to modify and or set the value of a parameter in this wizard is always the same:- Parameters that are to be used with their default values are listed in the left hand pane of the wizard.
- Parameters that are to be used with a custom value should be listed in the right hand pane.
- Only parameters that are shown in the right hand pane when the wizard is closed will be retained. Any other parameters that have been modified but moved back to the left hand pane will be ignored.
- To set a custom value for a parameter - in this case the file_age parameter:
- Select the parameter/value pair in the left hand pane, as shown in the screen-shot above
- Click on the " > " Accept these parameters Button in the middle of the wizard.
This will cause the parameter/value pair to be moved from the left hand pane to the right hand one and its name and value to be shown in the Name and Value fields as shown in the next screen shot:
- Change the parameter value by clicking on the value field and entering the new value. Values for the file_age parameter are days. The changed value of 2 shown in the screen shot below was selected to allow users to follow the working of this job quickly but is actually too short to be recommended for use in a production system. A more realistic value would be between 7 and the default value of 14.
If you have been using your JobScheduler for a number of days you can set the file_age and delete_file_age parameters to match for some but not all of your log files and then follow the operation of the job in your file structure.
Save the changed value by clicking on the Apply button.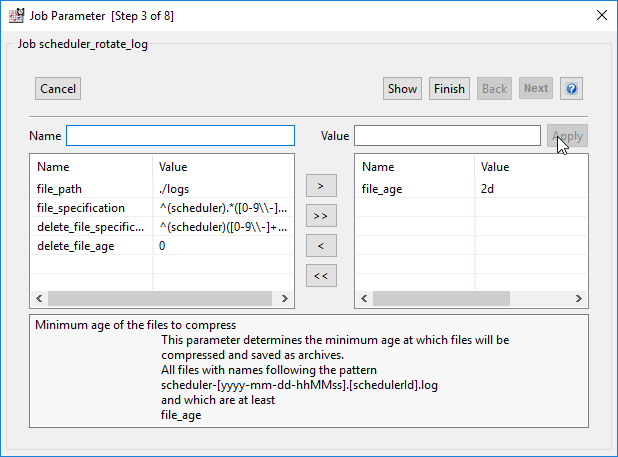
- Repeat steps i to iii for the delete_file_age parameter, whose default value of 0 means that files will not be deleted.
- Click on the Finish button to close the wizard.
Note that at this point the new parameter values have not been permanently saved.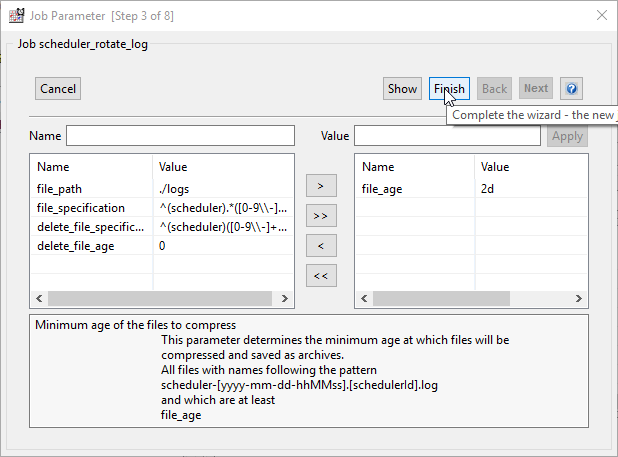
- The modified parameters will now have been added to the job Parameter tab as shown in the screen shot below.
Click on the Save Configuration symbol at the top of the JOE window as shown below to permanently save the modified parameters: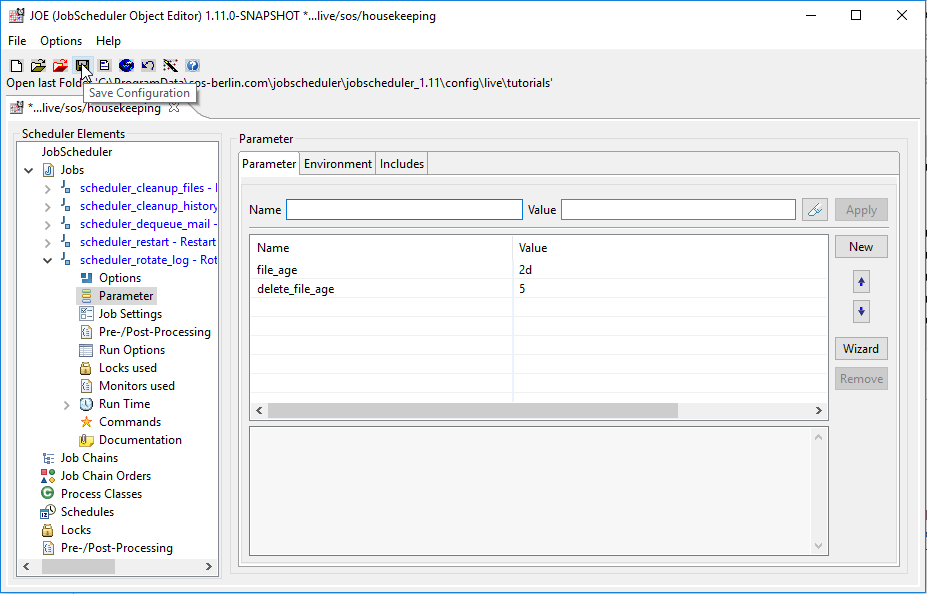
- Select the parameter/value pair in the left hand pane, as shown in the screen-shot above
- The scheduler_rotate_log job parameters have now been set. The next step is to set the job to run regularly.
Note that parameter name/values can also be modified, added and removed directly in the parameter tab, as shown in the next screen shot. Use of the wizard is, however, recommended to avoid any possible errors due to misspelling of parameter names.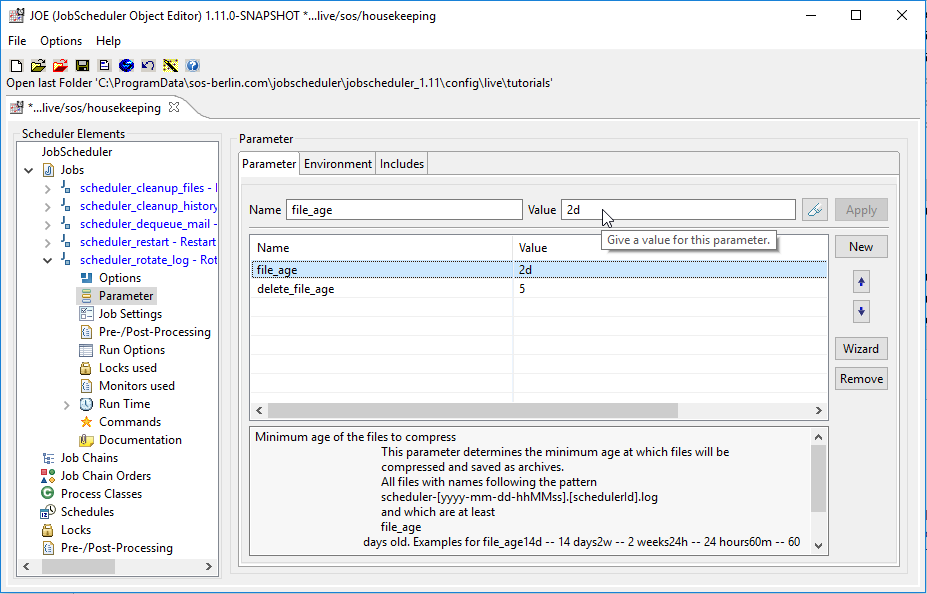
Setting the Job Run Times
The scheduler_rotate_log Job is intended to be run at regular intervals.
For the purposes of this tutorial it is suggested that the job is run once a day. In a production environment this job would typically be run with a frequency between once a day and once a month, depending on the number and nature of jobs being run and on the overall scheduling environment.
To keep things simple, it is suggested that job is run with similar Run Time settings to those described in the previous 'Running an Order Using the Run Time Parameter' tutorial.
Note, however, that the scheduler_rotate_log Job is a standalone job and therefore the Run Times are set for the scheduler_rotate_log Job itself and not for the Order. A close look at the following screenshot should make this clear: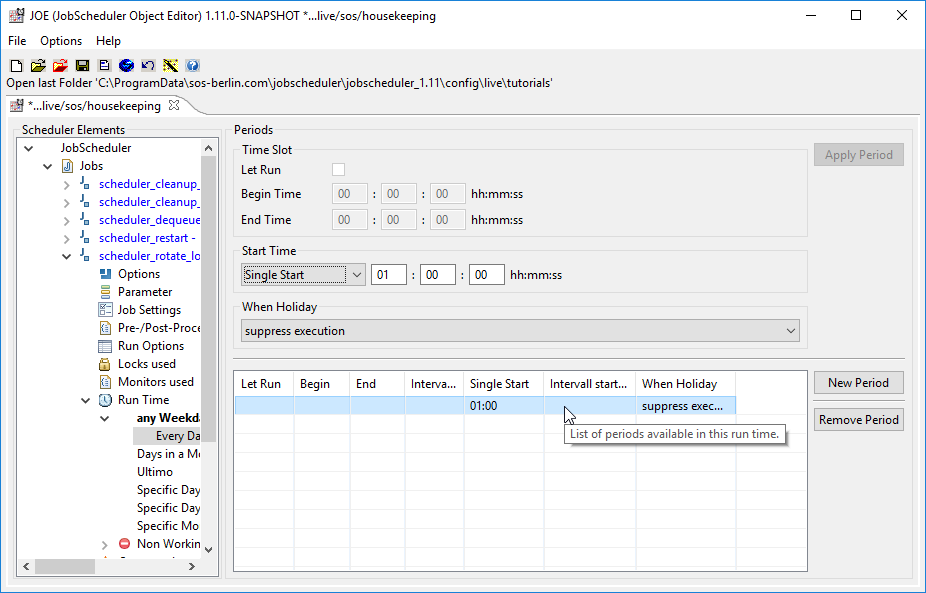
Checking the functioning of the scheduler_rotate_log job
This job compresses and deletes files from the JobScheduler logs folder. If the default settings were used for installing your JobScheduler, the logs folder will be a sub-folder in the Scheduler Data folder.
- On systems running Windows the Scheduler Data folder is:
C:\ProgramData\sos-berlin.com\jobschedulerId
- and on Unix systems it is:
/home/[user]/sos-berlin.com/jobschedulerId
where jobschedulerId is the ID set for the JobScheduler during installation.
Immediately after the scheduler_rotate_log job has run you should see the following:
- You will no longer have any scheduler-...log files older than the number of days that you set for the delete_file_age parameter
- Log files older than the number of days that you set for the file_age parameter will have been compressed and now carry the extension .gz
- You will have a new scheduler.log file, carrying a timestamp from when the scheduler_rotate_log job ran. This file will initially be 0 kb large.