Introduction & Requirements
This tutorial follows on directly from JobScheduler - Tutorial 2 - Editing a Simple Job with JOE and will show how a Run Time parameter can be configured to start the order. This is a first step towards learning to using the JobScheduler's Schedule function.
It is assumed that before you start to work through this tutorial you have already configured the 'Hello World' job chain with its two jobs as described in the previous tutorials.
Other tutorials:
The other JobScheduler tutorials are:
- JobScheduler Tutorials
- JobScheduler - Tutorial 1 - Getting Started
- JobScheduler - Tutorial 2 - Editing a Simple Job with JOE
- JobScheduler - Tutorial 3 - Running an Order Using the Run Time Parameter
Setting the Days When the Order is to Run
- Start by selecting the hello_world_order in JOE as shown here
- Now click on the triangle to the left of the order in the Scheduler Elements pane to show the Parameter and Run Time elements.
- Still in the Scheduler Elements pane, open the Run Time element and click on the Any Weekday element
This will open a Weekday form as shown in the diagram below: - Now click on the Every Day button as shown in the screen shot above, which will specify that the JobScheduler is to start the order every day of the week
These days will then be listed in the central field of the form as shown below:
Setting the Time of Day at which the Order is to run
- In the Scheduler Elements pane, click on the Every Day element to set the time(s) of the days specified when the order is to run.
For the purpose of this tutorial, it would be useful when the order would run once, starting a few minutes after the configuration of the Run Time has been completed. - Clicking the New Period button as shown below, to activate the Time Slot and Start Time fields (the field background color changes from grey to white) in the upper part of the form:
- The most useful setting for the purpose of this tutorial is probably to only run the job once.
Therefore, in the Single Start part of the form enter a start time, ideally around five minutes later than your current time: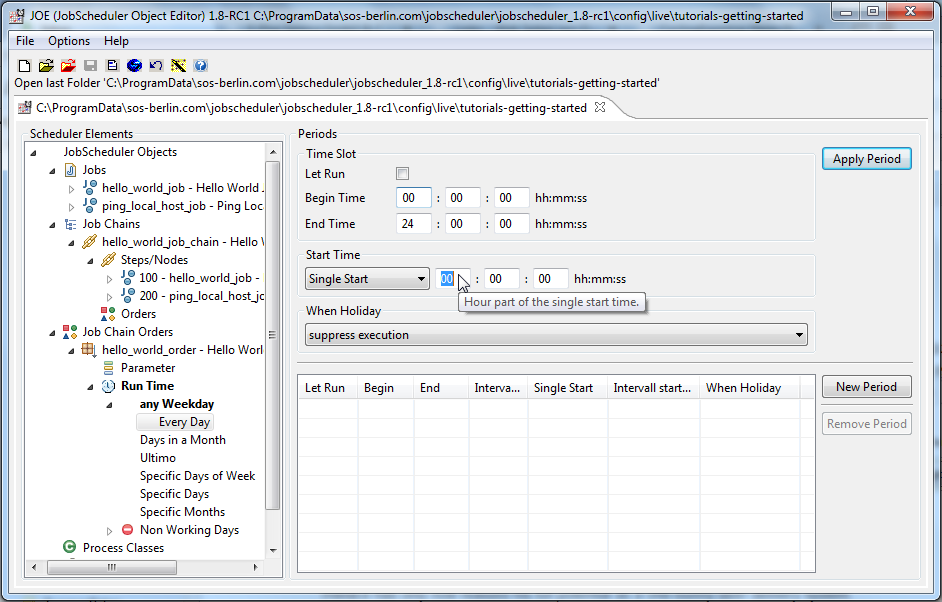
- Now click on the Apply Period button to note the start time - it will now be entered in the Periods list in the lower part of the form as shown below:
- As a final step in JOE, save the run time information using the Save Configuration button at the top of JOE.
Using JOE to Observe the Running of the Order
- Switch back to JOC where the Start Time you have just specified in JOE should be shown in green text ("Next start: .....") as can be seen in the screen shot below.
(You can go back to Step 3 above and alter the Start Time if you have to wait an inconvenient time for the order to start.) - As already described in the previous tutorial, the first "Hello World" job of the order will be processed almost instantaneously
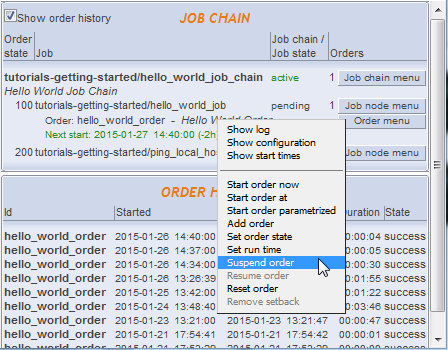
However, the second job will take a few seconds and during processing will be marked as shown in the screen shot below: - After processing of the order has been completed it will be added to JOC's Order History pane as shown, together with its start time of 14:40:00 and other information:
- Clicking on the Order ID, will now open the Order protocol in a new browser window
This log contains the protocols for both jobs with the "Hello World" output being listed before the task for the first job ends and the second job starts.
The results of the Pings from the second job can be seen in the middle of the screen shot.
Near to the foot of the screen shot is the information that the next start of the order will be on the 27th January (the next day) at the same time of 14:00.
The same information will now also be shown in JOC's main window in green.
Suspending the Order
If you leave your JobScheduler running then this order will be run every day at the same time.
- The simplest way to stop the order from being repeated is to use the Suspend Order function, which can be found in JOC's Order Menu button as shown in the next screenshot.