Introduction
Amazon AWS® CloudWatch is a service of Amazon Web Services that monitors the customer's applications and resources running on the AWS® infrastructure in real time. It is used to track and to collect metrics, variables you can measure for your applications and resources. AWS® CloudWatch monitors resources like Amazon Elastic Compute Cloud (EC2®) instances, Elastic Load Balancing (ELB®), Amazon Elastic Block Store (EBS®) volumes, and Amazon Relational Database Service (RDS®) instances.
JS7 can be integrated with AWS® CloudWatch. This integration allows users to check the logs and current statistics in a graphical user interface.
For JS7 JobScheduler as a Service, find the following suggested architecture.
Setting up the CloudWatch Agent
Managing the IAM Role
Creating the IAM Role
IAM Role is an IAM identity that users create in their accounts for specific permissions. Basically, to access the AWS resources, the users require permissions. This role includes the permission policy that grants the permissions.
Users need to follow the steps below to create an IAM Role.
- Login to AWS® Management Console and open the IAM console. Select Roles from the menu and then click the Create role button.

- Select the service that will use this Role for the AWS® services (EC2, Lambda, and others). Select EC2 and click the Next: Permission button.
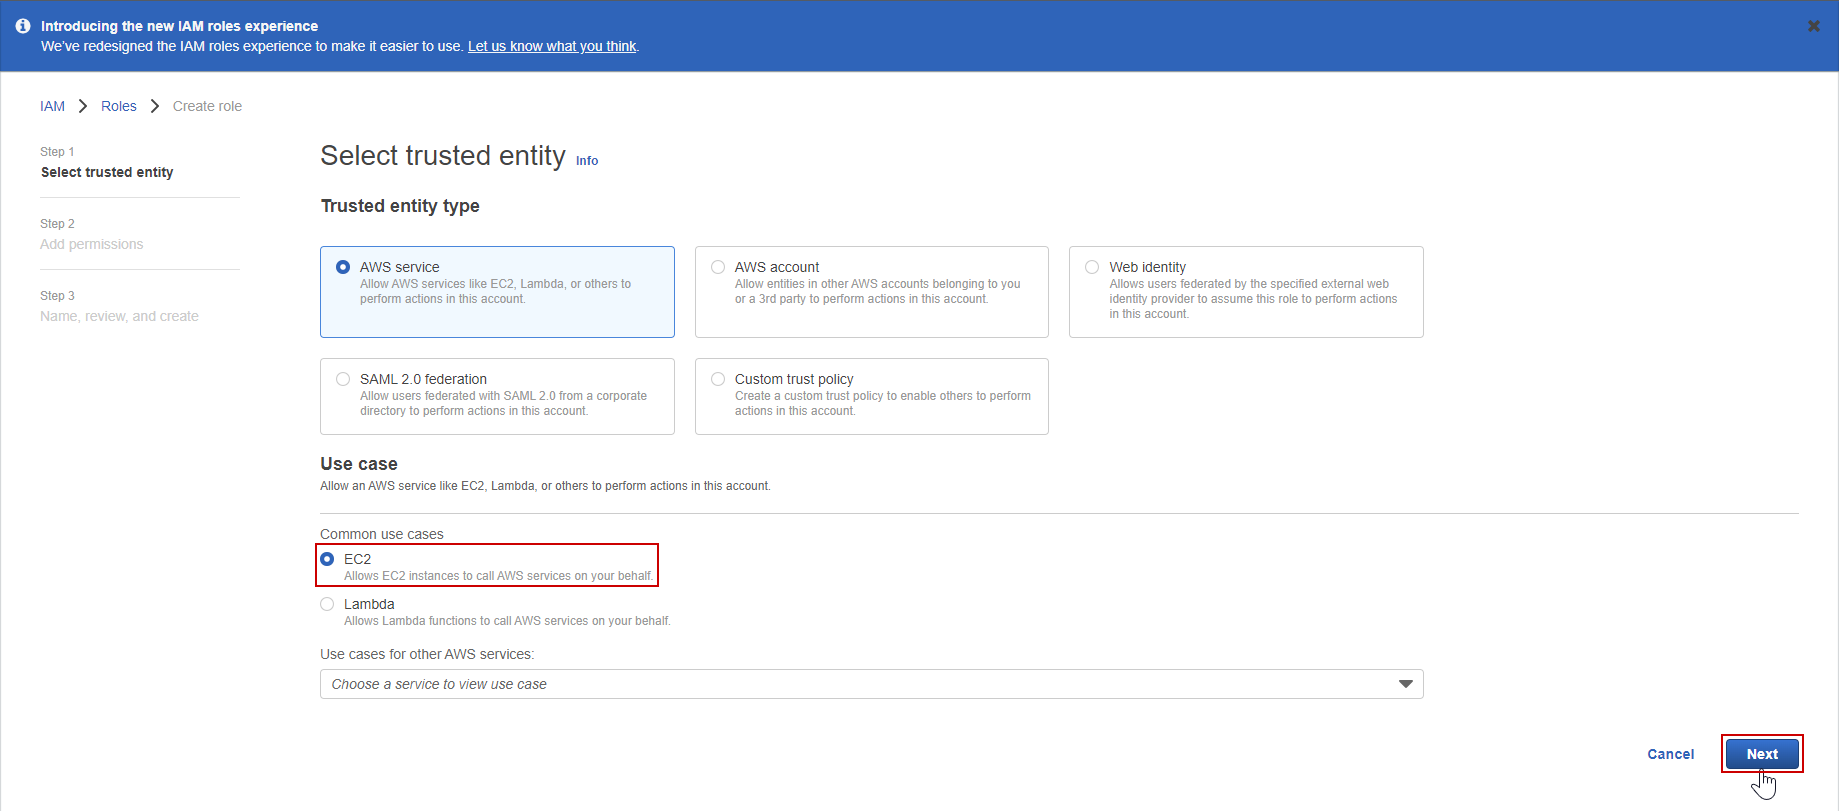
- To select your new role's policy, search for the CloudWatchAgentServerPolicy, check the checkbox and click the Next button.

- Provide the Role Name, review, and create the Role.

Attaching the IAM Role
To allow an EC2 instance to connect with AWS® CloudWatch, the user must attach the IAM role to the EC2 Instance. It can be done through the AWS console or via the AWS Command Line Interface (CLI).
- Using the AWS Console
To attach the IAM Role, navigate to the EC2 Dashboard, select Instance from the menu and check the checkbox of the EC2 Instance. Click on the Actions dropdown and choose Security>Modify IAM Role.
Choose the newly created IAM Role and update the IAM Role.
Using the AWS CLI
For AWS CLI Version 1.11.46, use the below command to attach the IAM Role:
$ aws ec2 associate-iam-instance-profile --instance-id <your-instance-id> --iam-instance-profile Name=CloudWatchAgentServerRole
Installing the CloudWatch Agent
Run the following commands to connect to the EC2 instance. First, the CloudWatch Agent has to be installed from S3. The below command can be used, for example, to download for AMD64 Ubuntu.
$ wget https://s3.amazonaws.com/amazoncloudwatch-agent/ubuntu/amd64/latest/amazon-cloudwatch-agent.deb
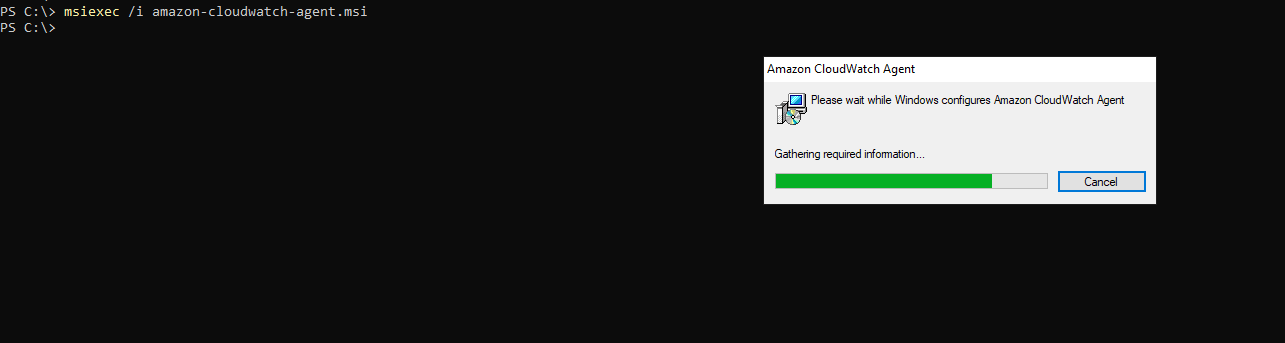
Use the below command to download for Windows.
Invoke-WebRequest -Uri "https://s3.amazonaws.com/amazoncloudwatch-agent/windows/amd64/latest/amazon-cloudwatch-agent.msi" -OutFile "C:\amazon-cloudwatch-agent.msi"

Use the following command to install the CloudWatch Agent on Ubuntu:
$ sudo dpkg -i -E ./amazon-cloudwatch-agent.deb
To install the CloudWatch Agent on Windows, the below MSI installer file is executed:
C:\> msiexec /i amazon-cloudwatch-agent.msi
After installing the CloudWatch Agent, it can be configured in two ways: by manually creating a config file or using the wizard that generates a configuration file.
Manually Creating config.json
The CloudWatch Agent makes use of a configuration file that, by default, is looked up from the below path:
If this file is unavailable from the below path, the user must create it manually.
/opt/aws/amazon-cloudwatch-agent/bin/config.json
From the above path, users can create the configuration file with the following content:
{
     "agent": {
         "run_as_user": "root"
     },
     "logs": {
         "logs_collected": {
             "files": {
                 "collect_list": [
                     {
                         "file_path": "{path to your log file}",
                         "log_group_name": "scheduler-error-log",
                         "log_stream_name": "{instance_id}"
                     }
                 ]
             }
         }
     }
 }
In the above example the file_path specifies the path to the log file from which data should be collected, for example /var/sos-berlin.com/js7/controller/ontroller.log, agent.log. The log_group_name and log_stream_name settings can be used to specify the names of Log Group and Log Stream in CloudWatch.
Running the Wizard
Execute the below command to start the wizard for Ubuntu:
$ sudo /opt/aws/amazon-cloudwatch-agent/bin/amazon-cloudwatch-agent-config-wizard
Execute the below command to start the wizard for Windows:
C:\> cd "C:\Program Files\Amazon\AmazonCloudWatchAgent"
.\amazon-cloudwatch-agent-config-wizard.exe

The wizard automatically creates the config.json file having asked a number of questions related to collecting system-level metrics. When using the wizard, users can always use the generated configuration file and manually add it to any EC2 instances.


Starting the CloudWatch Agent
Run the below command to execute the CloudWatch Agent on Ubuntu Server:
$ sudo /opt/aws/amazon-cloudwatch-agent/bin/amazon-cloudwatch-agent-ctl -a fetch-config -m ec2 -c file:/opt/aws/amazon-cloudwatch-agent/bin/config.json -s
Run the below command to execute the CloudWatch Agent on Windows:
PS C:\> & "C:\Program Files\Amazon\AmazonCloudWatchAgent\amazon-cloudwatch-agent-ctl.ps1" -a fetch-config -m ec2 -s -c file:config.json

Viewing Logs
In the CloudWatch Overview, users can select Logs from the menu. Users find the label for the Log Group created in the configuration of Logs. Selecting the Log Group Name allows to see the Log Streams. Clicking the Log Stream specifies the EC2 instance from which data is logged.
CloudWatch Logs provides better search capabilities. Users can use the filter text box to search in logs. Also, it can create alerts or notify users when triggering error messages or warning messages from log files.
Advantages of CloudWatch Logs
- CloudWatch log provides real-time application and System Monitoring.
- Long-term log retention
- A view of the entire infrastructure
- CloudWatch can be used to set alarms and execute automatic actions.
- Users can tune their AWS services to deliver the highest performance and throughput using the metric data and logs.
Benefits for Users of using CloudWatch Logs
- Easy to set up Alarms and Rules - In CloudWatch, users can set up Alarms to receive notifications while triggering the error messages from log files.
- Users can access all the data from a single dashboard. Lots of data can be accessed through a single CloudWatch Interface.
- CloudWatch logs enable users to see all the logs as a single and consistent flow of events ordered by time. Users can query and sort them based on their dimensions, create custom computations with a powerful query language, group them by specific fields, and visualize log data in dashboards.
Overview
Content Tools