Introduction
- Initial Operation is performed after installation of the JS7 Agent, Controller and JOC Cockpit.
- Operation of a Controller Cluster requires a commercial license, see JS7 - License.
- Tasks include applying the license key and licensed binary code.
- Tasks include registering the Controller Cluster and Agents.
Prerequisites
Initial Operation requires that a JS7 Agent, Controller and JOC Cockpit have been successfully installed and are up and running.
- Note that a Controller Cluster requires two Controller instances to be installed.
- For details see JS7 - Installation
- The steps for initial operation are the same for all supported platforms:
Controller Cluster Checks
Check Controller ID
Both Controller instances for a Cluster have to be installed with the same Controller ID, which is a unique identifier for the Controller Cluster.
Changing the Controller ID requires reinstallation of the Controller instances by carrying out the following steps for each instance:
- Stop the Controller service, see JS7 - Controller - Command Line Operation.
- Remove Controller journal files
- The journal files have to be removed from the configuration directory with the
statesub-folder. This means that any orders, which have been submitted for workflows will be removed and that workflows will have to be redeployed:- Unix:
rm -f /var/sos-berlin.com/js7/controller/state/* - Windows:
del C:\ProgramData\sos-berlin.com\js7\controller\state\*
- Unix:
- Note that a different location for the configuration directory can be specified during installation.
- The journal files have to be removed from the configuration directory with the
- Modify the Controller ID
- Unix: For headless installation as an exception to the rule the Controller ID is specified in the installation directory in the
bin/environment_variables.shfile, see JS7 - Controller - Headless Installation on Linux/Windows.- Modify the following environment variable:
JS7_CONTROLLER_ID=<controller-id>
- Windows: If the installer has been used (in headless mode or in graphical mode), then reinstall the Controller, see JS7 - Controller - Installation Using the Windows Graphical Installer.
- Unix: For headless installation as an exception to the rule the Controller ID is specified in the installation directory in the
- Restart the Controller instance.
Check Cluster Settings
The secondary Controller has to use the following configuration from its config/controller.conf file, see JS7 - Controller Configuration Items:
js7.journal.cluster.node.is-backup=yes
If changes to the above configuration are required then carry out the following steps for the secondary Controller instance:
- Stop the Controller service, see JS7 - Controller - Command Line Operation.
- Remove Controller journal files
- The journal files have to be removed from the configuration directory with the
statesub-folder. This means that any orders that have been submitted for workflows will be removed and that workflows will have to be redeployed:- Unix:
rm -f /var/sos-berlin.com/js7/controller/state/* - Windows:
del C:\ProgramData\sos-berlin.com\js7\controller\state\*
- Unix:
- Consider that a different location for the configuration directory can be specified during installation.
- The journal files have to be removed from the configuration directory with the
- Modify the the
config/controller.conffile to reflect the above setting. - Restart the Controller instance.
Adding License Key and Licensed Binary Code
Customers possessing a commercial license will receive a license key from SOS and can download the binary code that allows clustering of JS7 components, see JS7 - Download.
The steps required are summarized below, for details see JS7 - How to apply a JS7 License Key
Handling for Installation on premises
The following chapters can be skipped if a license key was added when using the Windows installer for the Controller. However, the steps described are required when a license key for an existing installation is to be added or replaced without updating the Controller.
Adding a License Key
- The license key can be added during installation of each Controller instance and each JOC Cockpit instance.
- The license key can be added later on by storing the license certificate file in the following locations:
- Unix: Controller Configuration Directory with
licensesub-folder- Default Location:
/var/sos-berlin.com/js7/controller/config/license - A different location for the configuration directory can be specified during installation.
- Default Location:
- Windows: Controller Configuration Directory with
licensesub-folder- Default Location:
C:\ProgramData\sos-berlin.com\js7\controller\<controller-id>\config\license- where
<controller-id>is the unique identifier for the Controller that is specified during installation.
- where
- A different location for the configuration directory can be specified during installation.
- Default Location:
- Unix: Controller Configuration Directory with
Adding Licensed Binary Code
- Binary code for clustering is available from the
js7-license.jarfile, which can be obtained from JS7 - Download. - By downloading the binary code for clustering you consent with the license terms for a commercial license of JS7.
- The
js7-license.jarfile has to be stored to the following locations:- Unix: Controller Installation Directory with
lib/user_libsub-folders- Default Location:
/opt/sos-berlin.com/js7/controller/lib/user_lib - A different location for the installation directory can be specified during installation.
- Default Location:
- Windows: Controller Installation Directory with
lib\user_libsub-folders- Default Location:
C:\Program Files\sos-berlin.com\js7\controller\lib\user_lib - A different location for the installation directory can be specified during installation.
- Default Location:
- Unix: Controller Installation Directory with
Handling for Docker® Installation
Basically the same locations for license key and licensed binary code apply as already explained for Unix operating systems in previous chapters.
Note that there is no access to the container's file system before the container is running, which makes it impossible to add or replace licensed binary code before the Controller has been started.
Adding a License Key
- The license key can be added by storing the license certificate file in the following location:
/var/sos-berlin.com/js7/controller/config/license- The directory
/var/sos-berlin.com/js7/controlleris typically mounted to a Docker var volume when running the container, for details see JS7 - Controller Installation for Docker Containers
Adding Licensed Binary Code
- Binary code for clustering is available from the
js7-license.jarfile, which can be obtained from JS7 - Download. - By downloading the binary code for clustering you consent with the license terms for a commercial license of JS7.
- The
js7-license.jarfile has to be stored in the following locations:/var/sos-berlin.com/js7/controller/config/lib- The directory
/var/sos-berlin.com/js7/controllertypically is mounted in a Dockervarvolume when running the container: for details see JS7 - Controller Installation for Docker Containers. - If the sub-directory
config/libdoes not exist then you can create it before storing thejs7-license.jarfile.
On startup the Controller checks the above directory for existence of the js7-license.jar file. If the file is found then
- the file will be copied to
/opt/sos-berlin.com/js7/controller/lib/user_lib - any existing version of the file in this directory will be overwritten.
Initial Operation
Login to JOC Cockpit User Interface
In your browser navigate to the JOC Cockpit URL and enter the User Account and Password. Typically the URL will include the hostname and port that JOC Cockpit has been installed with:
For example,
http://myhost:4446. Check that the JOC Cockpit port is accessible. This might require adding firewall rules to allow access to this port from the computer that you operate the browser on.After initial installation of JOC Cockpit the default User Account
rootand Passwordrootwill be available if no changes have been made to theshiro.iniconfiguration file.
Note that the root user is assigned the
allrole in the default configuration and possesses all available permissions.
See the Authentication and Authorization - Configuration article for information about the configuration of other user profiles and authentication methods.Note that the JOC Cockpit web service might take a minute to start and to display the login window.
Register Controller and Agents
After successful login to JOC Cockpit a dialog window for registering a Controller is shown. You will find the same dialog later on via the User -> Manage Controllers/Agents menu item.
You have a choice register of registering a Standalone Controller (within scope of the JS7 Open Source License) or a Controller Cluster for high availability (requires a JS7 Commercial License, see JS7 - Licensing).
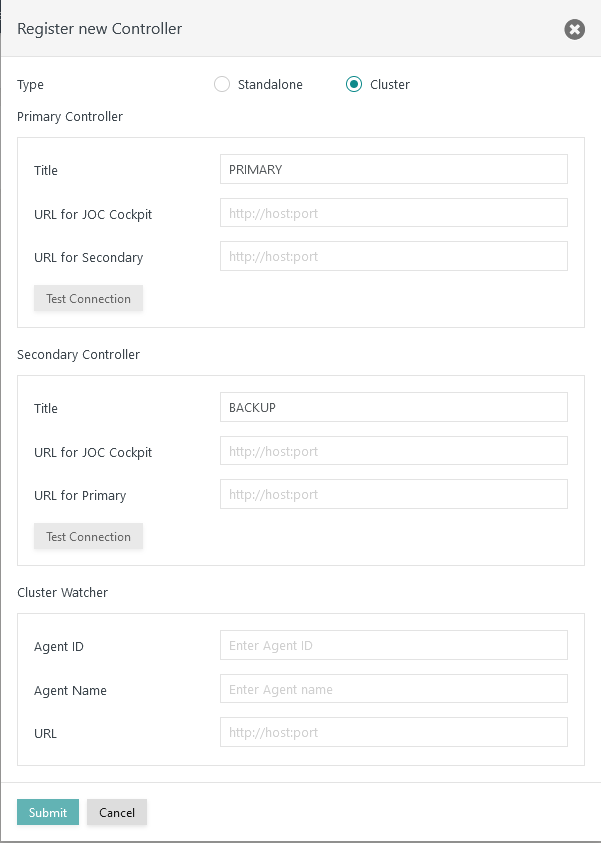
Register Controller Cluster
A Controller Cluster implements high availability for automated fail-over should a Controller instance be aborted or killed or become unavailable.
Explanation
- This dialog allows the Primary Controller instance, the Secondary Controller instance and an Agent Cluster Watcher to be specified.
- The title added for each Controller instance will be shown in the JS7 - Dashboard view.
- Primary and Secondary Controller instances require a URL as seen from JOC Cockpit. This URL is used by JOC Cockpit to connect to the relevant Controller instances.
- The URL of the Controller typically includes the hostname and port that the Controller instance is operated for.
- The Agent Cluster Watcher is required for operation of a Controller Cluster. The Agent is contacted by both Controller Cluster members to verify the cluster status should a direct connection between Controller Cluster members not be available.
- The Agent is assigned an
Agent IDwhich is a unique identifier for this Agent and cannot be modified during lifetime of an Agent. Change of theAgent IDrequires the removal and re-addition of the Agent with JOC Cockpit. It is not necessary to uninstall/reinstall the Agent. - The
Agent Nameis a unique identifier that is used for example in the JOC Cockpit Configuration view to assign Agents to jobs. TheAgent Namecan be modified later on. - The
Agent URLis the hostname and port for which the Agent is operated.
- The Agent is assigned an
- Note that the following connections should be accessible and that this might require the addition of firewall rules to allow access to the ports:
- JOC Cockpit connection to the Primary Controller host and port.
- JOC Cockpit connection to the Secondary Controller host and port.
- Primary Controller connection to the Secondary Controller host and port.
- Secondary Controller connection to the Primary Controller host and port.
- Primary Controller connection to the Cluster Watcher Agent host and port.
- Secondary Controller connection to the Cluster Watcher Agent host and port.
Register Agents
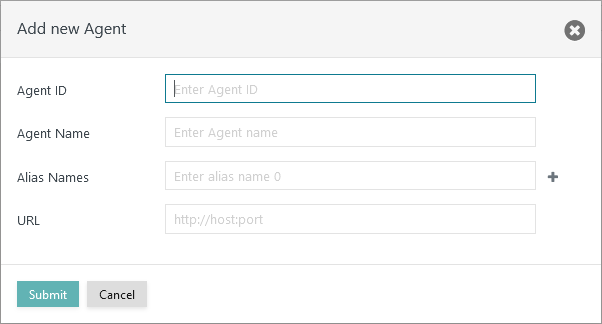
After the connection between JOC Cockpit and the Controller is established you can add Agents. To register an Agent, switch to the Manage Controller/Agents view from the user menu. Click on the Action Menu of the Controller for which an Agent should be registered and select Add Agent.
Explanation:
- The Agent is assigned an
Agent IDwhich is a unique identifier for this Agent that cannot be modified during the lifetime of an Agent. Change of theAgent IDrequires the removal of and re-addition of the Agent with the JOC Cockpit. It is not necessary to uninstall/reinstall the Agent. - The
Agent Nameis a unique identifier that is used for example in the Configuration view to assign Agents to jobs. TheAgent Namecan be modified later on. - In addition, you can add
Agent Alias Namesto make the same Agent available by different names. - The
Agent URLincludes the protocol, the hostname and port for which the Agent is operated.
Further References
- Installation
- Operation
- Configuration
Overview
Content Tools