This example shows the synchronization of tasks within separate job chains (crossover) as shown in the following diagram:
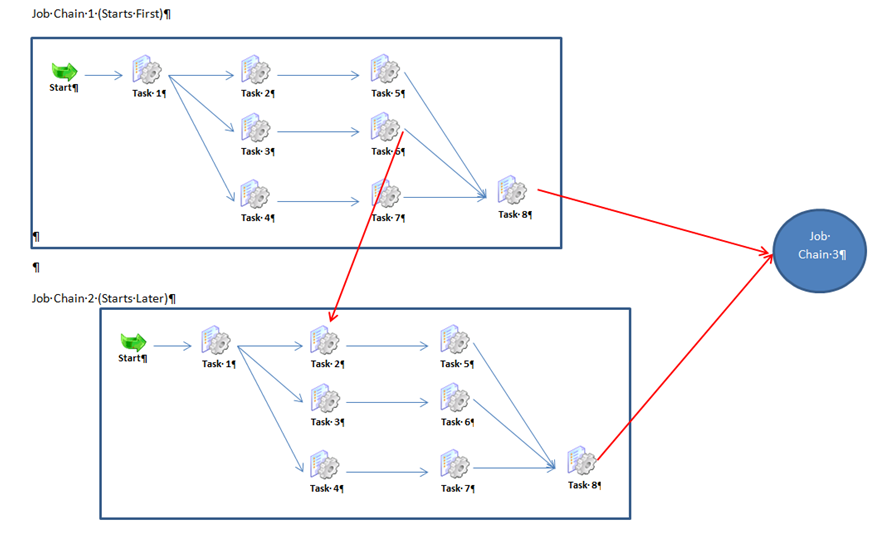
- First Job-Chain-1 is started with a start node and 8 tasks, some of them running in parallel.
- Somewhat later Job-Chain-2 is started, also with a start node and 8 tasks, some of them also running in parallel.
- Processing of both these job chains is also synchronized in a way that a task in one chain (Task 2 in Job-Chain-2) waits for the end of a task in the other chain (Task 6 in Job-Chain-1)
- Both chains have to end successfully before Job-Chain-3 starts.
Creating job chains
Job-Chain-1, Job-Chain-2 and Job-Chain-3 are implemented in JobScheduler as job chains using JOE, the JobScheduler Object Editor.
The following names are used in this example:
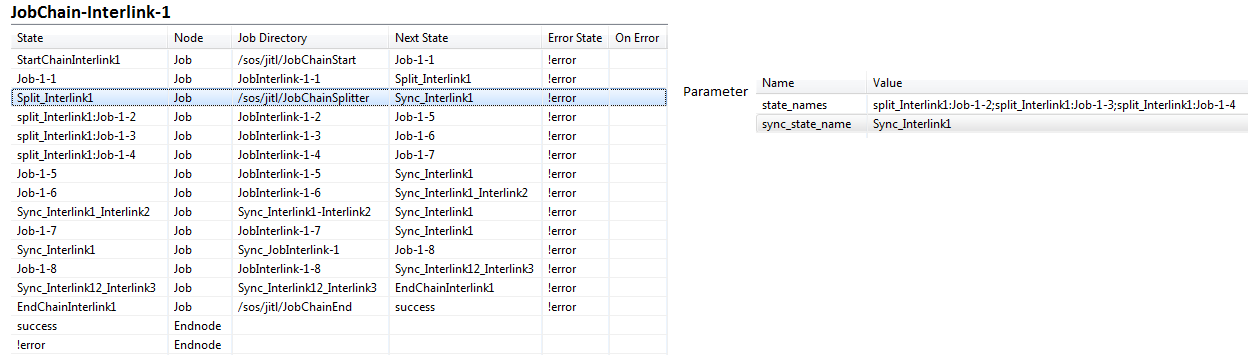
- JobChain1: JobChain-Interlink-1 with the jobs JobInterlink-1-<n> , <n>=1-8
- JobChain2: JobChain-Interlink-2 with the jobs JobInterlink-2-<n> , <n>=1-8
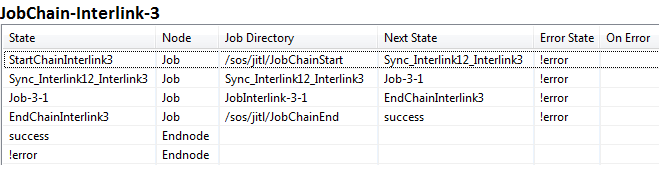
- JobChain3: JobChain-Interlink-3 with job JobInterlink-3-1
The job chains appear as follows in JOE's Job Chain Steps /Nodes list:

Detailed instructions for creating jobs and job chains can be found in Chapters 2 -4 of our JobScheduler Quickstart guide.
Parallel processing within the job chains
Parallel processing is realized by Split jobs and Sync-Jobs - as it is described in the Example for parallel execution in a job chain example.
The /sos/jitl/JobChainSplitter job in the ./live/sos/jitl directory is used for the splitter job, which is part of the JobScheduler download.
The com.sos.jitl.sync.JobSchedulerSynchronizeJobChainsJSAdapterClass JAVA class is used in the sync jobs.
Synchronization of the JobInterlink1 and JobInterlink2 job chains
The job jobInterlink-2-2 should only start when the job jobInterlink-1-6 has been successfully completed. This is achieved by adding a sync state after the job jobInterlink-1-6 and one before the job jobInterlink-2-2 and giving both states identical names: Sync_Interlink1_Interlink2.
As soon as the job jobInterlink-1-6 has finished, the synchronization will be activated, the follow-on job jobInterlink-2-2 will start and the parallel processing branch - including the jobInterlink-1-6 job - come to its sync state.
Synchronization before the start of the third job chain
The third job chain is to be started only when both predecessor job chains JobInterlink1 and JobInterlink2 are finished successfully. This dependency is also realized with a sync job. We define the sync job Sync_Interlink12_Interlink3 and inserted the node after the jobs jobInterlink-1-8 and jobInterlink-2-8 in the predecessor job chains and before jobInterlink-3-1 in the job chain which is to be started.
Sync job parameters
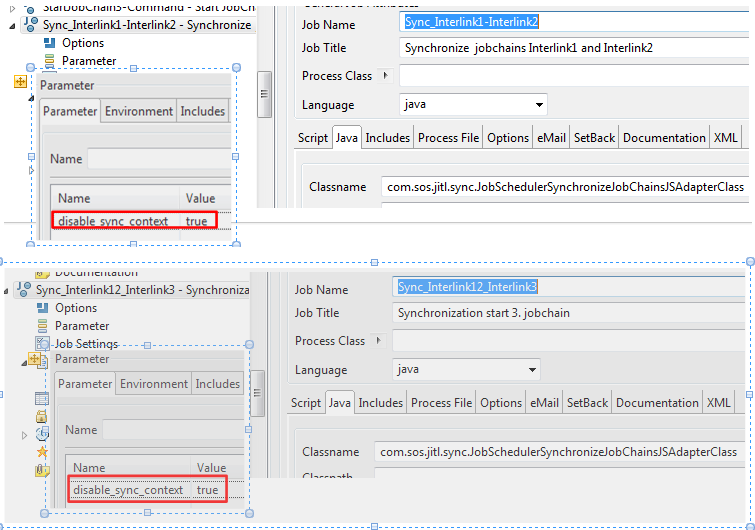
The functions of the com.sos.jitl.sync.JobSchedulerSynchronizeJobChainsJSAdapterClass Java class were extended with release 1.7 of the JobScheduler so that it is now possible to define a context for a sync job. This means that the synchronization job is only valid within the job chain where the sync node is defined. For synchronization in parallel processing (Split/Sync-combination) the context is automatically restricted to the job chain. However, this can be disabled using the disable_sync_context=true parameter to allow synchronization accross job chains, as in the current example.
The disable_sync_context parameter is set to true in the Sync_Interlin1-Interlink2 and Sync_Interlink12_Interlink3 jobs in JOE as shown in the following screen shot:
Graphic of the implemented job chains

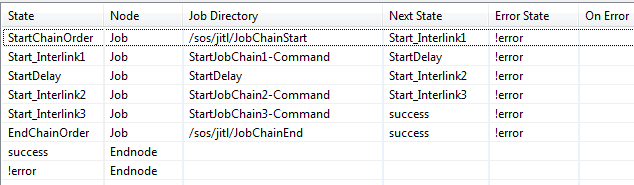
Creating orders with a starter job chain
Each of the three job chains requires an order to start. In this example a starter job chain with one job for each chain is used to generate the order.
In these jobs the order command is used as parameter with the name of the job chain as shown in the listings below. If necessary the path under the JobScheduler's LIVE folder could be included.
<?xml version="1.0" encoding="ISO-8859-1"?>
<job  title="Start JobChain via Command" order="yes">
    <params />
    <script  language="shell">
        <![CDATA[ echo ========== Generate Order for JobChain-Interlink-1 ========== exit 0 ]]>
    </script>
    <run_time />
    <commands  on_exit_code="error"/>
    <commands  on_exit_code="success">
        <order  job_chain="/Schulung/Aufgabe_verlinkte_Ketten/JobChain-Interlink-1" replace="yes"/>
    </commands>
</job>
Another way to generate an order would be to use a script. For example:
<?xml version="1.0" encoding="ISO-8859-1"?>
<job  stop_on_error="no" order="yes" title="Order für JobChain Interlink-1 erstellen (script)">
    <script  language="javax.script:rhino">
        <![CDATA[
function spooler_process()
   {
   var order = spooler.create_order();
   spooler.job_chain( '/Schulung/Aufgabe_verlinkte_Ketten/JobChain-Interlink-1' ).add_order( order );

   return true;
   }
        ]]>
    </script>
    <run_time />
</job>
Downloads
The example (for JobScheduler versions1.7 and newer) can be downloaded here: synchronization_jobchains.zip.