...
| Table of Contents |
|---|
...
|
Example: Synchronization of multiple Job Chains (cross-over)
...
This example shows the synchronization of tasks within separate job chains (crossover) as shown in the following diagram:
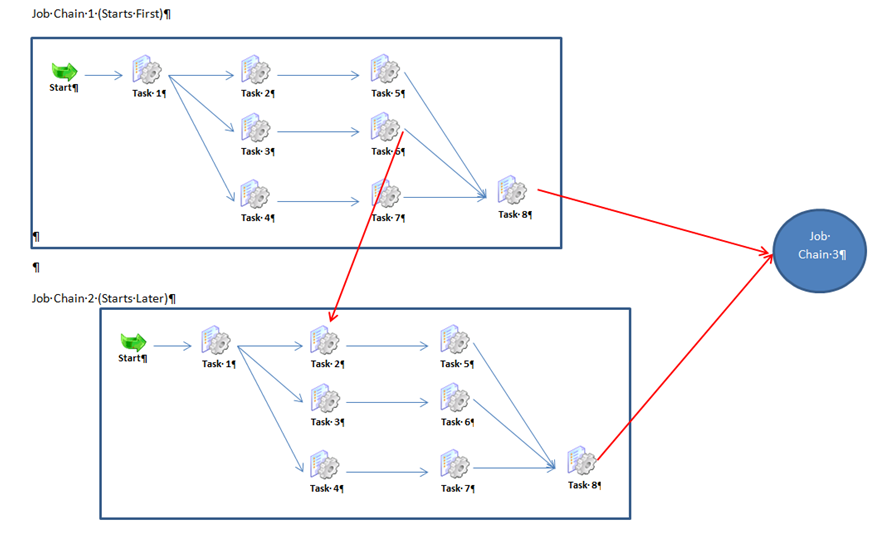
- First Job-Chain-1 is started with a start node and 8 tasks, some of them running in parallel.
- Somewhat later Job-Chain-2 is started, also with a start node and 8 tasks, some of them also running in parallel.
- Processing of both these job chains is also synchronized in a way
...
- that a task in one
...
- chain (Task 2 in Job-Chain-2) waits for the end of a task in the other
...
- chain (Task 6 in Job-Chain-1)
- Both chains have to end successfully before Job-Chain-3 starts.
Creating job chains
Job-Chain-1, Job-Chain-2 and Job-Chain-3 are implemented in JobScheduler as job chains using JOE, the JobScheduler Object Editor.
The following names are used in this example
The third chain has to be started after the other chains are both ended successfully.
This requirement was implemented as follows:
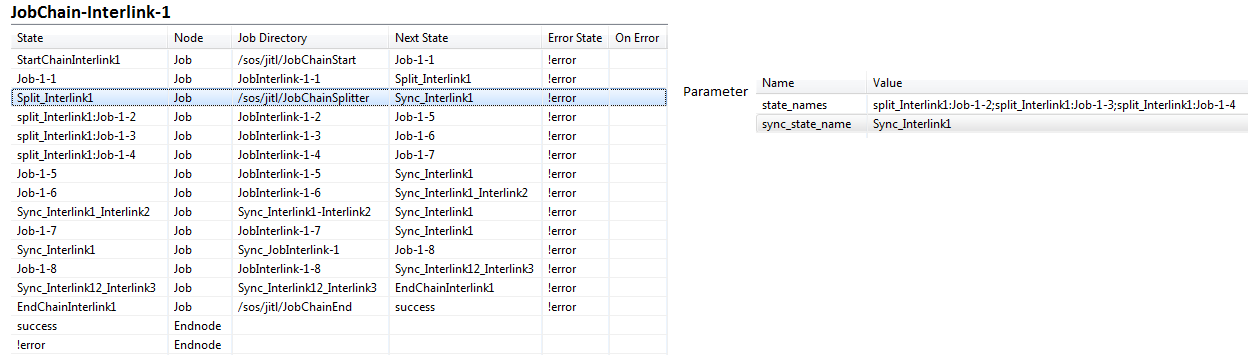
- JobChain1: JobChain-Interlink-1 with the jobs JobInterlink-1-<n> , <nh1. <n>=1-8
- JobChain2: JobChain-Interlink-2 with the jobs JobInterlink-2-<n> , <n>1<n>=1-8
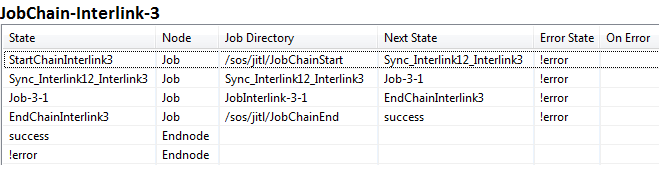
- JobChain3: JobChain-Interlink-3 with job JobInterlink-3-1
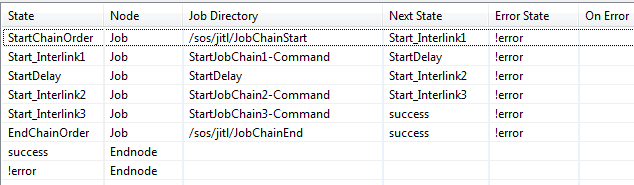
- There is another job chain, which generate an orders for each job chain by using the Command statement.
Generating the job chains of the requirement
The job chains appear as follows in JOE's Job Chain Steps /Nodes list:

Detailed instructions for creating jobs and job chains can be found in Chapters 2 -4 of our JobScheduler Quickstart guide.
Parallel processing
...
within the job chains
The parallel executing Parallel processing is realized by split Split jobs and Sync jobs -Jobs - as it is described in the example Parallel Execution Example for parallel execution in a job chain example.
For the splitter job the job The /sos/jitl/JobChainSplitter job in the directory ./live/sos/jitl directory is used for the splitter job, which is part of the JobScheduler download. In the sync jobs the JAVA class
The com.sos.jitl.sync.JobSchedulerSynchronizeJobChainsJSAdapterClass JAVA class is used in the sync jobs.
Synchronization of the
...
JobInterlink1 and JobInterlink2
...
job chains
The According to request the job jobInterlink-2-2 starts should only start when the job jobInterlink-1-6 is has been successfully completed. Therefore we need This is achieved by adding a sync state after the job jobInterlink-1-6 and one before the job jobInterlink-2-2 with the identical state name and giving both states identical names: Sync_Interlink1_Interlink2.
As soon as the job jobInterlink-1-6 has finished, the synchronization is will be activated, the subsequent follow-on job jobInterlink-2-5 starts running 2 will start and the parallel processing branch of the parallel execution including job - including the jobInterlink-1-6 comes job - come to its sync state.
Synchronization before the start of the third job chain
The third job chain is to be started only when the both predecessor job chains JobInterlink1 and JobInterlink2 are finished successfully. This dependency is also realized with a sync job. We define the sync job Sync_Interlink12_Interlink3 and inserted the node after the jobs jobInterlink-1-8 and jobInterlink-2-8 in the predecessor job chains and before jobInterlink-3-1 in the job chain which is to be started.
Every synchronization has its own sync job!
Schema of the Job Chains in JOE
The job chains were realized by using the job editor JOE.

"Cross-Over" Diagram
Das Diagramm der Beispiel-Jobkette (erstellt mit der Sandbox-JOE-Version).
Starter-Kette anlegen
Jede der drei Jobketten benötigt eine Order zum starten. In diesem Beispiel wird eine Starter-Jobkette angelegt, die für jede Kette einen Job enthält, der die Order erstellt.
Die Order wird über ein Kommando gesteuert, das nach am Ende des Scripts durchgeführt wird.Die zu startende Kette muß ggf. mit dem Pfad unterhalb des Live-Verzeichnisses angegeben werden
Best practices
Start- und End-Knoten verwenden
Wir empfehlen, in jeder Jobkette im ersten Knoten den Startjob /sos/jitl/JobChainStart und im letzten Knoten den Endjob /sos/jitl/JobChainEnd zu verwenden.
Konventionen für Knoten-Namen
Splitter-Knoten
Wir empfehlen, den Knoten-Namen eines Splitter-Jobs mit der Zeichenfolge split zu beginnen, zum Beispiel Split_Interlink1. Damit "weiß" der Algorithmus, der das Diagramm erstellt, dass es sich um einen Splitter-Knoten handelt und kann ihn korrekt darstellen. Den Knote-Typ "Splitter" gibt es in der Syntax der Job-Knoten nicht.
Parallele Knoten
Für die Knoten-Namen der parallel zu verarbeitenden Jobs empfehlen wir die Syntax "Knoten-Name des Splitter-Jobs" ":" "Name des Jobs", zum Beispiel split_Interlink1:Job-1-2. Damit "weiß" der Diagramm-Algorithmus, welche Knoten die direkten Nachfolger des Splitters sind und kann dies korrekt darstellen. Die Syntax des JobScheduler kennt eine Vorgänger Beziehung nicht, deshalb die hilfsweise Kennzeichnung des Vorgängers über den ersten Teil des Knoten-Namens.
Job-Knoten
Soweit möglich sollte der Name des Job-Knotens identisch sein mit dem Job-Namen (evtl. ohne Folder Namen). Wird ein Job mehrfach in einer Job-Kette verwendet, so können die Knoten-Namen durch eine angehängte Ziffer (oder Nummer) eindeutig spezifiziert werden.
Fehler-Knoten
Der Name des Fehler-Knotens sollte den Job-Namen enthalten oder identisch sein mit diesem. Damit kann bei einem Fehler im Ablauf der Jobkette sofort in JOC erkannt werden, an welcher Stelle die Jobkette abnormal beendet wurde.
Außerdem sollte der Name mit einem "!" (Ausrufezeichen) begonnen werden. Damit wird im JID eine Fehler-Status erkannt und rot markiert.
siehe auch
- Dokumentation des Jobs JobSchedulerSynchronizeJobChains.
- Beispiele für Anwendungen von Synx-Jobs siehe JobScheduler_FAQ
Downloads
Sync job parameters
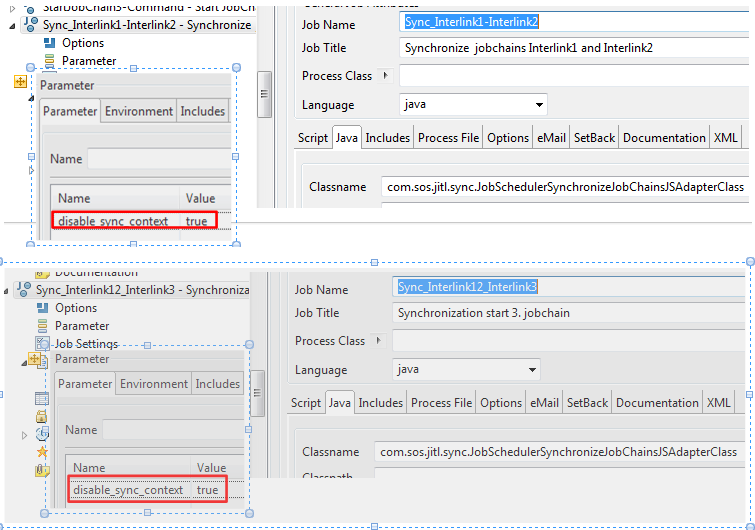
The functions of the com.sos.jitl.sync.JobSchedulerSynchronizeJobChainsJSAdapterClass Java class were extended with release 1.7 of the JobScheduler so that it is now possible to define a context for a sync job. This means that the synchronization job is only valid within the job chain where the sync node is defined. For synchronization in parallel processing (Split/Sync-combination) the context is automatically restricted to the job chain. However, this can be disabled using the disable_sync_context=true parameter to allow synchronization accross job chains, as in the current example.
The disable_sync_context parameter is set to true in the Sync_Interlin1-Interlink2 and Sync_Interlink12_Interlink3 jobs in JOE as shown in the following screen shot:
Graphic of the implemented job chains
| Graphviz |
|---|
digraph "Example: Synchronization of JobChains"{
node  [shape=record]
node  [fontsize=8]
graph [rankdir=LR]
ranksep=0.1
Sync_Interlink1_Interlink2[style=filled, fillcolor="gold"]
Sync_Interlink12_Interlink3[style=filled, fillcolor="gold"]

subgraph ChainInterlink1
{
edge [color="darkgreen"]
node [color="darkgreen"]
StartChainInterlink1[style=filled, fillcolor="darkolivegreen3"]
EndChainInterlink1[style=filled, fillcolor="darkolivegreen3"]

StartChainInterlink1 ->Job_1_1
Job_1_1 -> Split_Interlink1
Split_Interlink1 ->Job_1_2 ->Job_1_5 -> Sync_Interlink1
Split_Interlink1 ->Job_1_3 ->Job_1_6 -> Sync_Interlink1_Interlink2 -> Sync_Interlink1
Split_Interlink1 ->Job_1_4 ->Job_1_7 -> Sync_Interlink1
Sync_Interlink1->Job_1_8 -> Sync_Interlink12_Interlink3 -> EndChainInterlink1
}

subgraph ChainInterlink2
{
edge [color="deeppink3"]
node [color="deeppink3"]
StartChainInterlink2[style=filled,fillcolor="deeppink"]
EndChainInterlink2[style=filled,fillcolor="deeppink"]

StartChainInterlink2 ->Job_2_1
Job_2_1 -> Split_Interlink2
Split_Interlink2 -> Sync_Interlink1_Interlink2 -> Job_2_2 ->Job_2_5 -> Sync_Interlink2
Split_Interlink2  -> Job_2_3 ->Job_2_6 -> Sync_Interlink2
Split_Interlink2  -> Job_2_4 ->Job_2_7 -> Sync_Interlink2
Sync_Interlink2 -> Job_2_8 ->Sync_Interlink12_Interlink3 -> EndChainInterlink2
}

subgraph ChainInterlink3
{
edge [color="dodgerblue2"]
node [color="dodgerblue2"]
StartChainInterlink3[style=filled,fillcolor="dodgerblue"]
EndChainInterlink3[style=filled,fillcolor="dodgerblue"]

StartChainInterlink3 -> Sync_Interlink12_Interlink3
Sync_Interlink12_Interlink3 -> Job_3_1
Job_3_1 -> EndChainInterlink3
}

}
|
Creating orders with a starter job chain
Each of the three job chains requires an order to start. In this example a starter job chain with one job for each chain is used to generate the order.
In these jobs the order command is used as parameter with the name of the job chain as shown in the listings below. If necessary the path under the JobScheduler's LIVE folder could be included.
| Code Block | ||
|---|---|---|
| ||
<?xml version="1.0" encoding="ISO-8859-1"?>
<job  title="Start JobChain via Command" order="yes">
    <params />
    <script  language="shell">
        <![CDATA[ echo ========== Generate Order for JobChain-Interlink-1 ========== exit 0 ]]>
    </script>
    <run_time />
    <commands  on_exit_code="error"/>
    <commands  on_exit_code="success">
        <order  job_chain="/Schulung/Aufgabe_verlinkte_Ketten/JobChain-Interlink-1" replace="yes"/>
    </commands>
</job>
|
Another way to generate an order would be to use a script. For example:
| Code Block | ||
|---|---|---|
| ||
<?xml version="1.0" encoding="ISO-8859-1"?>
<job  stop_on_error="no" order="yes" title="Order für JobChain Interlink-1 erstellen (script)">
    <script  language="javax.script:rhino">
        <![CDATA[
function spooler_process()
   {
   var order = spooler.create_order();
   spooler.job_chain( '/Schulung/Aufgabe_verlinkte_Ketten/JobChain-Interlink-1' ).add_order( order );

   return true;
   }
        ]]>
    </script>
    <run_time />
</job>
|
Downloads
The example (for JobScheduler versions1.7 and newer) can be downloaded here: Das verwendete Beispiel können Sie hier herunterladen synchronization_jobchains.zip.