...
The JobScheduler Universal Agent Batch Installer is a set of files that are is used by a JobScheduler Master to install one or more Universal Agents on local and remote servers.
...
This article describes the use of the JobScheduler Universal Agent Batch Installer on a Linux server, working from a Windows system.
Note that the Batch Installer is only available for the current JobScheduler Universal Agent version.
Installation Procedure
General requirements:
...
| Info | ||
|---|---|---|
| ||
|
...
Two configuration elements are required for the transfer of the files required for each Universal Agent that is to be installedinstallation:
- a Protocol Fragment that defines how the file transfer is to be carried out and
- a Profile that defines the file transfer itself.
...
- Configurations
- Fragments
- ProtocolFragments
- SFTPFragment name="
SFTP_192.11.0.0202202:4441"- BasicConnection
- Hostname
192.11.02020.202
- Hostname
- SSHAuthentication
- Account sos
- AuthenticationMethodPassword
- Password
********
- Password
- BasicConnection
- SFTPFragment name="
- ProtocolFragments
- Fragments
...
A typical profile_id attribute would be 192.11.02020.202:4441.
A typical Profile configuration could contain the following elements:
- The CopySource ... Directory element
...
- , which points to the
batch_installfolder which was unpacked as described in Section 1 of this article above. - The SFTPFragmentRef element
...
- , which contains the name of the SFTPFragment element configured in the Protocol Fragment Configuration section above.
- The CopyTarget ... Directory
...
- , which points to a folder on the target server where the Account specified in the SSHAuthentication.Account element (configured in the Protocol Fragment Configuration section above) will be able to carry out the installation.
A complete typical Protocol Fragment Profile configuration for a single Agent would be (shown listed from the root Configurations element):
- Configurations
- Profiles
- Profile profile_id="
192.11.0.202:4441"- Operation
- Copy
- CopySource
- CopySourceFragmentRef
- LocalSource
- SourceFileOptions
- Selection
- FileSpecSelection
- FileSpec
.*\.(sgsh|gz)$ - Directory
C:\ProgramData\sos-berlin.com\jobscheduler\jobscheduler_1.12\config\batch_install
- FileSpec
- FileSpecSelection
- Selection
- CopySourceFragmentRef
- CopyTarget
- CopyTargetFragmentRef
- SFTPFragmentRef ref="
SFTP_192.11.0.202:4441"
- SFTPFragmentRef ref="
- Directory
/home/sos/temp/js_agent_batch_install
- CopyTargetFragmentRef
- CopySource
- Copy
- Operation
- Profile profile_id="
- Profiles
...
- Open your
batch_installer_config_file.xmlconfiguration file in the XML Editor.- Assign the
scheduler_universal_agent_installations.xsdschema, which will also be located in theSCHEDULER_DATA/
- Assign the
The root XML element of the Batch Installer configuration file is the <installations> element. This contains an <installation> element for each Agent instance to be installed. In addition, the <global> element can be used in a homogeneous environment to specify parameters that will be applied to all Agent installations. The majority of configuration elements can be specified as <global> and as <installation> elements. If a parameter is specified in both the <global> element and in an individual <installation> element then the setting for the individual element will overwrite the global setting.
The parameters to be configured are:
| Info | ||
|---|---|---|
| ||
|
The parameters to be configured are:
- The
<install_path>element, which points to a location where the Agent should be installed. (Mandatory)- A
<install_path>element, which points to a location where the Agent should be installed.- A typical value would be
/opt/sos-berlin.com/jobscheduler
- the <transfer><settings> The <transfer><settings> element which points to the location where the YADE transfer configuration file that was configured in Section 2.1 above. (Mandatory)
- A typical value would be
C:\ProgramData\sos-berlin.com\jobscheduler\jobscheduler_1.12\config\batch_install\yade_agent_batch_installer_settings.xml
- A typical value would be
- the The
<ssh>elements (often partly configured as<global>elements):<auth_method>: the authentication method to be used for the SSH connection. (Mandatory)<port>: SSH port. (Mandatory)<user>: SSH login account name. (Mandatory)<password>: Password for the SSH login account.- <
auth_method>: SSH authentication method. (Mandatory) <host>: the host name of the target server. (Mandatory)
- the The
<installation_file>element - the name of the Universal Agent installation file. This filename contains the version of the Agent which you are installing and it is helpful for recognizing the version of the Agents that are installed. (Mandatory)- For Unix systems this is usually
jobscheduler_unix_universal_agent.<version>.tar.gz
- For Unix systems this is usually
- the The
<agent_options>elements:<java_home>: the location of the Java Runtime Environment (JRE)- See here for more information.
<java_options>: the Java options, e.g the Java memory settings- See here for more information
<scheduler_http_port>: the http port that the Universal Agent is to use.<scheduler_user><scheduler_log_dir>- A typical location would be
/var/log/sos-berlin.com/jobscheduler/agent.
- A typical location would be
- listen to. (Mandatory)
<the IP address of the target system. (Mandatory)scheduler_ip_address><scheduler_user><scheduler_log_dir>- A typical location would be
/var/log/sos-berlin.com/jobscheduler/agent. - See here for more information
- A typical location would be
<the kill scripts allows a task and it's child processes to be killed.scheduler_kill_script>- See here for more information.
<scheduler_pid_file_dir>the- See here for more information.
<agent_installation_script>the script to be used for the installation of the Agent (Mandatory)- This is usually
jobscheduler_universal_agent_install.sh
- This is usually
- The
<postprocessing>elements:- Post
<postprocessing>elements:- The post-processing commands for the Agent server's operating system. The default commands for an Ubuntu distribution will place the Agent start script under
/etc/init.dand will setup the autostart for the Universal Agent:echo ${ssh.sudo_password} | sudo -S cp ${install_path}/jobscheduler_agent/bin/jobscheduler_agent_${agent_options.scheduler_http_port}.sh /etc/init.d/jobscheduler_agent_${agent_options.scheduler_http_port}echo ${ssh.sudo_password} | sudo -Supdate-rc.d jobscheduler_agent_${agent_options.scheduler_http_port} defaults
- These two commands will be executed by the
PerformInstalljob node, which is the last job node in the batch installer job chain. If you want to add more commands, please add the call to the job node.
...
Note that in the above example two of the SSH elements (<auth_method> and <port>) are configured globally and four (<user>, <password>, <sudo_password> and <host>) are configured individually for each Agent.
| Info | ||
|---|---|---|
| ||
|
...
| Excerpt | ||||||||||||
|---|---|---|---|---|---|---|---|---|---|---|---|---|
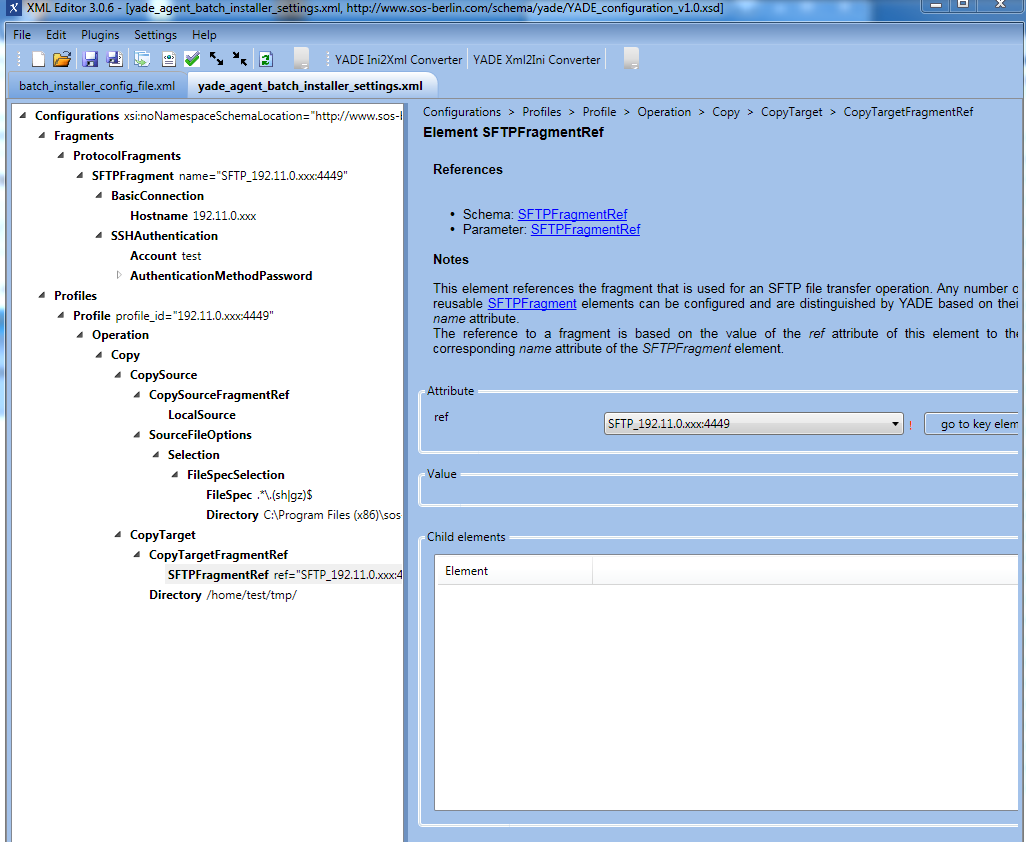
The XML Editor can be used to manage the Batch Installer configuration file and the YADE configuration file. XML Editor for Batch Installer configuration fileAn example Batch Installer configuration file for the installation of a single Agent is shown in the following screenshot:
XML Editor for YADE configuration fileAn example YADE configuration file for the installation of a single Agent is shown in the next screenshot:
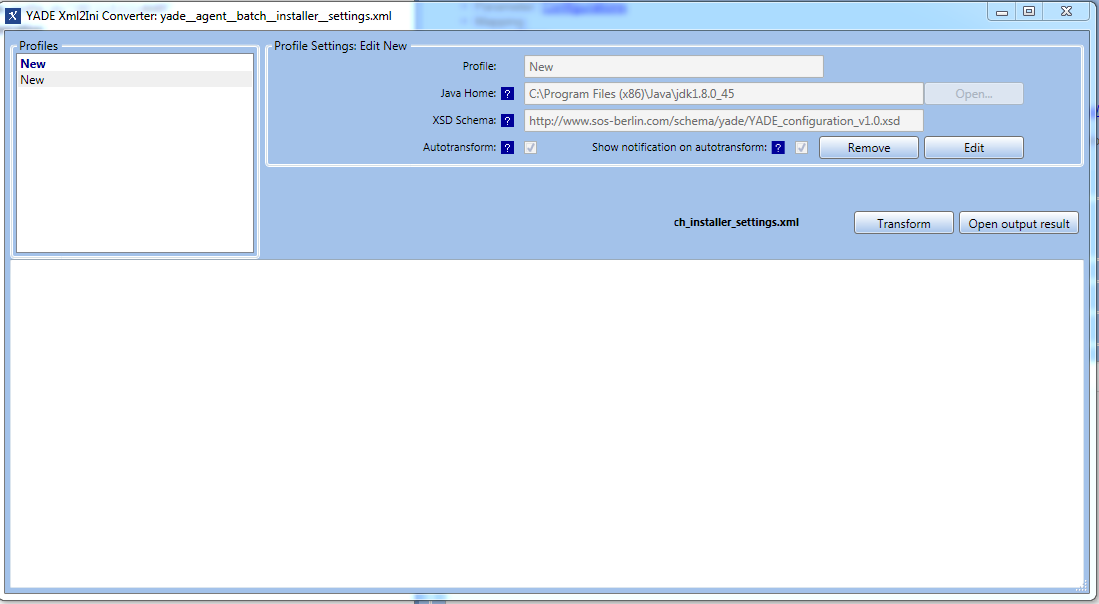
The "YADE Xml2Ini Converter" function in the XML Editor is available for converting YADE files from XML to the
Note that it is not necessary to create a Profile for the Batch Installer, as conversion will take place automatically once the "Autotransform" option has been chosen. Every time a change in the XML file is saved the XML file will be automatically converted and saved in A pop-up window will show every time a change is saved if the option "Show notification on autotransform" is chosen. |