...
The JobScheduler Operations Center (JOC) interface can be accessed after the setup by entering the following URL in a web browser (Firefox , Microsoft Internet Explorer®, Chrome® are supported):
http://localhost:[port]where[port]is the port specified for the JobScheduler instance during setup.
The JOC Cockpit interface can be accessed after the setup by entering the following URL in a web browser (Firefox , Microsoft Internet Explorer®, Chrome® are supported):
http://localhost:[port]/joc/where[port]is the HTTP/HTTPS port specified for the JobScheduler instance during setup.
| Anchor | ||||
|---|---|---|---|---|
|
1.2 Licenses
...
| Anchor | ||||
|---|---|---|---|---|
|
The JobScheduler Database
...
Package Forms
Standalone / Cluster Configuration
...
The radio buttons in the form shown above determine the architecture in which the JobScheduler Master is to be installed. The following options are available:
...
You can change the architecture later (see here).
The JobScheduler Database Management System
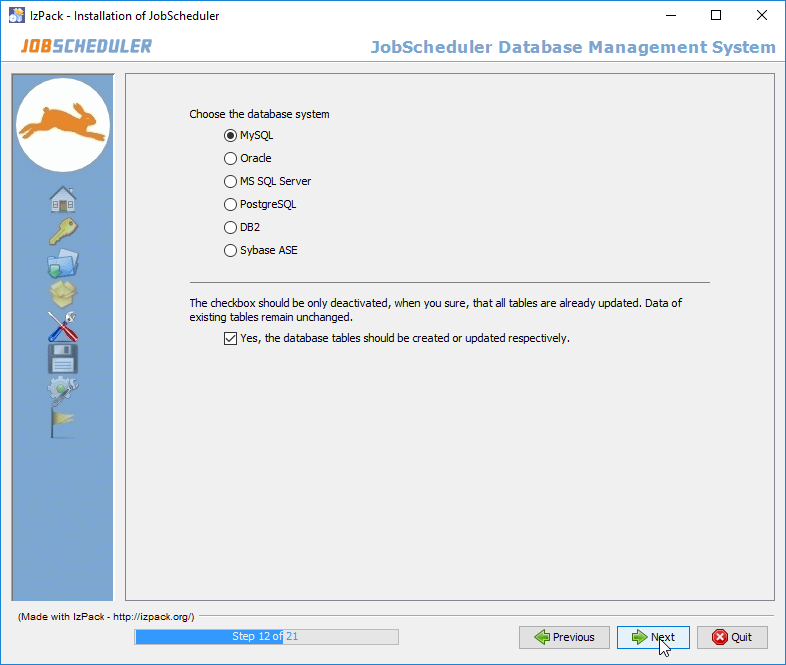
The database system is specified in the upper selection on this form. It is recommended that the box in the center of the form remains checked, so that the script which creates and fills the necessary database tables can be executed. Alternatively, the tables can be be changed manually later on. If you have already installed another JobScheduler with the same database connection then uncheck this option.
The JobScheduler Database Connection
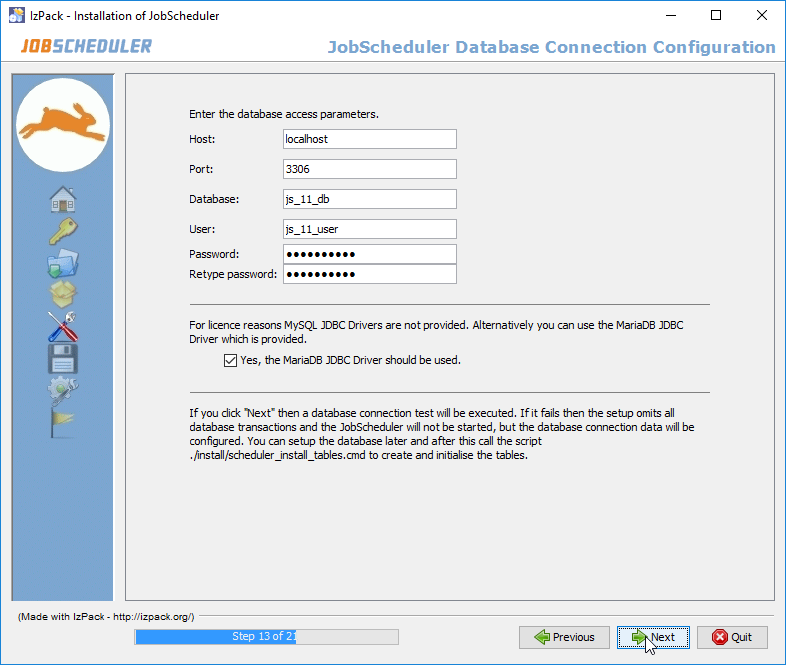
The database access parameters are specified in the upper part of the form. These are saved in the $SCHEDULER_DATA/config/factory.ini file, which can also be changed manually later on.
...
The database connection configuration is saved in the $SCHEDULER_DATA/config/factory.ini, $SCHEDULER_DATA/config/hibernate.cfg.xml and $SCHEDULER_DATA/config/sos_settings.ini files. All files can be changed manually if required.
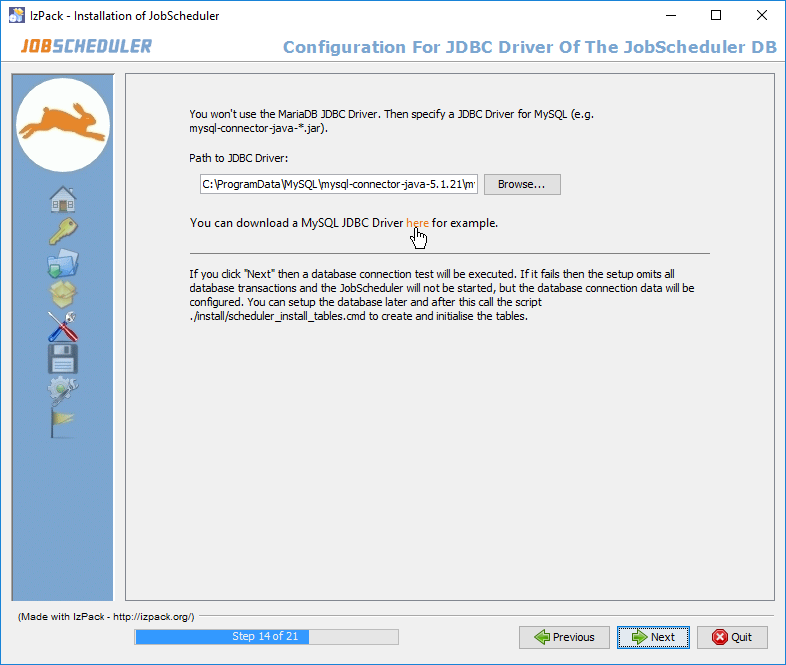
This dialog form is offer offered for:
- ... IBM® DB2.
- ... MySql® and you have unchecked the MariaDB® JDBC® driver for MySql® databaseswhen Use the MariaDB® JDBC® driver for MySql® databases was not checked.
- ... Microsoft® SQL Server or Sybase and you have unchecked when Use the jTDS JDBC® driver for Sybase and Microsoft® SQL Server databases was not checked.
The script for the creation of the database tables is started by the setup program and requires a JDBC® JDBC® driver appropriate to the database system being used. The drivers for Oracle® Oracle® Database and PostgreSQL are included in the setup. However, the relevant IBM® DB2, MySql®, Sybase and Microsoft® SQL Server JDBC® driver must be manually specified here. Note that for Microsoft® SQL Server and Sybase databases the jTDS JDBC® driver and for MySql® the MariaDB® JDBC® driver that is delivered as part of the JobScheduler setup can be used when the appropriate checkbox in the previous form is was activated. For IBM® DB2 you have to provide a license file for the driver too. As this driver will also be required by the JobScheduler later on, it is copied by the setup into the $SCHEDULER_HOME /lib/user_lib folder.
...
The Reporting Database Package Forms
Reporting information can be stored in the same database and DBMS as used by the JobScheduler Master or in a a separate one. This is specified in the form shown below. The check list for for specifying a DBMS for the reporting database shown in the form and the subsequent configuration forms will only be shown if the JobScheduler and Reporting Databases are the same box is unchecked.
...
If a separate reporting database is to be used then a second step form for the Reporting database will follow be shown in which the database connection for for this database the Reporting Database will be specified. The configuration information entered in this step is identical to that already specified for the JobScheduler Database Connection at Step 13. and need not be repeated here. (See above.)