| Table of Contents |
|---|
Environment
We consider a homogeneous environment a scenario in which a number of JobScheduler Agents will be installed based on the same prerequisites:
- A JobScheduler Master is up and running.
- Agent installations are performed for an arbitrary number of servers with the same operating system. One Agent is installed per server.
- Agents are operated with the same user, listening port and installation path.
The Batch Installer supports
- First Installation: no Agent is installed and running on the server.
- Update Installation: an Agent is installed and optionally up and running.
Structure
The JobScheduler Agents will be installed from a JobScheduler Master that connects to the Agent Servers to execute the corresponding Agent installations. The structure is formed by a JobScheduler job AgentBatchInstaller and a JobScheduler job chain universal_agent_installer. The job AgentBatchInstaller is responsible for creating the JobScheduler orders for the job chain. These orders are named <host>:<port> meaning the port and the host where an Agent will be installed.
The job chain have four job nodes and the sequence look like this:
...
The job chain for update/installation of an Agent uses the nodes:
CheckPreRequisiteSync:To wait until all prerequisites are checked and all instances have been shut down.- Checking for the correct Java version
- Checking whether JobScheduler Universal Agent already has been installed. If so:
- shutting down a possibly running instance
- remove the installation
TransferInstallationSetup: To transfer the installer files to the host- Before the transfer starts, the preprocessor will create the start script for the Agent instance from the template
jobscheduler_agent_instance_script.txt The files that will be transfered are specified with the element
<globals><transfer><file_spec=".*\.(sh|gz)$">- With this regular expression, the following files will be transfered:
- the JobScheduler Universal Agent installer files:
jobscheduler_unix_universal_agent.tar.gz - the instance start script:
jobscheduler_agent_<port>.sh - the installation script:
jobscheduler_universal_agent_install.sh
- the JobScheduler Universal Agent installer files:
- Before the transfer starts, the preprocessor will create the start script for the Agent instance from the template
PerformInstall: To start the installation using SSH.- The step before transfered installation script will be executed
- The installation script will install and start the JobScheduler Universal Agent
- Finally the post-processing commands will be executed
- The post-processing commands are stored with the element
<installation><postprocessing><command> - The default commands will place the Agent start script under
/etc/init.dand will setup the autostart for JobScheduler Universal Agent on a Linux server (example for an Ubuntu distribution):echo ${ssh.sudo_password} | sudo -S cp ${install_path}/bin/jobscheduler_agent.sh /etc/init.d/jobschedulerecho ${ssh.sudo_password} | sudo -S update-rc.d jobscheduler defaults
- The post-processing commands are stored with the element
Download
The following steps have to be carried out. Files can be downloaded from http://www.sos-berlin.com/jobscheduler-downloads
...
Introduction
The JobScheduler Universal Agent Batch Installer is a set of files used together by a JobScheduler Master to install the Universal Agent on local and remote servers.
This article is one of a series describing how to configure the JobScheduler Universal Agent Batch Installer so that a number of Universal Agents can be readily installed on a number of servers.
Article Scope
This article describes how to use the Universal Agent Batch Installer to install Agents in a homogeneous environment. Other use cases in this series of articles are listed in the introductory JobScheduler Universal Agent - Batch Installation and Update of Agents article.
A general introduction to installation of the JobScheduler Universal Agent can be found in the JobScheduler Universal Agent - Installation & Operation article.
The JobScheduler Universal Agent - Batch Installation and Update of Agents article provides an overview of how the Batch Installer works. New users are strongly recommended to read this article before proceeding with the instructions presented here.
The Batch Installation - Reference Documentation article provides a detailed guide to configuration of the batch installer with, for example, full lists of parameters.
Installation Environment
This article describes the use of the JobScheduler Universal Agent Batch Installer in a homogeneous environment - that is an environment in which a number of JobScheduler Agents will be installed according to the same prerequisites:
- Requirements for this use case:
- The Agent installations are to be performed on any number of servers that have the same operating system. One Agent is to be installed per server.
- The Agents will be operated with the same user, listening port and installation path.
Installation Procedure
General requirements:
- A JobScheduler Master is up and running.
- A Java Run-time Environment in version 1.8 or newer is installed on the system(s) the Agent is to be installed on.
- We recommend that you use the SOS XML Editor to manage the configuration files required for the Batch Installer. More information about the installation and use of the XML editor will be provided later in this article.
1. Download and Extract the Batch Installer and Agent Files
The following steps have to be carried out. Files can be downloaded from http://www.sos-berlin.com/jobscheduler-downloads
- 1.1 Unix
- Download the "JobScheduler Universal Agent" tarball for Unix.
- Download the "Universal Agent Batch Installer". The archive contains the following folders and sub-folders:
live/batch_install_universal_agent- This folder contains the Jobs and Job Chain used to carry out the installation.
- Extract these files to the the
livefolder of the JobScheduler Master:SCHEDULER_DATA/config/live.
batch_install- This folder contains the configuration files for the Batch Installer.
- Extract these files to the
configdirectory of the JobScheduler Master:SCHEDULER_DATA/config.
- Copy the JobScheduler Universal Agent installation file to the
SCHEDULER_DATA/config/batch_installfolder.
- 1.2 Windows
- Download the "JobScheduler Universal Agent" for Windows.
- Download the "Universal Agent Batch Installer". The archive contains the following folders and sub-folders
- the
live/batch_install_universal_agentfolder- This folder contains the Jobs and Job Chain used to carry out the installation.
- Extract these files to the
livefolder of the JobScheduler MasterSCHEDULER_DATA/config/live.
- the
batch_installfolder- This folder contains the configuration files for the Batch Installer.
- Extract these files to the JobScheduler configuration directory
SCHEDULER_DATA/config.
- the
- Copy the JobScheduler Universal Agent installation file to the folder
...
SCHEDULER_DATA
...
/config/batch_
...
instalfolderl.
...
- Download the "JobScheduler Universal Agent" for Windows.
- Download the "JobScheduler Universal Agent Batch Installer" for Windows. The archive provides the following content:
- the
config/live/batch_installer_agentfolder contains jobs and job chains that should be extracted to thelivefolder of the JobScheduler Master${SCHEDULER_DATA}/config/live. - the
config/batch_installerfolder contains configuration files for the Batch Installer that should be extracted to the JobScheduler configuration directory${SCHEDULER_DATA}/config. - Copy the JobScheduler Universal Agent installation file to the folder
${SCHEDULER_DATA}/config/batch_installer.
- the
Configuration
XML files
...
2. Configure the Transfer of the Universal Agent Installation Files and the Installation of the Agents
2.1 Edit the XML Configuration files
Configuring complex XML files with a text editor is often a tedious and error-prone procedure. To get around this, we recommend that you use our XML Editor to manage the configuration files required for the Batch Installer. The XML Editor automatically validates configuration files and therefore reduces the possibility of configuration errors. See the Using the XML Editor chapter below for more detailed information about using the XML Editor.
...
- After downloading the XML Editor, extract the contents of the zip file to a convenient folder (an installation routine is not required) and start the
sos.xml.editor.exeprogram. - Use the XML Editor to configure transfer of the Universal Agent installation files:
- Open your
yade_agent_batch_installer_settings.xmlYADE configurationfile, which is located in theconfig/batch_installerfolder and assign the following schema in the XML Editor:
- Open your
...
- .
- See the YADE profiles for the file transfer chapter below for instructions on
...
- how to configure the
...
- YADE configuration file
...
- .
...
- Use the XML Editor
...
- to configure the
...
- installation of the Universal Agents:
- Open your
batch_installer_config_file.xmlconfiguration file in the XML Editor and assign thescheduler_universal_agent_installations.xsdschema: both files are located in theconfig/batch_installerfolder.- See the Batch Installer Configuration File chapter below for instructions on how to configure the Batch Installer configuration file.
- Open your
| Info | ||
|---|---|---|
| ||
| ||
| Info | ||
| ||
|
2.2 Configure the JobScheduler Jobs
Once the Job and Job Chain have been extracted to the live folder of your JobScheduler Master carry out the following:
AgentBatchInstallerJob:- Set
AgentBatchInstaller:Adjust- the parameter values for the
AgentBatchInstallerjob in your JobScheduler Master. Adjust Set the
installation_definition_filejob parameter with to the path that points to the Batch Installer configuration file.
3 Installation
...
of the Agents
The Agents can be installed after Having configured the XML configuration files and the JobScheduler jobs, the Agents can be installedJobScheduler Jobs have been configured. Start a task for the AgentBatchInstaller job as follows:
- Open a JobScheduler Operating Center (JOC) browser window for the JobScheduler master.
- Go on the "Jobs" Window and open the "batch_installer_universal_agent" folder.
- Right click on the job to open the context menu.
- Select the
Start task immediatelyoperation. - Right click on the JobScheduler job
- From the context menu use the operation:
Start task immediately - This job will create different
- the appropriate Orders for the JobScheduler orders
- as explained in the chapter and the Agent installation
- description of the Batch Installer Application.
Example Use Case: Installation of two Agents
The following example explains describes the installation of two Agents for two servers, i.e. one Agent will be installed per serveron separate servers. First of all, the YADE configuration file for the file transfer will be configured (in XML format), it will then be converted to the YADE settings file format (.ini) and finally the Batch Installer configuration file will be specified.
| Anchor |
|---|
...
|
...
|
...
|
...
|
...
|
...
|
...
YADE Configuration File for File
...
Transfer
We assume that you You should have opened the Batch Installer configuration file batch_installer_config_file.xml and have assigned the XSD schema scheduler_universal_agent_installations.xsd. The XML file contains a basic example with the recommended values for an Agent installation.
The Batch Installer configuration file contains an <installation> element for each Agent instance. For a homogeneous environment parameters can be specified with the <global> element and will be applied to all Agent installations. If a parameter is available in the <global> element and in an individual <installation> element then the setting for the specific installation will overwrite the global setting.
Please, perform the following configuration steps:
...
- Specify the
<install_path>to point to a location where the Agent should be installed. - Specify the path to the YADE settings file (.ini file) in the Batch Installer configuration file with the element
<globals><transfer><settings>. - Specify the credentials for the SSH connection:
<user>: SSH login user<password>: Password for the login user<sudo_password>: Password forsudoactions- <
auth_method>: SSH authentication method <port>: SSH port
- Specify the post-processing commands that fit your operating system on the Agent server with the
<postprocessing>element. The default commands will place the Agent start script under/etc/init.dand will setup the autostart for JobScheduler Universal Agent on a Linux server (example for an Ubuntu distribution):echo ${ssh.sudo_password} | sudo -S cp ${install_path}/bin/jobscheduler_agent.sh /etc/init.d/jobschedulerecho ${ssh.sudo_password} | sudo -S update-rc.d jobscheduler defaults
yade_agent_batch_installer_settings.xml YADE configuration file in the XML Editor and assigned the http://www.sos-berlin.com/schema/yade/YADE_configuration_v1.0.xsd XSD schema.
A separate profile in the YADE configuration file is required for each Agent installation. The default profile name is <host>:<port> where:
<host>will be substituted with the value from the<installation><agent_option><scheduler_ip_address>element and<port>will be substituted with the value from the<installation><agent_option><scheduler_http_port>element.
Now carry out the following steps:
- Add a
<ProtocolFragments>element and nodes for each host that you want to install the Agent for. The best way to add another<ProtocolFragments>element using the XML Editor is copying the element and pasting it to the parent element - in this case<Fragments>. - Add a
<Profile>element and nodes for each host that you want to install the Agent for. The best way to add another<Profile>element using the XML Editor is copying the element and pasting it to the parent element - here<Profiles>. - The default
profile_idis<host>:<port>. If you do not use the default then you have to specify the profile name in the Batch Installer configuration file.
The contents of the YADE configuration file for the example is listed in the following code block:
| Code Block | ||||||
|---|---|---|---|---|---|---|
| ||||||
 <?xml version="1.0" encoding="utf-8"?>
<Configurations xsi:noNamespaceSchemaLocation="http://www.sos-berlin.com/schema/yade/YADE_configuration_v1.0.xsd" xmlns:xsi="http://www.w3.org/2001/XMLSchema-instance">
  <Fragments>
    <ProtocolFragments>
      <SFTPFragment name="SFTP_192.11.0.111:4445">
        <BasicConnection>
          <Hostname><![CDATA[192.11.0.111]]></Hostname>
        </BasicConnection>
        <SSHAuthentication>
          <Account><![CDATA[test]]></Account>
          <AuthenticationMethodPassword>
<Password><![CDATA[xxxx]]></Password> |
...
<scheduler_user>: Agent user<scheduler_log_dir>: Logs folder for the Agent
...
| Info | ||
|---|---|---|
| ||
|
An example for the Batch Installer configuration file for the installation of two Agents might look like this:
| Code Block | ||||||
|---|---|---|---|---|---|---|
| ||||||
<?xml version="1.0" encoding="UTF-8" standalone="yes"?> <installations lastRun="2015-11-20 14:11"> <globals> <install_path>/opt</install_path> </AuthenticationMethodPassword> <transfer></SSHAuthentication> </SFTPFragment> <settings>C:\Program Files (x86)\sos-berlin.com\jobscheduler\vg_4444\scheduler_data\config\batch_installer\yade_agent_batch_installer_settings.ini</settings><SFTPFragment name="SFTP_192.11.0.95:4445"> </transfer><BasicConnection> <ssh> <user>test</user> <Hostname><![CDATA[192.11.0.95]]></Hostname> </BasicConnection> <password>xxxx</password> <SSHAuthentication> <sudo_password>xxxx</sudo_password><Account><![CDATA[test]]></Account> <auth_method>password</auth_method><AuthenticationMethodPassword> <port>22</port><Password><![CDATA[xxxx]]></Password> </ssh>AuthenticationMethodPassword> <postprocessing></SSHAuthentication> </SFTPFragment> </ProtocolFragments> <command>echo ${ssh.sudo_password} | sudo -S cp ${install_path}/jobscheduler_agent/bin/jobscheduler_agent_${agent_options.scheduler_http_port}.sh /etc/init.d/jobscheduler_agent_${agent_options.scheduler_http_port}</command></Fragments> <Profiles> <Profile profile_id="192.11.0.111:4445"> <Operation> <command>echo ${ssh.sudo_password} | sudo -S chkconfig jobscheduler_agent_${agent_options.scheduler_http_port}</command> <Copy> <CopySource> </postprocessing> </globals> <installation lastRun="2015-11-20 14:11"> <CopySourceFragmentRef> <agent_options> <LocalSource /> <scheduler_user>test</scheduler_user> <scheduler_log_dir>/var/log/sos-berlin.com/jobscheduler/agent</scheduler_log_dir></CopySourceFragmentRef> </agent_options> <SourceFileOptions> <ssh> <host>xxxx</host><Selection> </ssh> </installation> <installation lastRun="2015-11-20 14:11"><FileSpecSelection> <agent_options> <scheduler_user>test</scheduler_user> <FileSpec><![CDATA[.*\.(sh|gz)$]]></FileSpec> <Directory><![CDATA[C:\Program <scheduler_log_dir>/var/log/Files (x86)\sos-berlin.com/jobscheduler/agent</scheduler_log_dir>\jobscheduler\vg_4444\scheduler_data\config\batch_installer]]></Directory> </agent_options> FileSpecSelection> <ssh></Selection> <host>xxxx<</host>SourceFileOptions> </ssh>CopySource> <CopyTarget> </installation> </installations> |
| Info | ||
|---|---|---|
| ||
|
...
You should have opened your YADE configuration file yade_agent_batch_installer_settings.xml and have assigned the XSD schema http://www.sos-berlin.com/schema/yade/YADE_configuration_v1.0.xsd. The XML file contains a basic example with recommended values for an Agent installation (of only one Agent).
Each installation makes use of a profile in the YADE configuration file. The default profile name is <host>:<port> where
<host>will be substituted with the value from the element<installation><agent_option><scheduler_ip_address><port>will be substituted with the value from the element<installation><agent_option><scheduler_http_port>
Please follow these steps:
- Add a
<ProtocolFragments>element and nodes for each host that you want to install the Agent for. The best way to add another<ProtocolFragments>element using the XML Editor is copying the element and pasting it to the element above<Fragments>. - Add a
<Profile>element and nodes for each host that you want to install the Agent for. The best way to add another<Profile>element using the XML Editor is copying the element and pasting it to the element above<Profiles>. - The default
profile_idis<host>:<port>. If you do not use the default then you have to specify the profile name in the Batch Installer configuration file.
An example for the Batch Installer configuration file for the installation of two Agents might look like this:
| Code Block | ||||||
|---|---|---|---|---|---|---|
| ||||||
<?xml version="1.0" encoding="utf-8"?> <Configurations xsi:noNamespaceSchemaLocation="http://www.sos-berlin.com/schema/yade/YADE_configuration_v1.0.xsd" xmlns:xsi="http://www.w3.org/2001/XMLSchema-instance"> <Fragments> <ProtocolFragments> <SFTPFragment name="SFTP_192.11.0.111:4445"> <BasicConnection> <CopyTargetFragmentRef> <SFTPFragmentRef ref="SFTP_192.11.0.111:4445" /> </CopyTargetFragmentRef> <Directory><![CDATA[/home/test/tmp/]]></Directory> </CopyTarget> </Copy> </Operation> </Profile> <Profile profile_id="192.11.0.95:4445"> <Operation> <Copy> <CopySource> <CopySourceFragmentRef> <LocalSource /> </CopySourceFragmentRef> <SourceFileOptions> <Selection> <FileSpecSelection> <FileSpec><![CDATA[.*\.(sh|gz)$]]></FileSpec> <Directory><![CDATA[C:\Program Files (x86)\sos-berlin.com\jobscheduler\vg_4444\scheduler_data\config\batch_installer]]></Directory> </FileSpecSelection> </Selection> </SourceFileOptions> </CopySource> <Hostname><![CDATA[192.11.0.111]]></Hostname><CopyTarget> </BasicConnection> <CopyTargetFragmentRef> <SSHAuthentication> <SFTPFragmentRef <Account><![CDATA[test]]></Account>ref="SFTP_192.11.0.95:4445" /> <AuthenticationMethodPassword> </CopyTargetFragmentRef> <Password><<Directory><![CDATA[xxxx/home/test/tmp/]]></Password>Directory> </AuthenticationMethodPassword>CopyTarget> </SSHAuthentication>Copy> </SFTPFragment>Operation> <SFTPFragment name="SFTP_192.11.0.95:4445"> <BasicConnection> <Hostname><![CDATA[192.11.0.95]]></Hostname> </BasicConnection> <SSHAuthentication> <Account><![CDATA[test]]></Account> <AuthenticationMethodPassword> <Password><![CDATA[xxxx]]></Password> </AuthenticationMethodPassword> </SSHAuthentication> </SFTPFragment> </ProtocolFragments> </Fragments> <Profiles> <Profile profile_id="192.11.0.111:4445"> <Operation> </Profile> </Profiles> </Configurations> |
| Anchor | ||||
|---|---|---|---|---|
|
Note that the file shown above is in the YADE XML format and that YADE versions 1.10 and older require a .ini file to perform the transfer that is specified in the <globals><install_path><transfer><settings> element in the Batch Installer configuration file.
- We recommended that you use the XML Editor to convert configuration files from XML to the
.iniformat (see the XML Editor for converting YADE configuration files (XML) into YADE setting files (.ini) section below for more information). - The following example shows as an example a
.inifile that has been converted from the XML file above. You can download the example using this link: yade_agent_batch_installer_settings.ini.
| Code Block | ||||
|---|---|---|---|---|
| ||||
[protocol_fragment_sftp@SFTP_192.11.0.111:4445] protocol = <Copy>sftp host <CopySource> <CopySourceFragmentRef> = 192.11.0.111 user <LocalSource /> </CopySourceFragmentRef> <SourceFileOptions> = test ssh_auth_method <Selection> = password password <FileSpecSelection> <FileSpec><![CDATA[.*\.(sh|gz)$]]></FileSpec> = xxxx [protocol_fragment_sftp@SFTP_192.11.0.95:4445] protocol <Directory><![CDATA[C:\Program Files (x86)\sos-berlin.com\jobscheduler\vg_4444\scheduler_data\config\batch_installer]]></Directory> = sftp host </FileSpecSelection> </Selection> = 192.11.0.95 user </SourceFileOptions> = </CopySource> test ssh_auth_method <CopyTarget> = <CopyTargetFragmentRef>password password <SFTPFragmentRef ref="SFTP_ = xxxx [192.11.0.111:4445" /> ] operation </CopyTargetFragmentRef> <Directory><![CDATA[/home/test/tmp/]]></Directory> = copy source_protocol </CopyTarget> </Copy> = </Operation> local file_spec </Profile> <Profile profile_id="192.11.0.95:4445"> <Operation> <Copy> = .*\.(sh|gz)$ source_dir <CopySource> <CopySourceFragmentRef> = C:\Program Files (x86)\sos-berlin.com\jobscheduler\vg_4444\scheduler_data\config\batch_installer target_include <LocalSource /> </CopySourceFragmentRef> = protocol_fragment_sftp@SFTP_192.11.0.111:4445 target_dir <SourceFileOptions> <Selection> = /home/test/tmp/ [192.11.0.95:4445] operation <FileSpecSelection> = copy source_protocol <FileSpec><![CDATA[ = local file_spec = .*\.(sh|gz)$]]></FileSpec> source_dir <Directory><![CDATA[= C:\Program Files (x86)\sos-berlin.com\jobscheduler\vg_4444\scheduler_data\config\batch_installer]]></Directory> target_include </FileSpecSelection> = protocol_fragment_sftp@SFTP_192.11.0.95:4445 target_dir </Selection> </SourceFileOptions> </CopySource> <CopyTarget> <CopyTargetFragmentRef> <SFTPFragmentRef ref="SFTP_192.11.0.95:4445" /> </CopyTargetFragmentRef> <Directory><![CDATA[/home/test/tmp/]]></Directory> </CopyTarget> </Copy> </Operation> </Profile> </Profiles> </Configurations> |
YADE Settings File for File Transfer
Note that the file shown above is an XML file and YADE will expect an .ini file to perform the transfer that is specified with the Batch Installer configuration file in the element <globals><install_path><transfer><settings>.
...
= /home/test/tmp/ |
| Anchor | ||||
|---|---|---|---|---|
|
We assume that you have opened the Batch Installer configuration file batch_installer_config_file.xml in the XML Editor and assigned the scheduler_universal_agent_installations.xsd XSD schema.
The Batch Installer configuration file contains an <installation> element for each Agent instance. In addition, the <global> element can be used in a homogeneous environment to specify parameters that will be applied to all Agent installations. If a parameter is specified in both the <global> element and in an individual <installation> element then the setting for the individual element will overwrite the global setting.
The following configuration steps should be carried out:
- Specify the Global parameters:
- Specify the
<install_path>to point to a location where the Agent should be installed. Specify the path to the YADE settings file (.ini file) in the Batch Installer configuration file with the element
<globals><transfer><settings>.Specify the credentials for the SSH connection:
<user>: SSH login user<password>: Password for the login user<sudo_password>: Password forsudoactions- <
auth_method>: SSH authentication method <port>: SSH port
Specify the filename (not the path) for the Agent that has to be installed with the
<installation_file>element. This filename contains the version of the Agent which you are installing and it is helpful for recognizing the version of the Agents that are installed.- Use the
<postprocessing>element to specify the post-processing commands for the Agent server's operating system. The default commands for an Ubuntu distribution will place the Agent start script under/etc/init.dand will setup the autostart for the Universal Agent:echo ${ssh.sudo_password} | sudo -S cp ${install_path}/jobscheduler_agent/bin/jobscheduler_agent_${agent_options.scheduler_http_port}.sh /etc/init.d/jobscheduler_agent_${agent_options.scheduler_http_port}echo ${ssh.sudo_password} | sudo -Supdate-rc.d jobscheduler_agent_${agent_options.scheduler_http_port} defaults
- Specify the
- Specify the installation parameters for each Agent installation:
- Agent options:
<scheduler_user>: the Agent user<scheduler_log_dir>: the Logs folder for the Agent
<host>: SSH Host
- Agent options:
| Info | ||
|---|---|---|
| ||
|
The Batch Installer configuration file for the example can be downloaded here: batch_installer_config_file.xml and its contents are listed in the following code block:
| Code Block | ||||||
|---|---|---|---|---|---|---|
| ||||||
<?xml version="1.0" encoding="UTF-8" standalone="yes"?>
<installations lastRun="2015-11-20 14:11">
    <globals>
        <install_path>/opt</install_path>
        <transfer>
|
...
| Code Block | ||||
|---|---|---|---|---|
| ||||
[protocol_fragment_sftp@SFTP_192.11.0.111:4445] protocol = sftp host = 192.11.0.111 user = test ssh_auth_method = password password = xxxx [protocol_fragment_sftp@SFTP_192.11.0.95:4445] protocol = sftp host = 192.11.0.95 user = test ssh_auth_method <settings>C:\Program = password passwordFiles (x86)\sos-berlin.com\jobscheduler\vg_4444\scheduler_data\config\batch_installer\yade_agent_batch_installer_settings.ini</settings> </transfer> = xxxx [192.11.0.111:4445] operation<ssh> <user>test</user> <password>xxxx</password> = copy source_protocol <sudo_password>xxxx</sudo_password> = local file_spec<auth_method>password</auth_method> <port>22</port> </ssh> = .*\.(sh|gz)$ source_dir<installation_file>jobscheduler_unix_universal_agent.1.10.2.tar.gz</installation_file> <postprocessing> <command>echo ${ssh.sudo_password} | sudo = C:\Program Files (x86)\sos-berlin.com\jobscheduler\vg_4444\scheduler_data\config\batch_installer target_include-S cp ${install_path}/jobscheduler_agent/bin/jobscheduler_agent_${agent_options.scheduler_http_port}.sh /etc/init.d/jobscheduler_agent_${agent_options.scheduler_http_port}</command> <command>echo ${ssh.sudo_password} | sudo -S update-rc.d jobscheduler_agent_${agent_options.scheduler_http_port} defaults</command> = protocol_fragment_sftp@SFTP_192.11.0.111:4445 target_dir </postprocessing> </globals> <installation lastRun="2015-11-20 14:11"> <agent_options> = /home/test/tmp/ [192.11.0.95:4445] operation<scheduler_user>test</scheduler_user> <scheduler_log_dir>/var/log/sos-berlin.com/jobscheduler/agent</scheduler_log_dir> = copy source_protocol</agent_options> <ssh> = local file_spec<host>xxxx</host> </ssh> </installation> <installation lastRun="2015-11-20 14:11"> = .*\.(sh|gz)$ source_dir <agent_options> <scheduler_user>test</scheduler_user> = C:\Program Files (x86)\ <scheduler_log_dir>/var/log/sos-berlin.com\jobscheduler\vg_4444\scheduler_data\config\batch_installer target_include/jobscheduler/agent</scheduler_log_dir> </agent_options> = protocol_fragment_sftp@SFTP_192.11.0.95:4445 target_dir <ssh> <host>xxxx</host> </ssh> = /home/test/tmp/</installation> </installations> |
| Info | ||
|---|---|---|
| ||
|
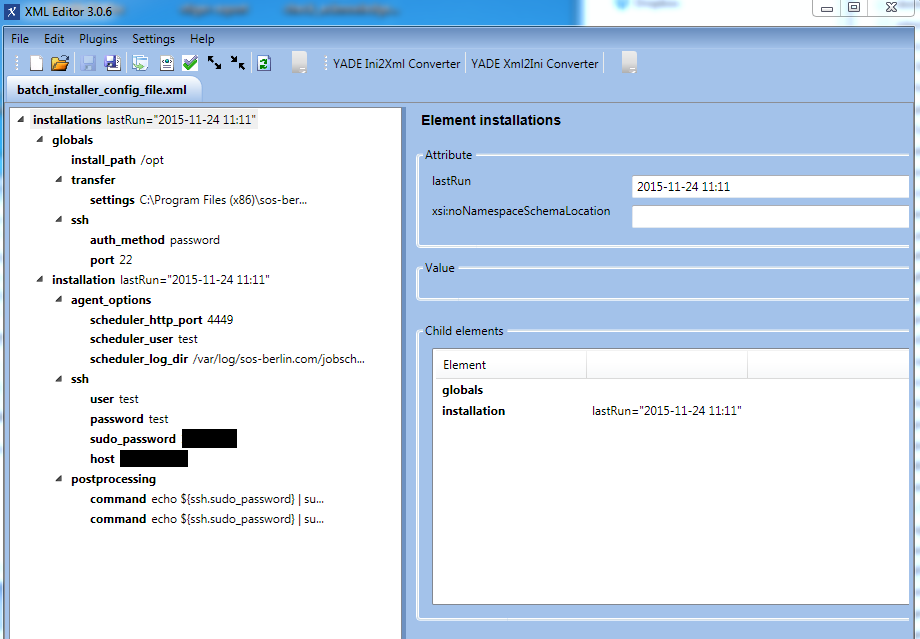
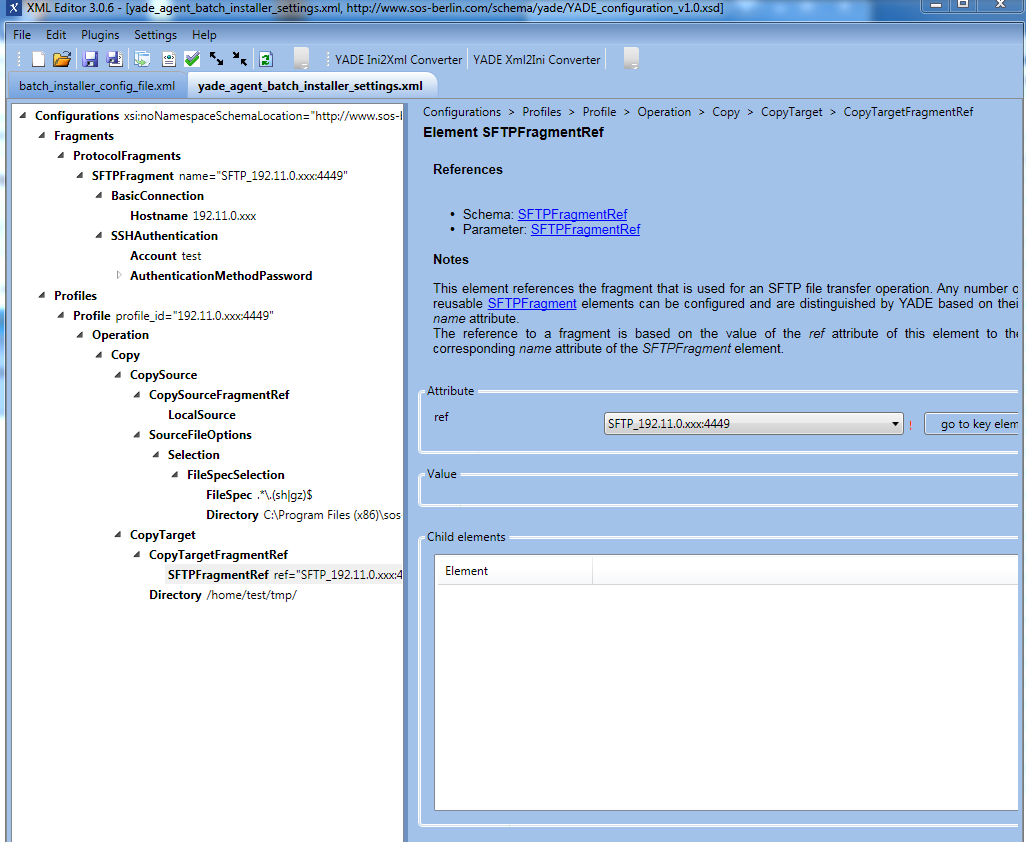
| Excerpt |
|---|
The XML Editor can be used to manage the Batch Installer configuration file and the YADE configuration file. XML Editor for Batch Installer configuration fileAn example |
Batch Installer configuration file |
for the installation of a single Agent is shown in the following screenshot:
XML Editor for YADE configuration fileAn example |
YADE configuration file |
for the installation of a single Agent is shown in the next screenshot:
|
The "YADE Xml2Ini Converter" function in the XML Editor is available for converting YADE files from |
XML |
to |
the |
format required by versions of YADE before 1.11. Clicking on the button of the same name will open the following form:
|
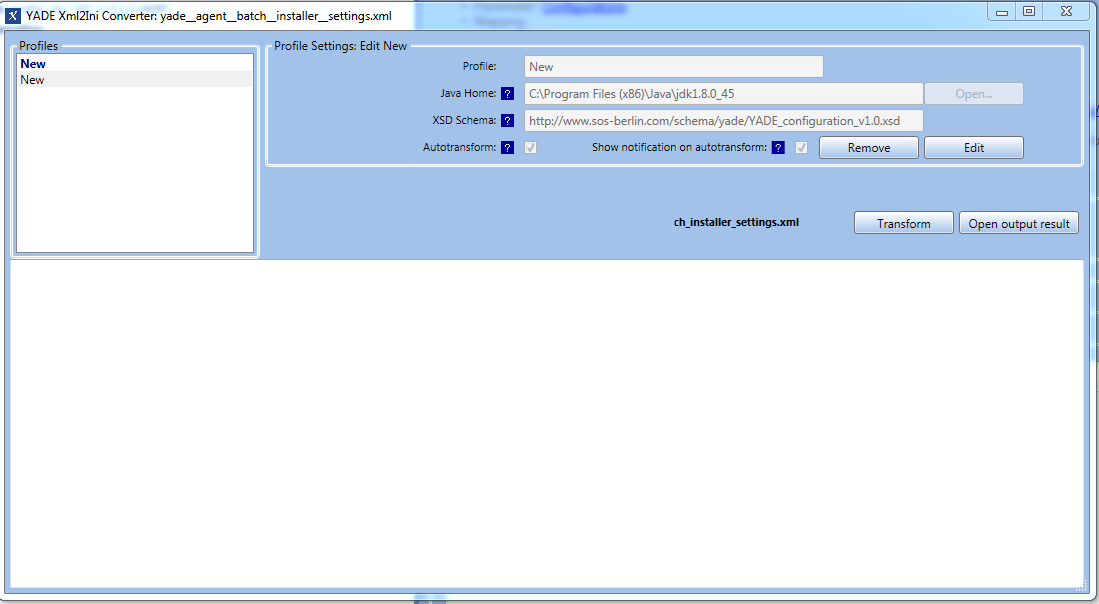
Note that it is not necessary to create a Profile |
for the Batch Installer, as conversion will take place automatically once the "Autotransform" option has been chosen. Every time a change in the XML file is saved the XML file will be automatically converted |
and saved in |
format. A pop-up window will show every time a change is saved |
if the option "Show notification on autotransform" is chosen. |
|