...
- Named Monitors are Pre-/Post-Processing Monitors that are specified in the configuration of individual jobs.
(Monitors can also be specified in the configuration of the executing JobScheduler as Enforced Monitors.) - Pre-/Post-Processing Monitors are generic blocks of code stored in separate files in the JobScheduler's
livefolder with file extension*.monitor.xml, e.g.MyMonitor.monitor.xml.- Pre-/Post-Processing Monitors can be reused - i.e. included by multiple jobs.
- Pre-/Post-Processing Monitors can implement unique features within JobScheduler by accessing the JobScheduler's API Interface.
- Feature Availabiliy
Jira server SOS JIRA columns key,summary,type,created,updated,due,assignee,reporter,priority,status,resolution serverId 6dc67751-9d67-34cd-985b-194a8cdc9602 key JS-1145 Jira server SOS JIRA columns key,summary,type,created,updated,due,assignee,reporter,priority,status,resolution serverId 6dc67751-9d67-34cd-985b-194a8cdc9602 key JOE-117
- Example
- In following example we will create a Pre-Processing Monitor that shows all the order parameters before start of a job. In addition, we will see that parameters created by one task can be carried forward by the executing order to the next task. The first job
JobAwill create two parametersBOOKINGD_DATEandSTART_TRX_IDwhich will be carried forward by the order to the next jobJobB.
- In following example we will create a Pre-Processing Monitor that shows all the order parameters before start of a job. In addition, we will see that parameters created by one task can be carried forward by the executing order to the next task. The first job
...
- In the left hand navigation pane click on the Pre-/Post-Processing Monitor element.
- In the far right top side click on New to create a Pre-/Post-Processing Monitor
- A new Monitor will be created with a default name,
process0.
- A new Monitor will be created with a default name,
- Click on the Name of the newly created Monitor:
- This will open a form allowing more configuration options such as Name, Ordering etc. to be set.
- Click inside the Name text box and specify a relevant name for the Monitor, e.g. show_all_orders_parameters_pre.
- Leave the Ordering at the default value of 0.
- Choose the javax.script:ecmascript script language from the Language dropdown menu.
Just below of click on the script tab and chose thespooler_process_before() code snippet.
Copy & Paste the following code snippet as a replacement for the function:
Code Block language js title show_all_order_parameters_pre collapse true function spooler_process_before() { var parameters = spooler_task.order().params(); spooler_log.info( ".. total number of order parameters: " + parameters.count() ); var names = parameters.names().split( ';' ); for( i=0; i < parameters.count(); i++ ) { spooler_log.info( ".. parameter: "+ names[i] + " = " + parameters.value( names[i] ) ); } return true; }Save the configuration by clicking on the Save Configuration icon in the top left hand corner of JOE.
- This will open a form allowing more configuration options such as Name, Ordering etc. to be set.
Specification of Monitors as Pre- or Post-
...
Processors
- The use of the spooler_process_before() or spooler_process_after() function in the monitor script defines whether a Monitor is a pre-processor or post-processor.
- In addition to the two spooler_process_... *() functions two further additional functions can be used in monitor scripts:
spooler_task_before()spooler_task_after()
- The most important difference between the
spooler_processandspooler_taskfunctions is that thespooler_taskfunctions are able to handle return codes. More detailed information about these functions can be found in the Monitors section of the JobScheduler reference documentation.
...
- The same Pre-/Post Processing Monitor can be used by a number of jobs.
- The Browse button in the Monitors Used pane can be used to select Monitors from other subfolders in the JobScheduler
livefolder.
This means that a series of generic Monitors could be configured in a central directory and then be specified for individual jobs as required.
Specification of the
...
Monitor Execution Order in Detail
The Ordering setting
- The Ordering setting can be specified in both the Monitor configuration itself and in the job configuration as an attribute for the Monitors used parameter.
- Ordering values saved as an attribute for the Monitors used parameter will overwrite settings specified for the Monitor itself.
- Pre-processor Monitors with a smaller Ordering attribute will be executed before pre-processor Monitors with a larger Ordering attribute.
- Post-processor Monitors with a smaller Ordering attribute will be executed after post-processor Monitors with a larger Ordering attribute.
The position of the Monitor in the JobScheduler's live Folder
- The order in which JobScheduler executes monitors is dependent on the position of the monitor element in the JobScheduler
livefolder:Pre-processing monitors
- Monitors are in different folders:
- Consider the folders
a/b/c:- all
process_beforemonitors in folderawill be executed beforeprocess_beforemonitors in foldersbandc
- all
- Consider the folders
- Monitors in the same folder:
- Monitors in the same folder will be executed according to the ordering attributes specified for the monitors.
- Monitors are in different folders:
Post-processing monitors
- Monitors are in different folders:
- Consider the folders
a/b/c:- all
process_aftermonitors in foldercwill be executed beforeprocess_aftermonitors in foldersbanda
- all
- Consider the folders
Monitors in the same folder:
Monitors in the same folder will be executed according to the ordering attribute specified for the monitors.
- Monitors are in different folders:
Modifying Monitors
- JobScheduler tracks changes to Monitor files and to files included with monitor files that make use of <include live_file="..."/> elements.
- Adding, modifying and removing monitor files or files included with monitor files causes the JobScheduler to terminate tasks that use the relevant monitor i.e. the tasks are terminated with the current process step. This behavior is the same as for other JobScheduler elements: schedules, process classes and locks.
Viewing Monitors in JOC
Monitor configuration is not directly visible in the JobScheduler Operating Center (JOC) as can be seen in the the following screenshot, which shows the Named Monitor example described above.
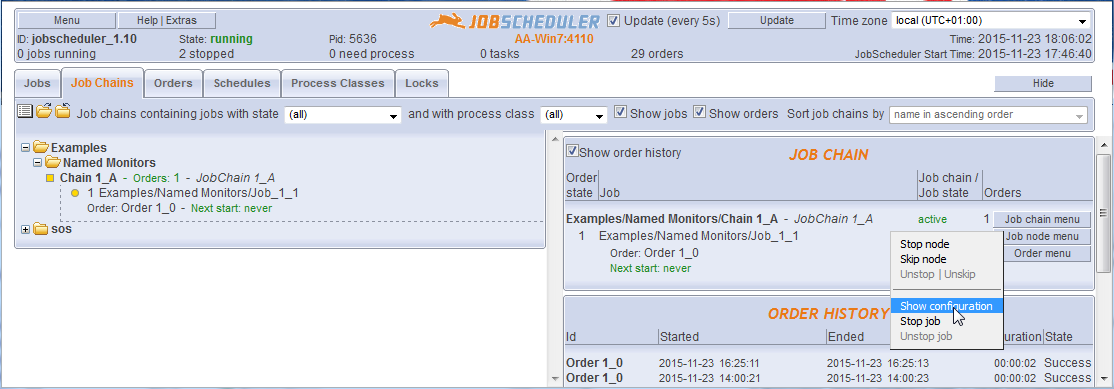
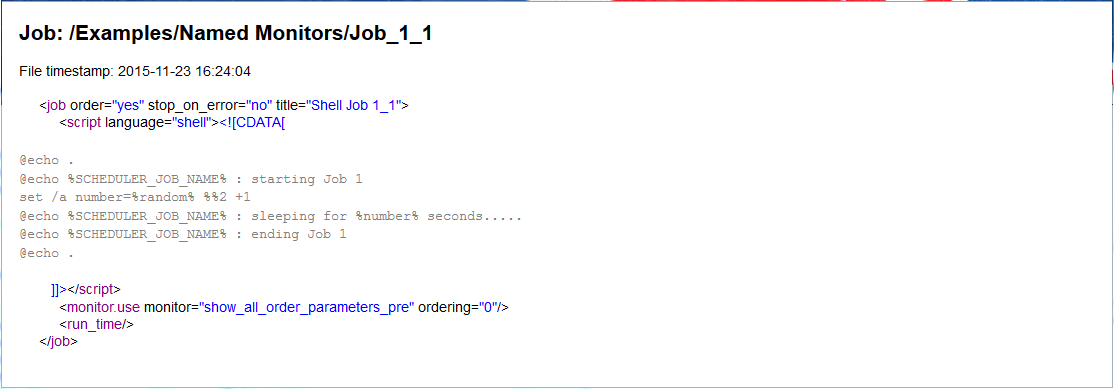
However, clicking on the Job node menu Show configuration button as shown in the screenshot will open a listing of the job node configuration with the <monitor.use> element as shown below:
Instruction Video
References
...
| Jira | ||||||||||
|---|---|---|---|---|---|---|---|---|---|---|
|
...