...
| Excerpt |
|---|
The JOC Cockpit comes with an a configuration editor for Managing Authentication and Authorization - the Manage Accounts view. It can be used to manage all aspects of authentication and authorization when Shiro authentication is used and can be used to manage authorization and some aspects of Authentication when LDAP Authentication is used. |
| Display feature availability | ||
|---|---|---|
|
...
Permissions are configured hierarchically:
- User Account
- Role(s)
- Permission(s) for operations
- Permission(s) for folders
- Role(s)
In addition:
- Permissions can be restricted to specific JobScheduler Master IDs and
- Roles can be restricted to specific Folders within a JobScheduler's live folder.
...
- Accounts: for the configuration of User Accounts. Accounts configured here use shiro name / password Authentication.
- Note that while Shiro authentication is not as secure as, for example, LDAP, it provides a convenient basis for configuring authorization in a test environment.
- See the JOC Cockpit - Authentication and Authorization article for more information about Shiro and other methods of authentication that can be used with the JOC Cockpit.
- Masters: for configuring Roles and the JobScheduler Masters that can be accessed by a Role.
- Permissions: for configuring access to Folders and the Permissions for a Role.
These views will be described in the following sections.
...
- The Create Account button is used to open a window to add a new User Account with name, password and Roles
- The additional options (ellipsis) symbol allows an Account to be edited (change the Account Name and/or Password, select/unselect deselect Roles) and to be copied or deleted.
- Clicking on the Account Name brings the user to the Masters tab (described below) where the Masters and Role(s) allocated for the User Account can be edited.
...
The main purpose of the Masters tab is to allow JobScheduler Roles and any Masters and which these Roles will be restricted to be configured.
When the tab is first opened after installation of the JOC Cockpit it will appear as shown in the next screenshot:
...
The above screen shows seven default Roles that are provided with the JOC Cockpit. These Roles are intended to help system administrators get a realistic authorization configuration working as quickly as possible and can be modified as required. Roles shown in this tab under the heading default are valid for all JobScheduler Master instances in the environment. By default Roles are active for all Masters.
Note that the default heading in the screenshot denotes that the roles listed under this heading are active for all Masters - the default setting.
If the Masters If the Masters tab is opened by clicking on an Account Name in the Accounts tab (mentioned abovedescribed in the previous section), the Masters Tab will show those Roles that have been assigned to that Account. The Account that is active is shown in the Account button, which can also be used to select and deselect the AccountAccounts.
Positioning the mouse over a role name blends in two links as shown in the screenshot above:
...
A set of Permissions is configured for each Roleof these default Roles. Each Permissions set can be inspected by clicking on the Role name in the Masters view list, which will open the Permissions tab for the Role in question. An example Permissions set is described in the next section. A matrix showing the default Roles and their Permissions along with a description of the Permission is provided in the Authentication and Authorization - Permissions for the JOC Cockpit Web Service article.
The Permissions Tab
The main purpose of the Permissions view is to allow Permissions and Folders to be configured for each Role.
...
Folders themselves are selected from a simple tree view of the folders in the JobScheduler Master's live Folder. The This tree view is opened by clocking clicking on the folder symbol shown in the screenshot.
...
- A graphical editor as shown in the next screenshot:
- Changes to the Permissions tree are saved to the
shiro.inifile in near real-time. - The Undo button allows the last 10 changes made to be undone stepwise.
- The states saved in the Undo button will deleted when the Permissions tab is left.
- The Reset button button changes the Permissions tree back to the initial state when the Permissions Tab is was opened.
- The state stored in the Reset button will be deleted when the Permissions tab is left.
- Clicking on the middle of a Permission icon will grant the Permission for the current Role.
- Granted Permissions have a blue background and are by default recursive.
- The "+" and "-" symbols at the right of each Permission icon open and close child branches.
- The "+-" and "-+" symbols at the left of each Permission icon are used to revoke a higher Permission and are by default recursive.
- Permission icons affected by revoked Permissions are shown with a gray background
Status subtle true colour Green title Feature available with Version 1.11.4
- Permission icons affected by revoked Permissions are shown with a gray background
- Changes to the Permissions tree are saved to the
- A list editor as shown in the next screenshot:

- Individual Permissions can be modified and removed from the Role using the pencil and X symbols that are blended in when the user's mouse is moved over a Permission:
- The Edit function allows the the Permission to be made subtractive - i.e. for a permission granted at a higher level to be removed.
- The Folder part of the view is for restricting the Role to accessing particular Folders - and thereby particular Jobs, Job Chains, etc - within a JobScheduler Master's
livefolder and will be described laterbelow. - Editing Permissions is described below .
...
- A Role with the Permission
sos:products:joc_cockpit:jobscheduler_master:view'only' allows a User to view JobScheduler Masters, while a User with the 'higher'sos:products:joc_cockpit:jobscheduler_masterPermission is able not only to view JobScheduler Masters but able to carry out all other operations - in this case view, execute and administrate. - The Authentication and Authorization - Permissions for the JOC Cockpit Web Service article contains a link to a full list of all Permissions that can be granted as well as a matrix describing and listing the Permissions that are granted by default for the default Roles.
Editing Permissions
Consider the default business_user Role, which has the following permission:
...
This permission does not allow the business_user Role to access JobScheduler Master log files or parameters which would . These Permissions could be granted individually with the following Permissions:
sos:products:joc_cockpit:jobscheduler_master:view:mainlogsos:products:joc_cockpit:jobscheduler_master:view:parameters
The following Permissions can be set to allow the business_user Role to view JobScheduler Master statuses and log files but not parameters:
sos:products:joc_cockpit:jobscheduler_master:view:statussos:products:joc_cockpit:jobscheduler_master:view:mainlog
Alternatively, it may make sense in some situations to grant the Role a higher level Permission and then remove one or more specific Permissions. This approach is shown in the following combination:
...
where the ...jobscheduler_master:view Permission is an overall 'view' Permission Permission covering status, parameters and mainlog-sos:...jobscheduler_master:view Permission is removed from the :parametersbusiness_user Role.
...
Adding Permissions:
- The Add Permission button in the Permissions View allows a Permission to be selected from a list of all available Permissions as shown in the screenshot below.
- Note that the Permissions listed are all individual Permissions. They can be edited to make them higher level / less specific.
- For example, the screenshot below shows that the
...jobscheduler_master:execute:restart:terminatepermission in the process being selected.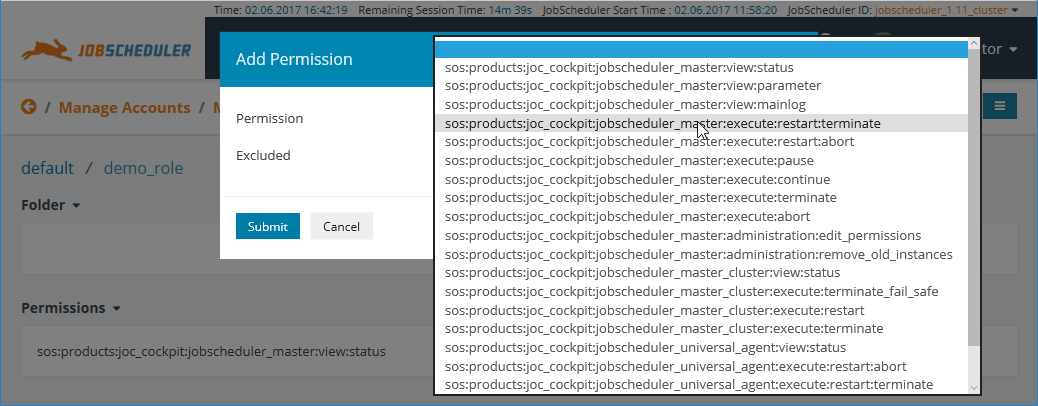
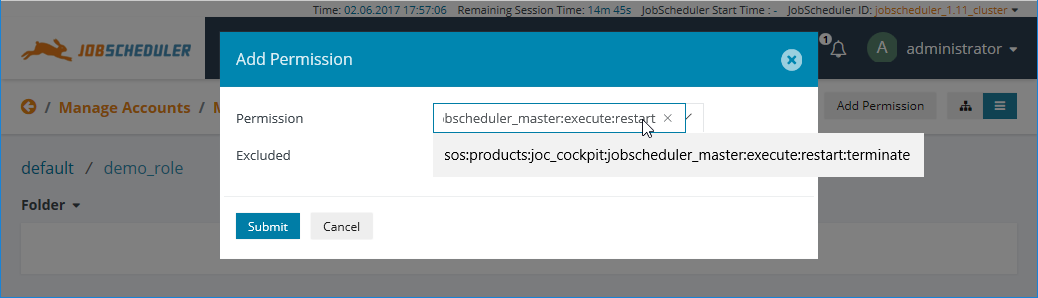
- Once selected the Permission can be edited before the Submit button is clicked. This allows, for example, the Permission to be modified to
..., allowing the Role to carry out all operations covered by this Permission. These are:jobscheduler_master:execute:restartsos:products:joccockpit:jobscheduler_master:execute:restart:terminatesos:products:joccockpit:jobscheduler_master:execute:restart:abort
- The following screenshot shows the edited version alongside the original:
- A selected permission can also be made subtractive - i.e. to remove a specific part of a higher level Permission.
- This is done by ticking the Excluded checkbox, which is obscured in the above screenshot.
- For example, the screenshot below shows that the
- Note that the Permissions listed are all individual Permissions. They can be edited to make them higher level / less specific.
- The Add Permission button in the Permissions View allows a Permission to be selected from a list of all available Permissions as shown in the screenshot below.
Modifying Existing Permissions:
- The pencil symbol shown alongside existing Permissions in the Permissions view (shown in the screenshot above) can be used to change the function of a Permission in a Role - to make an additive Permission subtractive and vice-versa. It cannot be used to edit a Permission.
- The X symbol shown alongside existing Permissions in the Permissions view can be used to remove an existing Permission from a Role.
- Note that a Role must be configured to have either a Permission or a Folder or it will be deleted.
- Note that by if a user does not have the following permission or higher they will not be able to log into the JOC Cockpit interface:
sos:products:joc_cockpit:jobscheduler_master:view:status
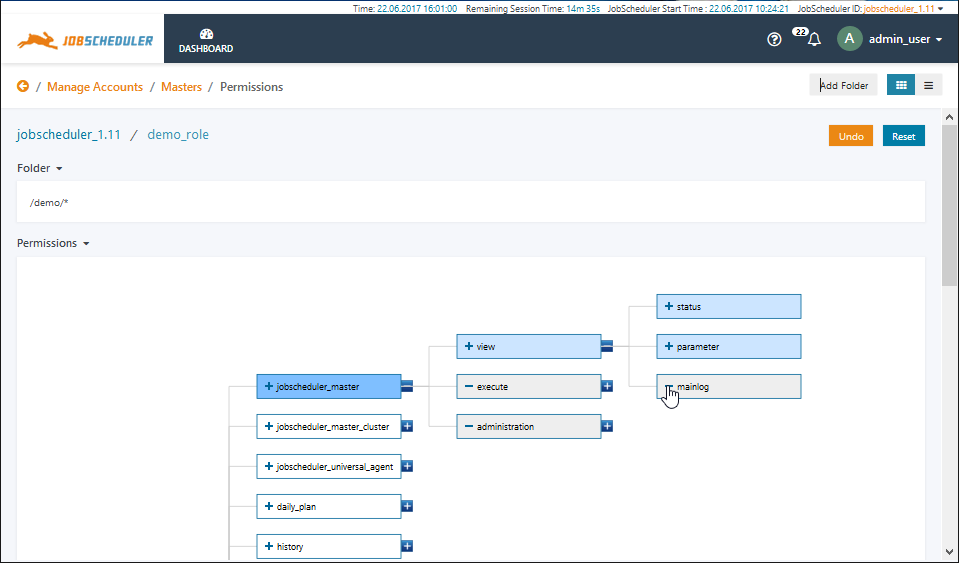
Graphical Permissions Editing:
- The Graphical Permissions Editor is activated by selecting the 'Tree' symbol at the top right of the Permissions section.

- The editor opens with a partially collapsed permissions tree as shown in the next screenshot:

- The Expand tree button (shown in the above screenshot) can be used to open all the tree elements.
Navigation is carried out by dragging & dropping the tree view.
The functions available for the tree elements are (with reference to the screenshot below):
- Select / Unselect a Permission - click on the body of an unselected / selected element
- Selected Permission elements are shown in blue (see the view element in the screenshot)
- Children of selected Permission elements are shown in light blue (as shown in the screenshot)
- Negate a Permission - click on the plus sign at the left hand end of the element
- Remove a Permission Negation - click on a - sign at the left hand end of the element
- Show / hide child elements - click on the + / - symbols at the right hand end of an element
- Select / Unselect a Permission - click on the body of an unselected / selected element
In the following screenshot the view element has been selected, automatically selecting the view:status, view:parameter and view:mainlog child permissions.
In addition, the view:mainlog child permission has been negated, meaning that only the view:status and view:parameter child permissions are active.
- The Graphical Permissions Editor is activated by selecting the 'Tree' symbol at the top right of the Permissions section.
...